Working on a High Performance Computer (HPC)
http://www.riffomonas.org/reproducible_research/hpc/ Press 'h' to open the help menu for interacting with the slides
Welcome back to the Riffomonas Reproducible Research tutorial series. Today's tutorial is called "Working on a High-Performance Computer." We're going to talk about using cloud computing to enhance the reproducibility of your workflow as well as to help analyze large datasets that can't easily be analyzed on your own personal computer.
The material in today's tutorial isn't super-critical to making your research more reproducible. However, I still think that you'll see the value as part of an overall effort towards greater reproducibility. Furthermore, as data sets get larger, I think it's worth knowing how to use high-performance computers at your own institution or using services like Amazon Web Services, or AWS for short, to analyze these large data sets.
If your local institution has their own high-performance computer cluster, then it'll probably also have its own idiosyncrasies with how to log in, how to load packages, how to move files around. So if you go through these slides with me, you'll notice that I'll skip some. And those that I'm skipping are the basics on how to use a cluster here at the University of Michigan called Flux. But because the idiosyncrasies of Flux and other clusters are not universal, I'll instead focus on working with the AWS cloud computing tools.
The systems administrators at your local cluster likely have training materials that you can use to get going quickly. We're going to use AWS for the remainder of this tutorial series. It's not free, but it's pretty cheap. And if you follow along with me over the rest of the tutorials, you'll find that it maybe only costs you a few bucks. So now, join me in opening the slides for today's tutorial series, which you can find within the Reproducible Research tutorial at the riffomonas.org website.
This is a test!
This is a listing of the top 5 songs from Casey Kasem's Top 40 Year End Countdown for 1976. Using markdown, convert this to an ordered list and italicize the song name.
Silly Love Songs, Paul McCartney & Wings
Don't Go Breaking My Heart, Elton John & Kiki Dee
Disco Lady, Johnny Taylor
December 1963, Four Seasons
Play that Funky Music, Wild Cherry
Before we go into today's tutorial on working with high-performance computers, I'd like to give you all a little test to see how much you remember of the previous discussion we had on Markdown. On this slide, you'll see a list of the top five songs from Casey Kasem's top 40 year-end countdown for the year 1976. Using Markdown, convert this list to an ordered list and italicize the song name.
This is a test!
This is a listing of the top 5 songs from Casey Kasem's Top 40 Year End Countdown for 1976. Using markdown, convert this to an ordered list and italicize the song name.
1. *Silly Love Songs*, Paul McCartney & Wings1. *Don't Go Breaking My Heart*, Elton John & Kiki Dee1. *Disco Lady*, Johnny Taylor1. *December 1963*, Four Seasons1. *Play that Funky Music*, Wild CherryHere is how I would have done it. So first, you'll see to make it an ordered list, I put the number 1 with a period at the beginning of each line. Alternatively, you could have numbered them one, two, three, four, five. The advantage of using all ones like this is if I wanted to add something between Don't Go Breaking My Heart and DiscoLady, it would automatically update the numbering for the now six different lines of the list. In addition, to italicize the song names, I could put a single * at the beginning and end of the song names.
If I had perhaps wanted to bold Paul McCartney, I could put two stars around Paul McCartney's name to make it bold. So if this doesn't seem super-familiar to you, go ahead and go back and listen to the previous talk where we introduced the concept of Markdown.
This will be a very useful tool in the coming tutorials where we talk about documentation.
Learning goals
- Identify the practical and financial benefits of using high performance computers over a local computer
- Access HPC resources on Amazon Web Services (AWS)
- Run jobs with
tmux - Move files between a local computer and AWS
- Learn how to work with a local HPC
The learning goals for today's tutorial are to identify the practical and financial benefits of using high-performance computers or HPCs over a local computer. While accessing HPC resources on Amazon Web Services, we'll see how you can run jobs and do analyses using a program called tmux.
And then, we'll see how we can move files between a local computer and AWS and then back to your local computer. I'm not going to discuss this as I introduced in the introduction to this tutorial, but the slide deck here also contains information on how to work with a local high-performance computer cluster.
Again, because of the idiosyncrasies of various HPCs from different institutions, I figured it's kind of a fool's errand to try to serve everybody. And so, we'll really be focusing on information about how to work with AWS. So one of the most frequently asked questions that I'm asked when I teach workshops or when people are starting to learn to use Mothur or R, any other type of bioinformatics tools drives me nuts.
Most Frequently Asked Question...
Most Frequently Asked Question...
What type of computer should I get?
They ask me, "What type of computer should I get?" And I hate this question because I don't really want to spend other people's money. And so, I think a computer is a very personal thing that it's probably the one piece of equipment, lab equipment, that I use more than anything else.
So it's something I want to be comfortable using and like, and enjoy the experience of. I also do see it as a piece of lab equipment. That this is a lot like a thermal cycler or a pipettor that you might use in the lab. Well, my lab is my desk here in my office. And so it's important to me that I have a computer and a setup that I like. But beyond that, I don't really know what to tell you.
Ask yourself...
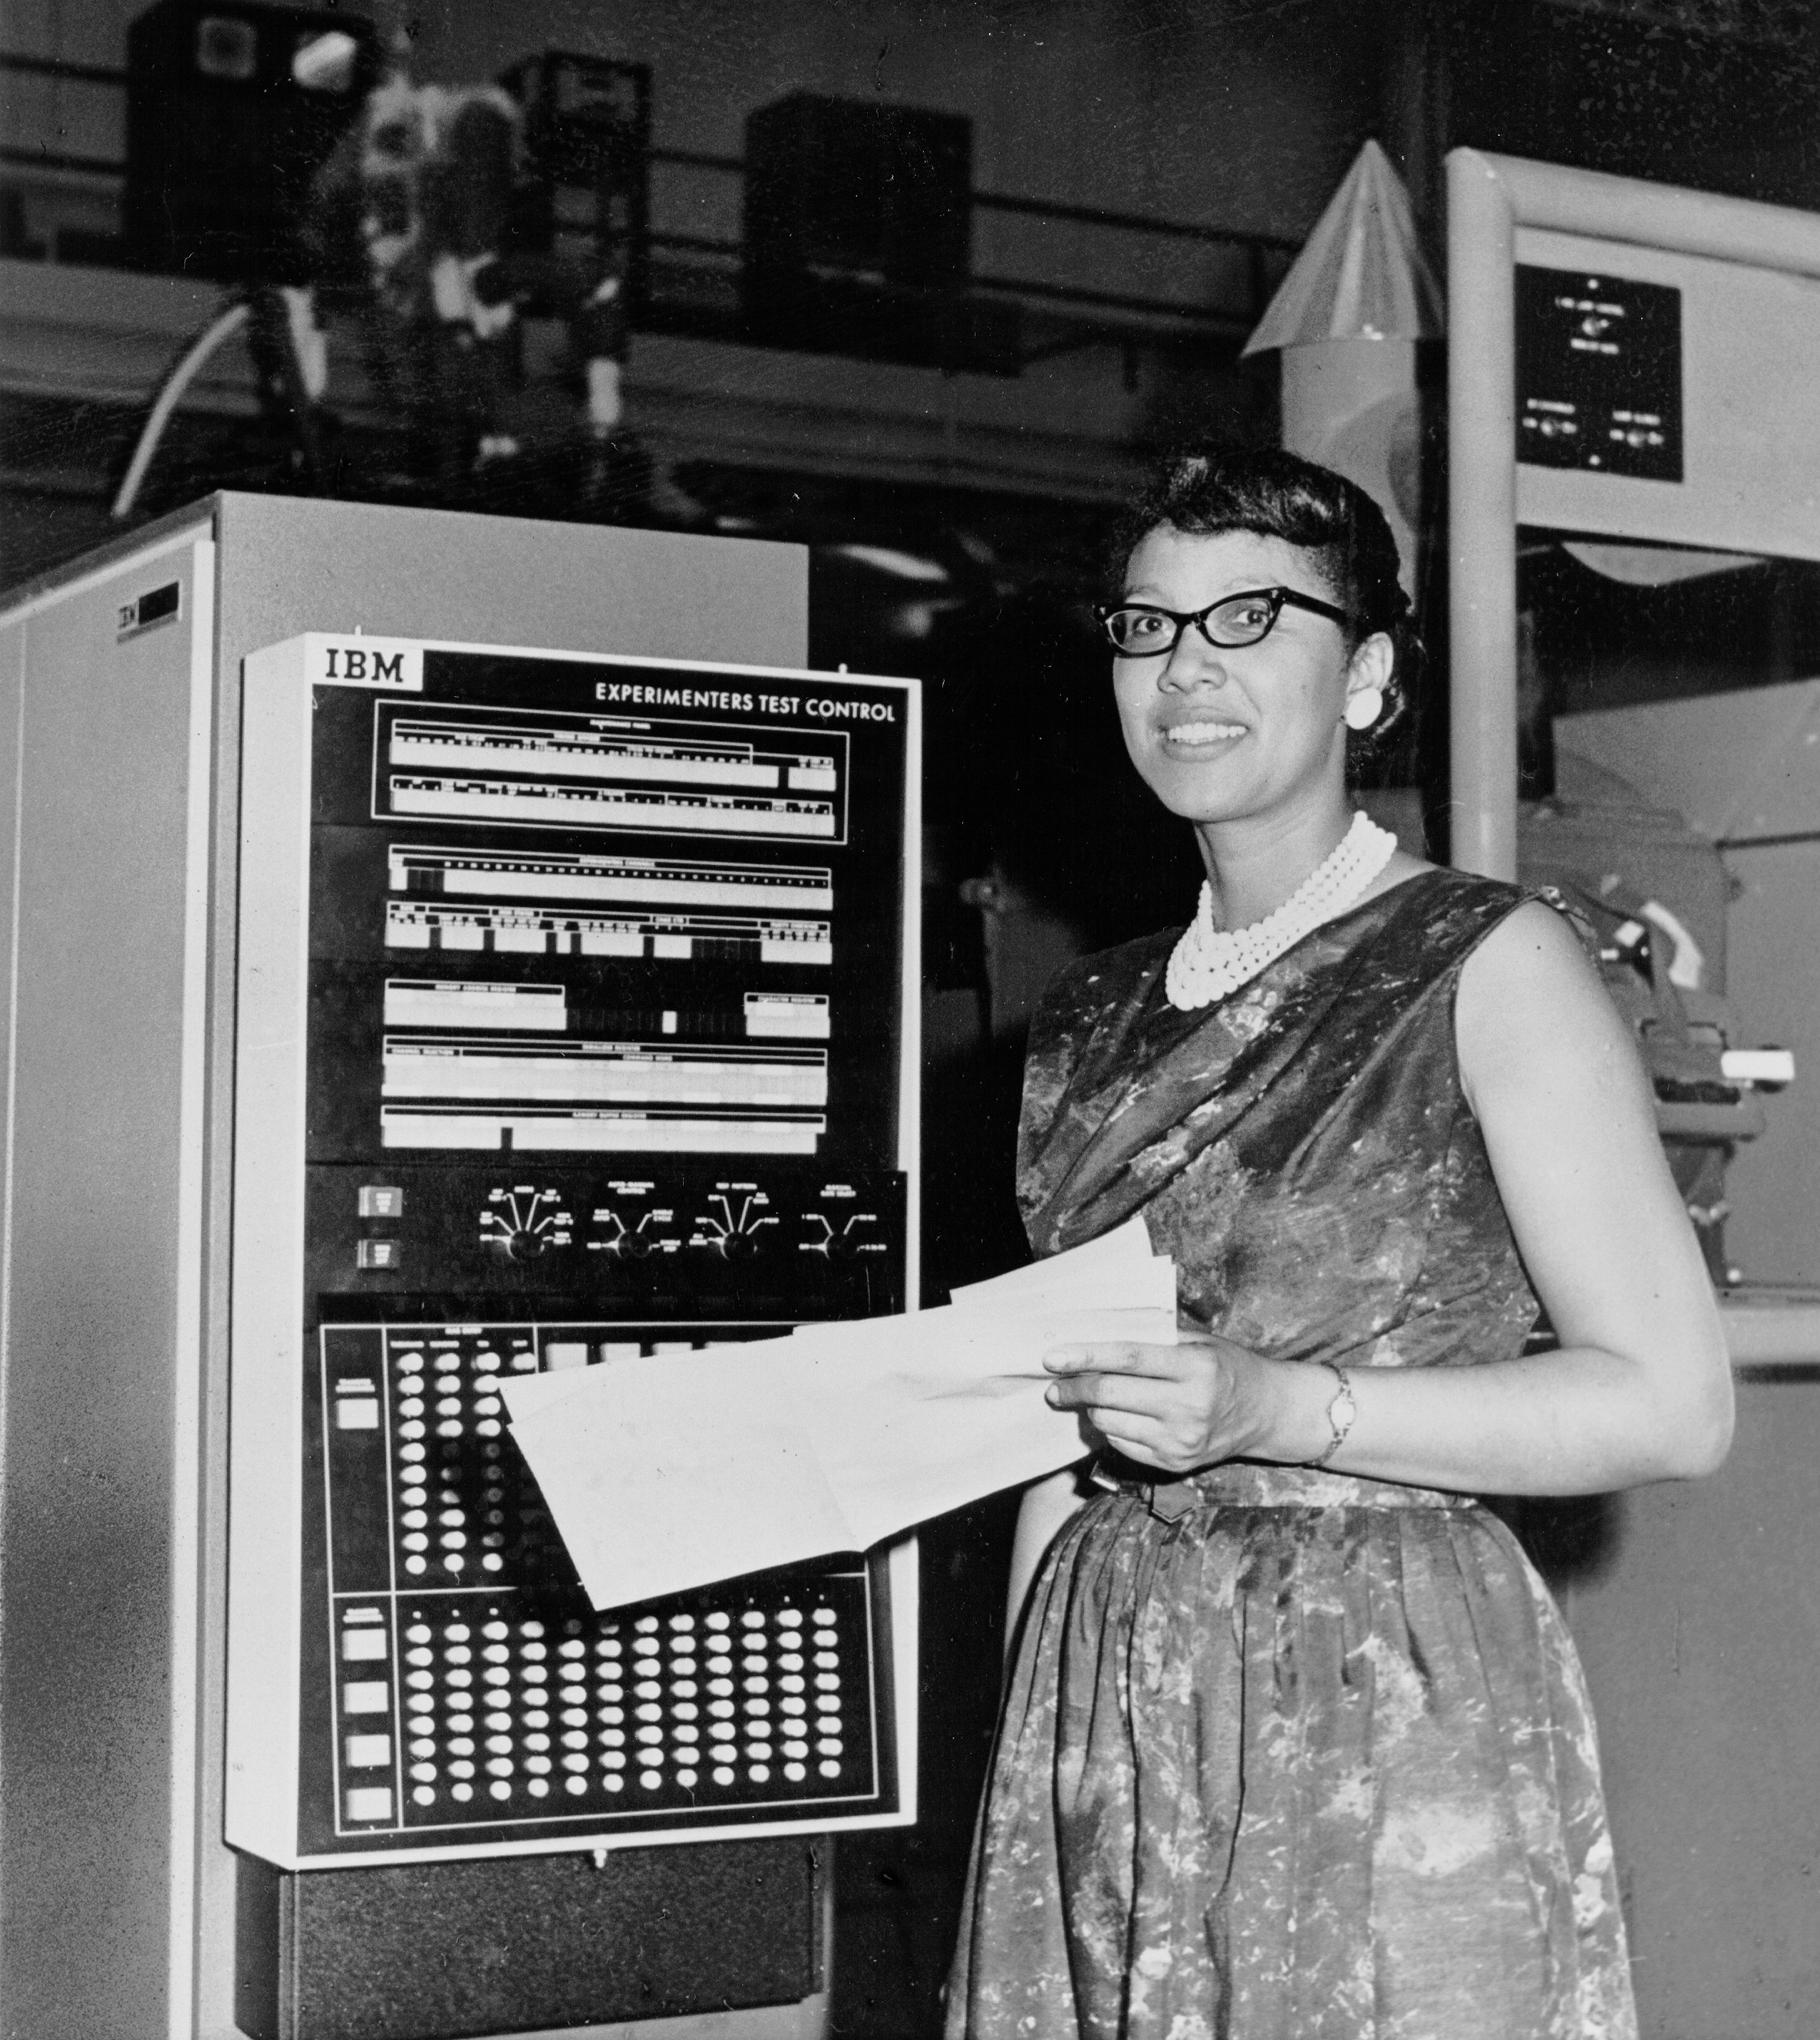
Melba Roy Mouton, an early NASA "Computer"
- What am I going to use it for?
- What is my budget?
- How much RAM do I need?
- How much CPU speed?
- How many CPUs?
- How much space do I need?
- What operating system do I want?
- What does my lab use?
Some people like Macs, some like Windows, some like Linux. And so, I always get a little bit uncomfortable because I don't want to be seen as taking sides. And also, computers can get really expensive and people want to try to price things out for hardware. And so some of the questions I ask people to think about are, what are you going to use it for?
Are you only going to be doing Word processing or are you going to be doing coding and analysis or perhaps without your PI watching, are you going to be using it to play games or watch movies? What is your budget? How much RAM do you need? How much CPU speed? How many CPUs do you need? How much hard drive space do you need?
What operating system do you want to use? And then, what does your lab use? As a PI, it can be frustrating when everybody's using a different operating system, and it's really difficult to get everybody on the same page because sometimes, there's a lot of conflicts between, say, Windows and Mac users in terms of the types of files they use. And so, these are all really relevant and really important questions, maybe I can answer for people how much RAM or CPU's speed or number that they need, but even that's going to change as the size of the datasets are going to change.
So a lot of these questions are personal and things that I really can't answer.
Problem with modern computers
- They get old. Quick
- They sit idle. A lot
- They can be expensive
- They can be ridiculously cheap
- Hard to predict what you are going to use them for
And so some of the problems with modern computers is that they get old quick. So by the time you buy a computer, it might be obsolete already. They also sit idle a lot. I know my computer is open when I'm at work, and the rest of the day, it's closed and on my desk or in my backpack.
It's not getting used. They can also be quite expensive. If you get a top-of-the-line MacBook Pro that's got all the bells and whistles, that's going to be pretty expensive. Alternatively, they can also be ridiculously cheap. You can get a Chromebook for a couple hundred bucks. So it's hard to predict also what you're going to be using them for.
So you might get a computer today, and a year from now, you decide to go into a different area of research and you might need different features than you'd previously anticipated. So it's a moving target in terms of what type of hardware and even software that you're going to want to use on your computer.
So these are all the difficulties of working with computers and picking out a computer. So here's a quick comparison. These numbers were valid when I looked them up a month or so ago looking at kind of top-of-the-line and middle-of-the-line laptops. So a MacBook Pro, a Dell, or a System76 to run Mac, Windows, or Linux.
Quick comparison
MacBook Pro
- 15 in, 2.9GHz, 16GB RAM, 512GB SSD: $2,800
- 13 in, 2.3GHz, 8GB RAM, 256GB SSD: $1,500
Dell XPS (Windows)
- 15 in, 2.4GHz, 16GB RAM, 512GB SSD: $2,000
- 13 in, 1.9GHz, 8GB RAM, 256GB SSD: $1,050
System 76 (Linux)
- 15 in, 3.5GHz, 16GB RAM, 512GB SSD: $1,200
- 14 in, 2.4GHz, 16GB RAM, 256GB SSD: $828
For comparison purposes only
And like I was saying, you can get something that varies considerably in terms of cost. And so these are different configurations for each of the types that vary in price by about twofold. So if you get a 15-inch monitor for a Mac with 2.9 gigahertz and 16 gigs of RAM and 500-gigabyte hard drive versus 13-inch, 2.9, 8-gig, 256 hard drive, it's a difference in price of about $1,300 which is a lot of money.
And so it's easy to see how you can spend a lot of money and how you can very quickly get a bit confused about what to do. And of course, there are far cheaper laptops than these that are out there, too.
HPC pricing
- Amazon Web Services
- 4 CPU, 16GB RAM (on demand) ~ $0.20/hour
- 8 CPU, 32GB RAM (on demand) ~ $0.40/hour
- 64 CPU, 256GB RAM (on demand) ~ $3.20/hour
- University of Michigan "FLUX"
- $16.94 per core per month (on demand; 4GB RAM per core)
- $13.30 per core per month (whole month; 25GB RAM per core)
- Other public and commercial computer clusters are available
So in comparison, we might also think about using a high-performance computer cluster rather than doing all of the analysis on our laptop or on our desktop computer. So if we were to use something like AWS, the prices here are also frequently changing. That you can get access to a computer with 4 CPUs and 16 gigs of RAM for about 20 cents an hour.
And similarly, you can get bigger and bigger computers through AWS paying different amounts of money. And so one of the things to note about this pricing is that it's by the hour. And so if it sits idle and you put the computer to sleep, you're not paying for it. Whereas the computer that sits on my desk or in my backpack closed and not running, I paid for it.
And so it's only getting older and it's not getting any cheaper. Alternatively, at the University of Michigan, we have a high-performance computer cluster called Flux and I pay about $17 per core per month for a core that's 4 gigs of RAM per core. Alternatively, I could pay $13 per core per month for a computer with 25 gigs of RAM if I buy the whole month.
So on demand means I get access to it when it comes available. Usually, that only takes a few minutes, but there's different pricing systems and different ways to think about the value of your computing. And there's also other public and commercial computer clusters available.
The prices also don't include the cost of storage which is generally pretty cheap, and with AWS, you can also get access to various educational discounts. Related to that also is that the University of Michigan, and I think a lot of other universities that have these HPCs, they heavily subsidize the cost of the HPC.
And it comes out, I think, to be about half the cost of AWS. So there's pluses and minuses of using your local HPC relative to Amazon. I don't want to get into those too much here. And again, computing isn't free. And so while we'll use AWS for this tutorial series, it's not going to be much more than a few bucks to pay for what we're doing in these tutorials.
Benefits of HPC
- Hardware constantly updated at no cost to you
- Cheap! With AWS $1,000 would last 104 days with 100% usage (unlikely)
- Flexible!
- May only need 8 CPU/32 GB RAM for short period
- Downstream analyis with R could possibly be done on free instances
- Reinforces good reproducible research practices
So I encourage you to come along with me in using the Amazon Web Services as we go through this tutorial and the other tutorials in this series. So some of the benefits of using an HPC. The hardware is constantly being updated at no cost to you.
I think it's updated perhaps a little bit faster when you're using AWS than your local cluster. With $1000 at AWS, it would last you about 104 days with 100% usage which I think is unlikely that you would have 100% usage. And that's also a really nice computer that you'd be using on AWS.
It's pretty flexible. So you might only need 8 CPUs and 32 gigs of RAM for a short period of time in your analysis whereas downstream analyses perhaps using R where you don't need a lot of RAM could possibly be done for free. And so you can mix and match different needs in your analysis using different costs along the way.
I also think that this will reinforce good reproducible research practices, which we'll talk about in a bit.
Benefits of HPC
- Hardware constantly updated at no cost to you
- Cheap! With AWS $1,000 would last 104 days with 100% usage (unlikely)
- Flexible!
- May only need 8 CPU/32 GB RAM for short period
- Downstream analyis with R could possibly be done on free instances
- Reinforces good reproducible research practices
With availability of HPC, you are better off thinking of your laptop as a terminal rather than as a workhorse
So I encourage you to come along with me in using the Amazon Web Services as we go through this tutorial and the other tutorials in this series. So some of the benefits of using an HPC. The hardware is constantly being updated at no cost to you.
I think it's updated perhaps a little bit faster when you're using AWS than your local cluster. With $1000 at AWS, it would last you about 104 days with 100% usage which I think is unlikely that you would have 100% usage. And that's also a really nice computer that you'd be using on AWS.
It's pretty flexible. So you might only need 8 CPUs and 32 gigs of RAM for a short period of time in your analysis whereas downstream analyses perhaps using R where you don't need a lot of RAM could possibly be done for free. And so you can mix and match different needs in your analysis using different costs along the way.
I also think that this will reinforce good reproducible research practices, which we'll talk about in a bit.
With the availability of an HPC then, you're perhaps better off thinking of your laptop as a terminal rather than as a workstation or as a workhorse. So if you only need to be able to log into a remote computer, then your laptop doesn't need to have all the bells and whistles. I mean, you may want the bells and whistles to watch Netflix and to do other things, but you don't need the bells and whistles for doing your data analysis, and I think that's very comforting because as your data sets get larger or perhaps your research interests change, you're not so invested into a computer to do that work. So if your dataset doubles or triples in size, well, your computer now might be too small. Well, if you're using it as a terminal to get access to an HPC, that's not such a big deal.
Drawbacks of HPC
- Learning curve
- Learn command line
- It feels weird at first
Some of the drawbacks of using an HPC is that there is a learning curve, and hopefully, today's tutorial will help us to get over that learning curve. You'll have to learn how to use the command line, which we'll do in a future tutorial, and it feels weird at first. But you're working in the cloud and you might wonder, "Well, where is this computer?" I've had in the past a computer at the University of Michigan that was attached to the cloud and I never saw the computer. It took me a few months to get used to that. I had no idea physically where this thing was located and that was just fairly unsettling, but eventually, you get used to it and you realize that you have access to a really powerful computer that is relatively inexpensive.
So to get to your HPC, if you're working with your local HPC, you're going to need information from your systems administrators. And like I said earlier, typically, they'll have tutorials for you to follow and information that you can use to get up and going quickly. For accessing your local HPC as well as AWS, you'll likely use SSH if you're using a Mac or a Linux. SSH comes pre-installed with a Mac and Linux. If you're on Windows, you'll want to download a program called PuTTY and so you can go to these links and download them. Like I said, SSH should already be installed on your Mac or Linux computer whereas PuTTY, you'll have to go out and install. If you're accessing a local HPC, you might also need to get things like a VPN or two-factor authentication to get access. We'll deal with those things when we log into AWS.
Disclaimer...
... your local HPC should hopefully have their own instructional materials to get you going. This is only to give you a rough look at what's going on
Your local HPC
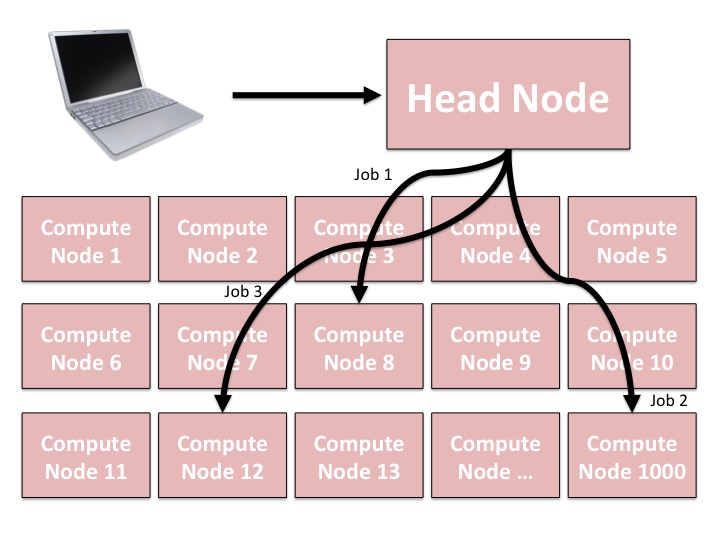
- You log into the head node from your computer.
- You will get yelled at if you run anything significant on the head node. Some systems will automatically boot you from the system if you run things on the head node
- You cannot directly log into the compute nodes
- Must submit a "job" to run your processes on one of the compute node
- Can submit multiple jobs at the same time using a scheduler
Install software
- Can generally install software in your own storage to run on the HPC
- Most HPCs also have a system where you can "load" modules to make common software available
$ module avail # list software that is available to load$ module list # list software that you have already loaded$ module load [modulename] # load [modulename]$ module unload [modulename] # unload [modulename]$ module save # save list of modules to load for each sessionInstall software
- Can generally install software in your own storage to run on the HPC
- Most HPCs also have a system where you can "load" modules to make common software available
$ module avail # list software that is available to load$ module list # list software that you have already loaded$ module load [modulename] # load [modulename]$ module unload [modulename] # unload [modulename]$ module save # save list of modules to load for each sessionHere's what I have loaded:
$ module listCurrently Loaded Modules: 1) gcc/4.9.3 3) samtools/1.2 5) r-biomed-libs/3.3.2 2) boost/1.61.0 4) python-anaconda3/latest 6) R/3.4.1Really only need gcc, boost, and R for these tutorials
Scheduler
- Your HPC will have software it uses to manage the jobs of you and everyone else
- Mine uses Torque Portable Batch System (PBS)
- PBS queues, starts, controls, and stops jobs
- There are many ways to use PBS, I'll show you two: interactive and batch mode
Batch mode
#!/bin/sh#PBS -l nodes=1:ppn=12#PBS -l mem=10gb#PBS -l walltime=500:00:00#PBS -j oe#PBS -m abe#PBS -V#PBS -M your_email@your_institution.edu#PBS -A example_fluxod#PBS -q fluxod#PBS -l qos=fluxecho "ncpus-2.pbs"cat $PBS_NODEFILEqstat -f $PBS_JOBIDcd $PBS_O_WORKDIRNCPUS=`wc -l $PBS_NODEFILE | awk '{print $1}'`# Put your bash code below here# Put your bash code above hereecho "qsub working directory absolute is"echo $PBS_O_WORKDIRexitSave as my_job.qsub
- ppn is the number of processors/cores you want to run per node (customize to your project/resources)
- mem is the amount of memory you want to request (if this is above the available memory, the job will never launch)
- walltime is in hours:minutes:seconds (your hpc may have limits)
- -M put your email to get emails regarding status of your job
- -A indicates your account (may not be required by your HPC)
- -q is the queue that you want to be in (unless you're at UMich, it won't be fluxod)
- qos is specific to your HPC
Run your bash code by doing this...
$ qsub my_job.qsub- Once you submit the job, you can then log out and go away
- It may take some time for the scheduler to launch your job. If it is taking more than 30 minutes, contact your SysAdmin and ask what is going wrong
- When your job completes, you'll get an email
- This can be hard if using batch scripts is foreign to you
Interactive mode
- We might want to run something interactively
- Can do what we had previously like this:
$ qsub -I -V -A example_flux -q flux -l nodes=1:ppn=12,pmem=10gb,walltime=500:00:00,qos=flux- Typing all of that can get tedious and you may forget what options to include
Interactive mode with a file
#!/bin/sh#PBS -l nodes=1:ppn=12#PBS -l mem=10gb#PBS -l walltime=500:00:00#PBS -j oe#PBS -m abe#PBS -V#PBS -A example_fluxod#PBS -q fluxod#PBS -l qos=fluxecho "ncpus-2.pbs"cat $PBS_NODEFILEqstat -f $PBS_JOBIDcd $PBS_O_WORKDIRNCPUS=`wc -l $PBS_NODEFILE | awk '{print $1}'`- Save this as
interactive.qsub - Run as:
$ qsub -I interactive.qsub- Then run your commands as you would normally
But!
- You might have a job that needs to run for a long period of time
- Power could go out
- Internet might drop you
- You might want to move computer
- Instead, run the interactive job in the background using the
tmuxprogram
$ tmux$ qsub -I interactive.qsub$ mothurtmux
tmux: Start a sessionControl-b d: Detach from current sessiontmux ls: List existing tmux sessionstmux aortmux a #0: Attach a specified session- There are many other commands and features for use wiht
tmux, but these will get you pretty far
tmux
tmux: Start a sessionControl-b d: Detach from current sessiontmux ls: List existing tmux sessionstmux aortmux a #0: Attach a specified session- There are many other commands and features for use wiht
tmux, but these will get you pretty far
Remember to use tmux before starting your interactive PBS session!
Other PBS tools to know
qstat -u your_username: List out the jobs you have submitted and their statusqdel [job_id]: Kill one of your jobs
Amazon Web Services (AWS)
- Many "services"
- Compute nodes
- Long and short term Storage
- Widely used
- Many commercial applications
- Web hosting
- Education applications
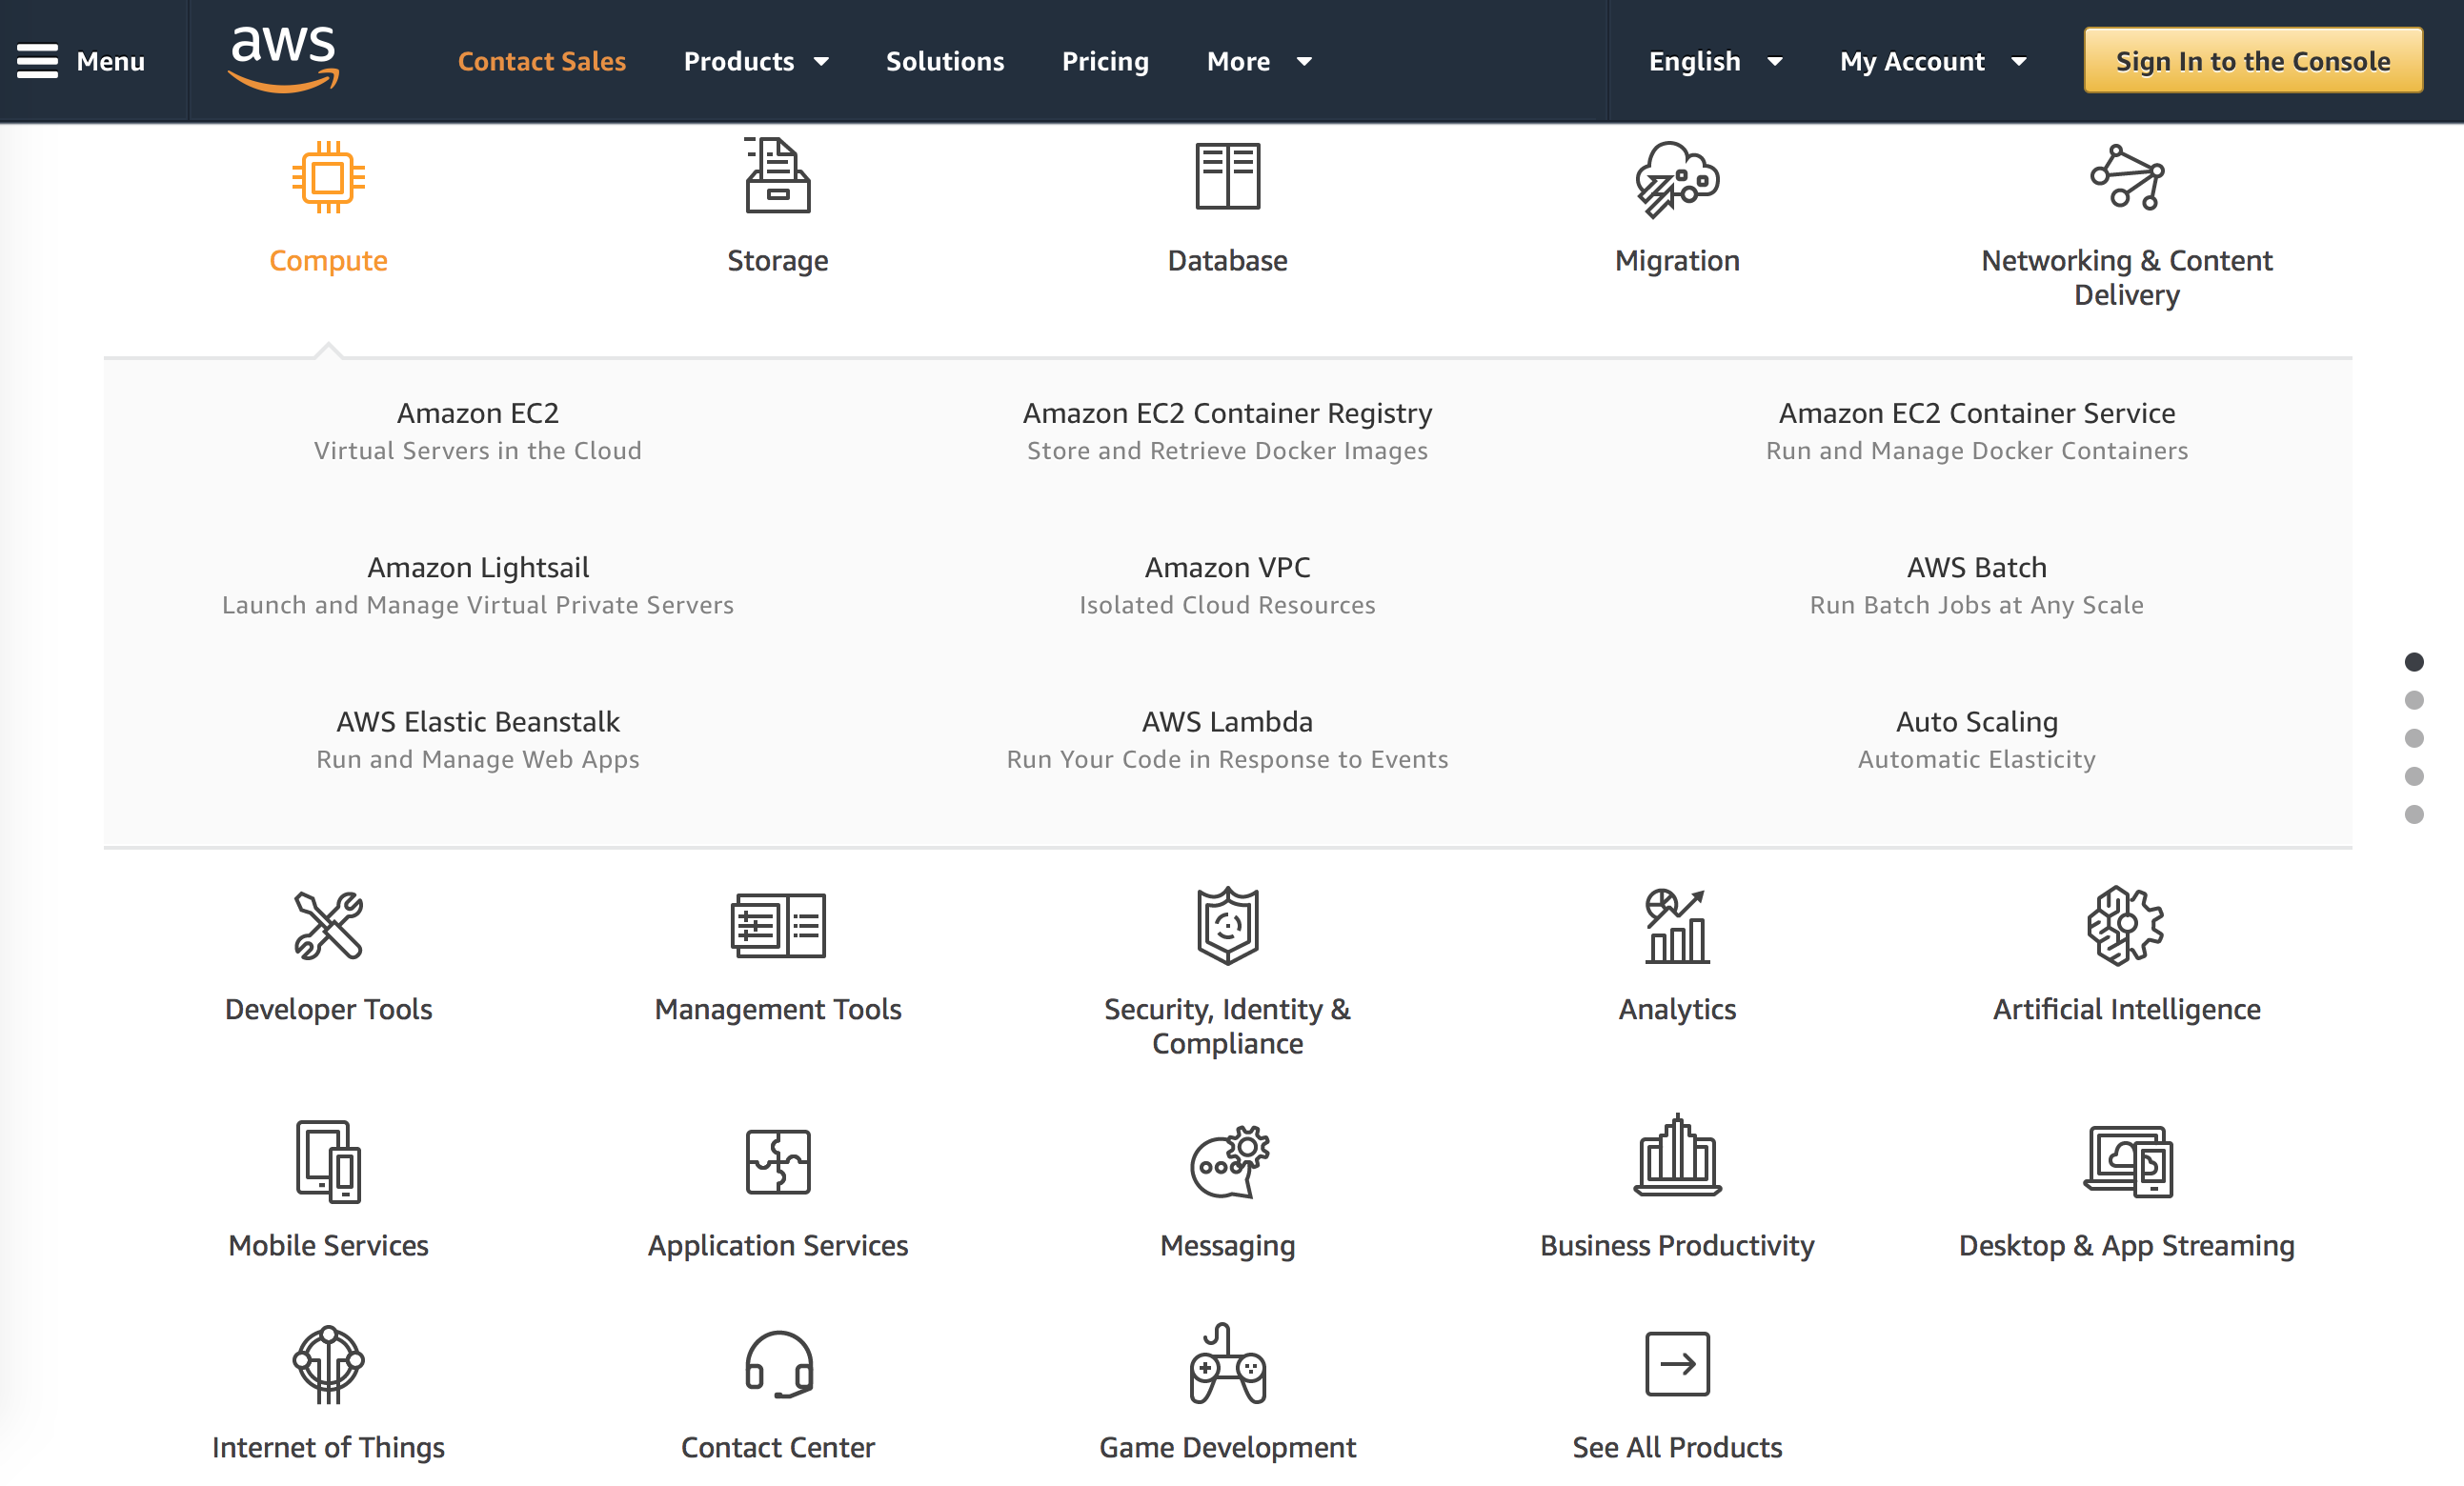
So to introduce AWS, you should realize that the S is for services and there's many different types of services. They have tools for doing data analysis like we're going to do. They have tools for different types of storage. They have services for databases, for maintaining websites, all sorts of different things. And it sometimes becomes overwhelming by all the various services they offer. It's widely used. So, many commercial applications, websites that you use, are being run off of AWS.
They'll do web hosting for you. They also have various educational applications. And as I mentioned, if you go into their portal, you'll find ways to get discounts for educational usage which we qualify for when we're at a university. The service that we're going to use is the Amazon Electric Compute Cloud or Amazon EC2.
Amazon Elastic Compute Cloud (EC2)
- This is the service that we will primarily utilize for this series of tutorials
- Create virtual computing environments that are called "instances"
- Build upon existing instances called Amazon Machine Images (AMIs)
- "Elastic" comes from the ability to manipulate the hardware configuration of the instance you are using
- Can create your own AMI, which is preloaded with software and data and that you can share with others
This creates a virtual computing environment that are called instances. So this is an important piece of jargon to tuck away. That these computing environments or remote computers are called instances, and we can build upon existing instances that are called Amazon Machine Images or AMIs.
Elastic in the Elastic Compute Cloud comes from the ability to manipulate the hardware configuration of the instance you are using. So as I mentioned before, you could have an instance that requires tons of RAM. You could then modify that instance to use very little RAM. And this way then, you can adapt your cost to what you're doing.
In addition, you can create your own AMI which is preloaded with all of the software and data that you can share with others. So we're going to get going using AWS using a tutorial that they have built into their website. And so I'm going to go ahead and leave the full-screen mode here of the tutorial and click on this link for the AWS tutorial.
So the tutorial that we're going to do on the AWS site is how to launch a Linux virtual machine with Amazon EC2. And as you'll see, this is a tutorial with a handful of steps that will quickly get us connected to an instance and will get us set up with credentials to log in as well as how to terminate our instance and quit the instance.
And this will be very useful for when we want to use our own AMI for the rest of the tutorial series. So the first thing that we need to do is just click "Sign in to the Console." This then brings us to a "Sign in" window. If you don't already have an Amazon account, and you might first try your Amazon credentials for the main website where you would buy books or movies or coffee or any other things from Amazon.
If you don't have one of those or if that doesn't work for some reason, go ahead and click to "Sign in to a different account." And then if you can go ahead and click on "Create a new AWS account," and then go ahead and insert your information to create your AWS account.
I'm going to go ahead and click on "Sign in to an existing AWS account" because I already have an account and this is with my email address and my password. So I'll click "Sign in," and this then brings me to the AWS homepage. And so we'll go ahead and click on EC2. And if that's not up here for some reason, you could always type EC2.
So virtual servers in the cloud. And so then you might have something similar or different than what I have up here, but go ahead and press "Launch Instance." And so we've launched our instance.
We're now at the EC2 Launch Instance Wizard which will help us to configure and launch our instance.
And so what we want is to find the Amazon Linux AMI. So we'll come here and there's our Amazon Linux AMI at the very top. We can click "Select" for that. And then we'll now want to pick our instance type, and they have these instance types of varying combinations of CPU properties, memory, storage, and networking capacity.
So you can choose the appropriate configuration for your application. So what we're going to use for this tutorial is the t2.micro which is already clicked, and this is covered under a free tier so it doesn't cost us anything. So we're going to come back here and see that t2.micro is already clicked.
And then we're going to click the blue button at the bottom for review and launch. It brings us to the summary page to review our instance launch and everything here looks right. So we'll go ahead and press the Launch button. And then it then says on the next screen, you'll be asked to choose an existing key pair or to create a new key pair. So a key pair is the way that you can securely access this instance using SSH or PuTTY.
And so AWS stores the public part of the key pair which is just like a house lock. So you download the private part of the key pair which is just like the key. So when you put the key into the lock, you're granted access. So we're going to select "Create a new key pair" and give it the name "My Key Pair." So we'll say "Create new key pair," and they wanted us to call it "My Key Pair."
So we called it "My Key Pair." And now, we're going to click "Download Key Pair." And so this then was downloaded and opened.
And so we want to…As it says, we want to store this in a secure location. So right now, I have it on my desktop which isn't super-secure because sometimes things get deleted from my desktop.
And so looking at the instructions here, there's a link for Windows and there's a link for Mac. I'm using a Mac so I'm going to go ahead and follow these instructions, but if you're using a Windows computer, of course, you should then follow these instructions. So for the Mac, we recommend saving your key pair in the .ssh subdirectory from your home directory.
So we haven't gotten too deep into how to use the bash and how to move things around, but we'll follow the instructions that they have here. And sometimes, people have the key pair stored into their Downloads directory. For me, mine downloaded to my desktop. And so we can type the command mv ~/Downloads/MyKeyPair.pem ~/.ssh/MyKeyPair.pem.
So what I'd tell you to do is go ahead and copy that. You can then right-click to copy and then paste it up here into a terminal window. And I should back up and tell you that the terminal for a Mac is if you click on the Finder and go Applications and at the bottom, there's a directory called Utilities, and here then there's a program called terminal.app.
And so that will open that, but I use the terminal.app app a lot and so I like to keep it in my dock over here on the left. So I'd encourage you to do that, too, just because it's…we're going to be using it a lot and it's easier to get access to that way. Again, I told you that mine didn't get stored to Downloads, mine is stored on the desktop.
So I'm going to scroll to the left over here and remove "downloads" and replace that with "desktop." So I move desktop/MyKeyPair.pem. And when it was downloaded, it added .txt to the end of it. So I need to change that to .txt. So move ~/Desktop/MyKeyPair.pem.txt.
So there's no spaces in there. And then there's a space where we then have the ~/.ssh/MyKeyPair.pem. So if I go ahead and hit Enter, I can test what happened.
Well, first of all, I didn't get an error message and I can type ls .ssh. And I see in here MyKeyPair.pem, so it got moved. And so that's there. And so now, the tutorial tells me that after I have stored my key pair, click "Launch Instance" to start your Linux instance.
So go ahead and click "Launch Instance." It goes through, and voilà, your instances are now launching. And so I can go ahead and click on the blue button. Just double-check that that's what they want me to do. Yep, and it tells me to click the blue button for view instances.
And so it's got this message here. There's notifications that I'm not going to worry about. I'll close that, and you'll see that there's a line across the top here for my instance. The instance state is running and it's checking the status, is that it's initializing. Great. So it takes a few moments, but then the instance state column on your instance will change to Running and a public IP address will be shown.
So it's running and is there a public IP address? Yes, public IP address is right here. This 54.196.11.3 or this longer one here. So again, if you're using Mac or if you're using Windows, with Windows, they'll have you download a tool called Git for Windows.
This is similar to what PuTTY does or has functions in it that are similar to what PuTTY does. I'll leave the Windows users to follow that. Those of you using Mac/Linux, I'll click on that to bring up these instructions. And so it says, "Your Mac or Linux computer most likely includes an SSH client by default," as we already mentioned.
So we can check for an SSH client by typing SSH at the command line. So I'll do that, SSH. Aha, so it gives me something. I'm not sure what exactly all that means, but it works. We'll now need to use the chmod command to make sure that our private key is not publicly viewable by entering the following command.
So I'm not worried about what this means. I'm going to highlight this text, right-click on it to copy, and then over here, I'll right-click to paste. And then I'll hit Enter, and I'll never have to worry about this step again.
So again, in the land of using a Mac or Linux computer to access AWS, I can now use SSH. So I can say ssh -i ~/.ssh/MyKey…and to show you a nice little trick, I can hit…once I've started typing this path in, I can hit the Tab key and it will complete it for me.
So I don't have to type so much. And then I can type ec2-user@, and I'm going to give it this IP address. Well, not this IP address, I'm going to give it my IP address which was back here. And so I can highlight this one. We'll see if this one works, and I'll do right-click, copy, and I'll come back up here and do right-click, paste.
Then I'll hit Enter. Let's see. "Are you sure you want to continue?" I'm pretty sure I want to continue, but let's just double-check that it doesn't say anything. Aha, here it says, "Are you sure you want to continue connecting? Yes or no." So I'm going to say yes. And so it's permanently added it to the list of known hosts.
And so now, I'm in. All right. So I'm going to scroll down here and see what happens. So it tells me that I've logged in. If I type ls, there's nothing there, but you can rest assured that you are connected to Amazon's computer.
So that's pretty cool. We got it to work. So for now, we're not going to do anything in here, but what we'd like to do is to show then how we can terminate the instance. And so if we're not using it, it's a good idea to terminate the instance that we're no longer using so we don't get charged for it.
And so to quit out of the terminal here, we can type exit and that leads us to see now that the connection to that IP address is closed. I'm going to go ahead and type exit again to close the terminal shell. And then I can come up here to my EC2 management console, and I can right-click on it and go to Instance State and click Terminate, and it gives me a warning that it will be deleted once the instance is terminated and any storage on local drives will be lost.
Are you sure you want to terminate these instances? Yes, I'm sure. So now, we see it's shutting down. This instance was free so we're not worried about it, but if this was running a big analysis that had a bunch of stuff stored, it would be shutting down so we wouldn't be getting charged for it. But at the same time, it would also be deleting everything.
So later, we'll see a different way that we can change the instance state to something where it's not terminated but where it's in a suspended state. Great. So hopefully, that made sense, and hopefully, the Windows users were able to follow along in parallel to what we were doing. I think the key differences for those of you using Windows, if we scroll back up here to this step up here where we were creating the key pair was saving the key pair to a subdirectory called .ssh underneath your home directory.
And like we did for Mac, and then also connecting to the instance with Windows was to do it with a tool called Git Bash. And so Git Bash is part of a tool called Git that you've heard me talk about already in this series, but by installing this, you will then be able to run this similar to what we would do on a Mac, but instead of using the terminal command, you're going to be using Git Bash to do it.
And so I think I mentioned previously possibly using PuTTY. Instead of using PuTTY, you could use Git Bash. If you already know how to use PuTTY, you can also use PuTTY, but Git Bash is a nice lightweight tool. It doesn't take up a lot of space, and it's…the instructions to use it are here. So, great. We've gone through this tutorial and it doesn't seem like we did anything, but we really have.
Like, we've created that key pair that allows us to connect securely to AWS. We've seen a list of different types of instances and we've also connected to an instance. We've made sure that if we're using SSH or Git Bash or PuTTY that that works.
Let's go...
- Go to https://aws.amazon.com
- Click "Sign In to the Console"
- Either Sign In using your existing Amazon account or create a new account
- Type "EC2" in the search window in the upper right corner of the screen
- Hit enter
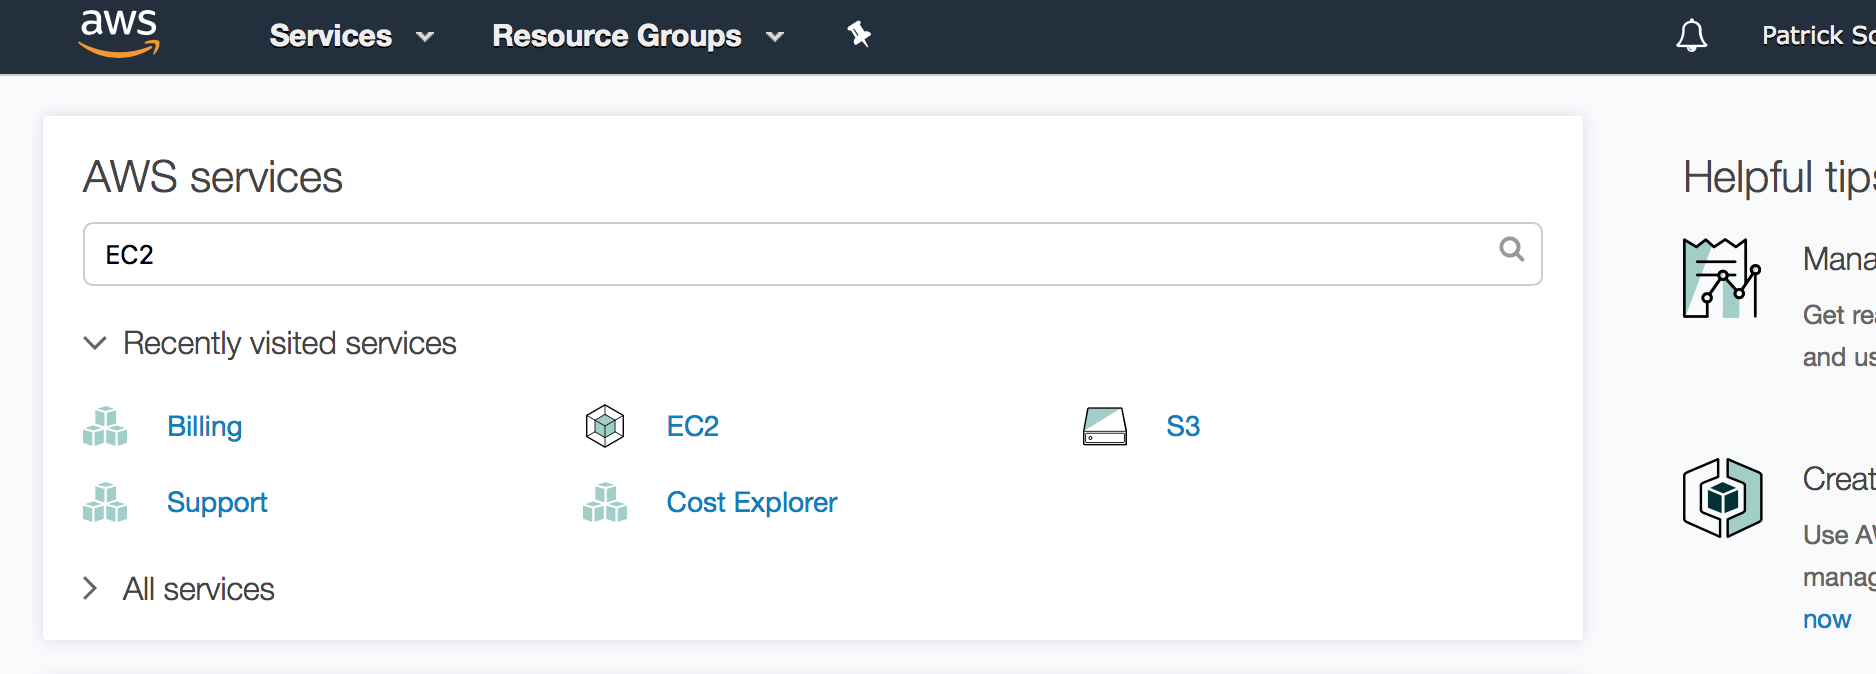
And so we're really in a good position to go forward now. So I'm going to close this tab from the tutorial and we'll see now that in our console, that that instance has been terminated. So the next thing we're going to do is to create a new instance that we'll be using for the remainder of the tutorial series. It's going to be a little bit more sophisticated and have a lot more to it than that one we used in the tutorial series.
EC2
- At this point you will see a dashboard that tells you what resources you are using
- If you've never logged in before, you'll have a bunch of zeroes on this page
- In the upper right corner of the screen next to your name is the region that your instance will be living in. Make sure it is set to "N. Virginia"
- Click blue "Launch Instance" button
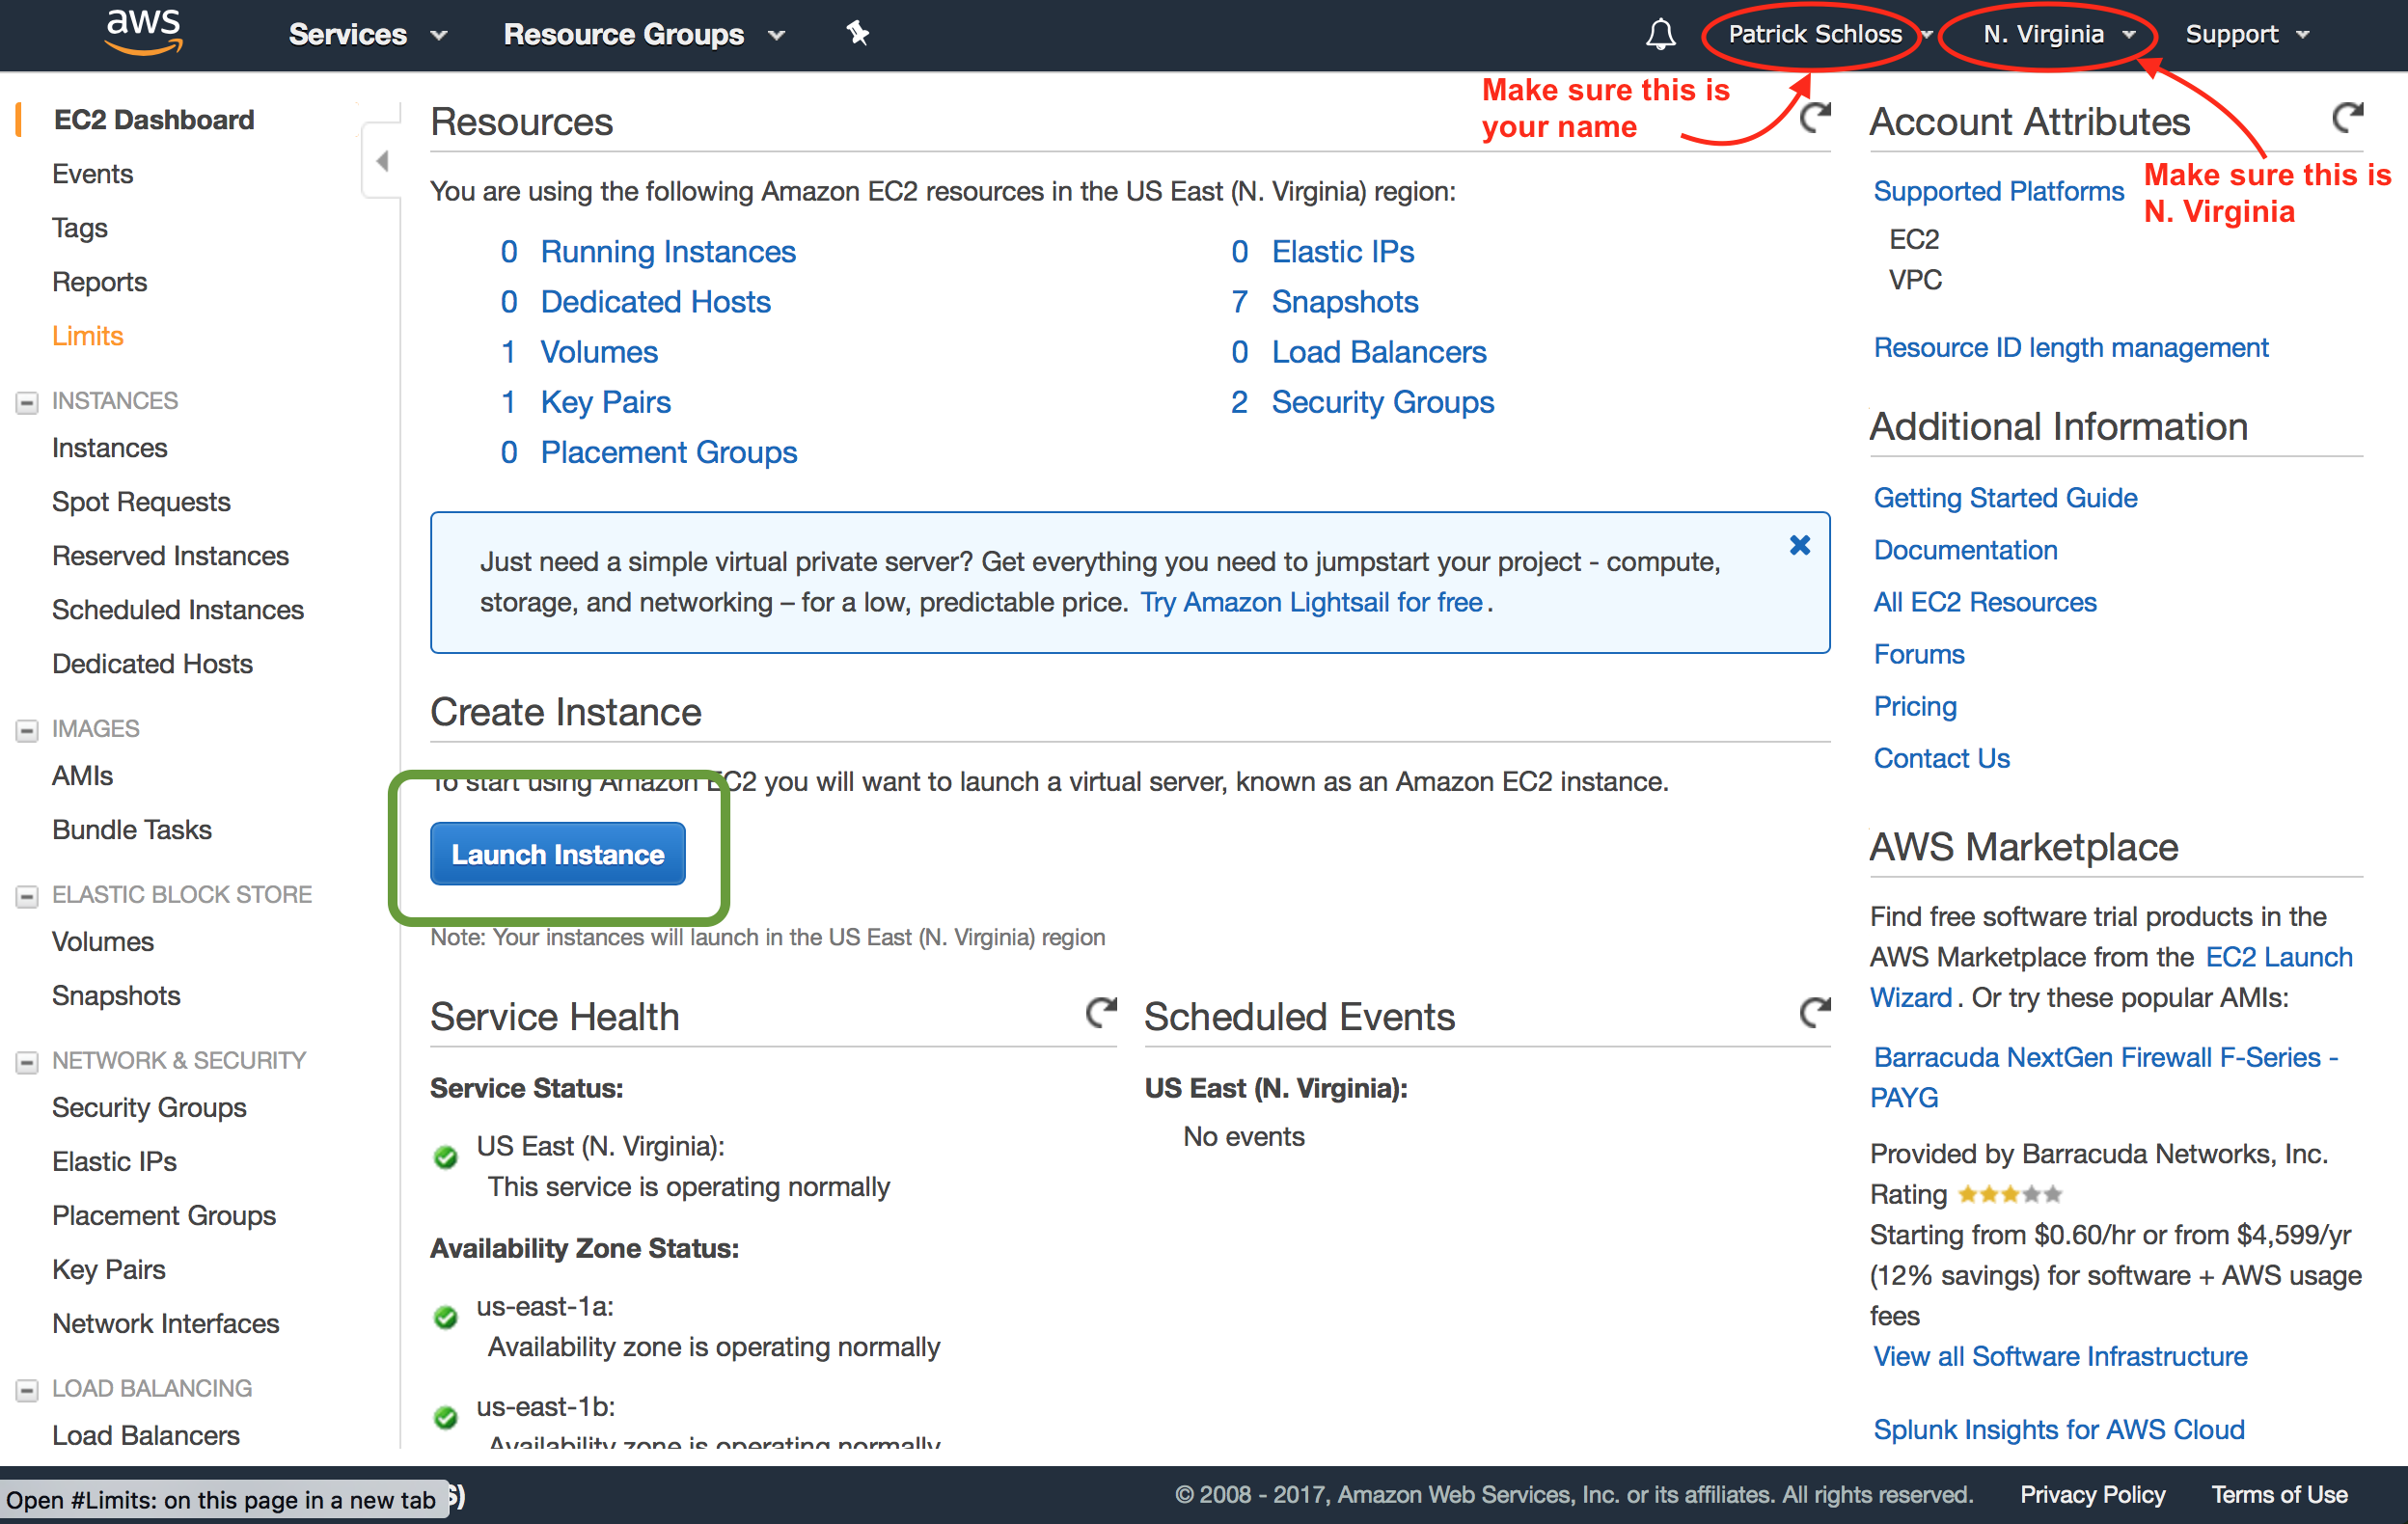
So we can go ahead and click, if we're at this window, Launch Instance, or if you're at the EC2 dashboard, you can then click that blue button to launch a new instance. So we'll go ahead and click this Launch Instance. The first step that it wants us to do is to choose an Amazon Machine Image.
So make sure that...this is your name up here, that's me. Make sure that this says N. Virginia, North Virginia. And so you'll see there's a whole bunch of other versions or locations, but we're going to use the North Virginia location. And then we're going to go to Community AMIs. And so Community AMIs are AMIs, Amazon Machine Images, that were made and contributed by members of the community.
Finding an AMI
Details of how riffomonas AMI was constructed
- Along the left side click on the tab that says "Community AMIs"
- In the search bar that says "Search Community AMIs", type "riffomonas"
- Select the most recent version of the AMI (year-month format)
- Press "Select" button
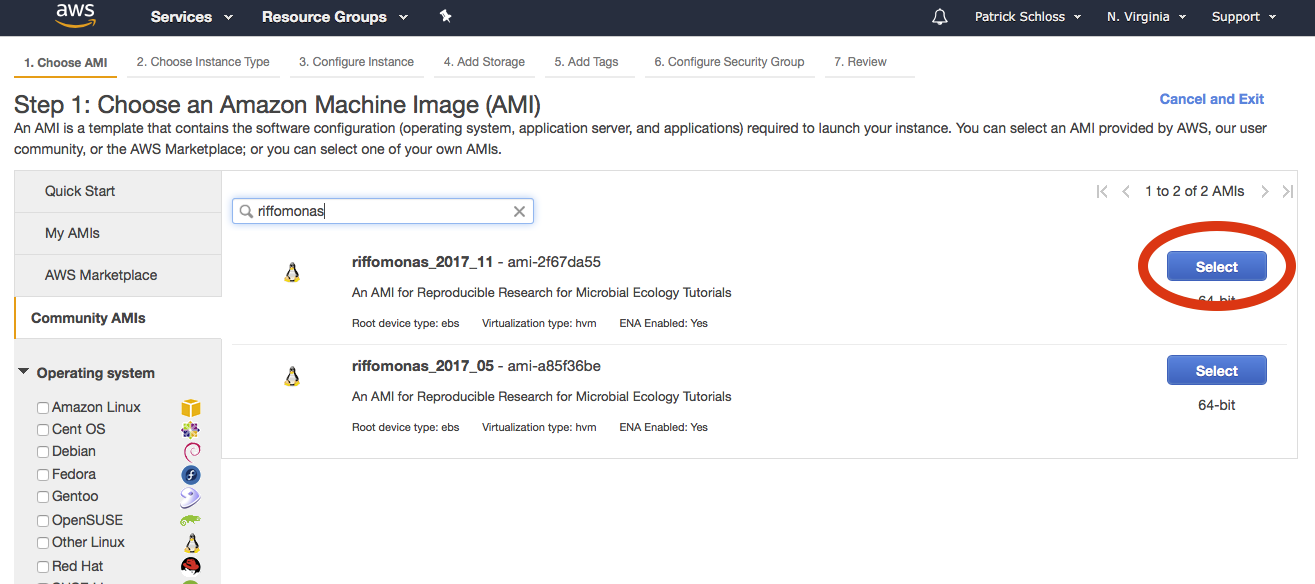
And so here, I'm going to type in riffomonas, and you'll see that there are two versions of the riffomonas AMI here. And so the first is from May of 2017 and the second is November of 2017. And if you're watching this at a later date later in 2018, you might find a third or fourth version as well.
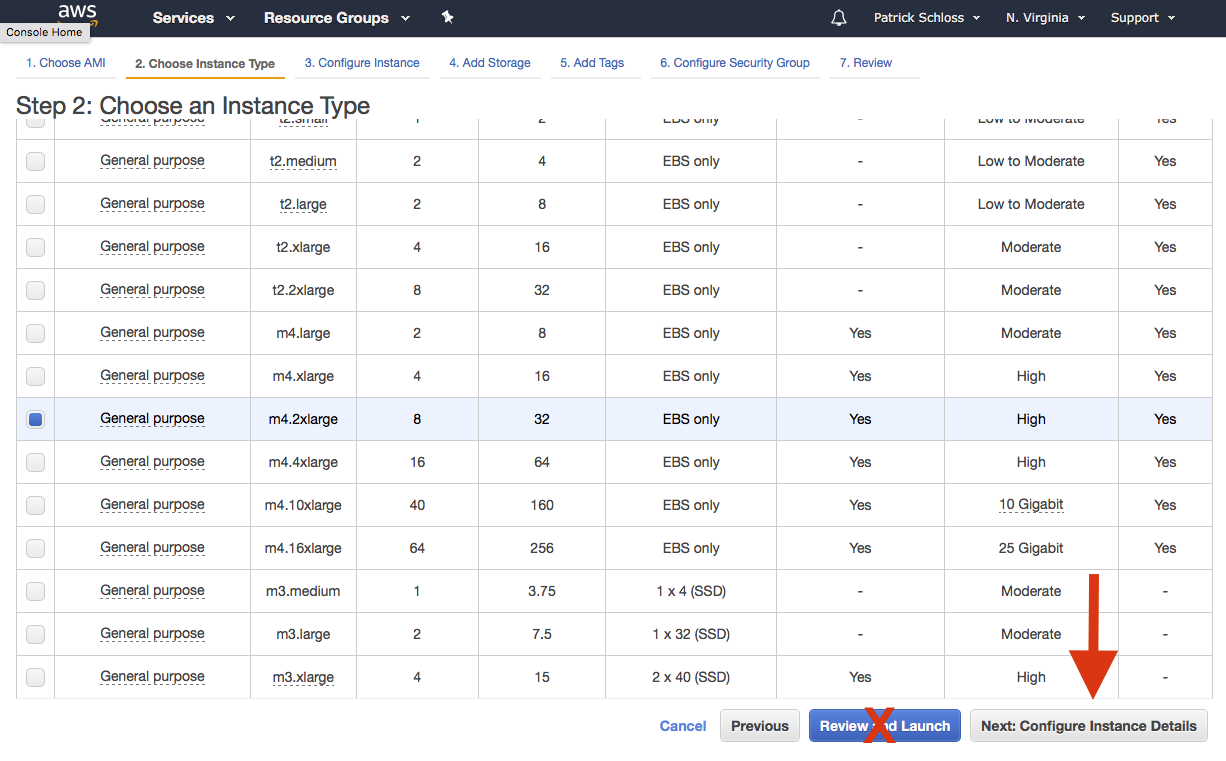
So go ahead and pick the latest version. So I'm going to pick this one from November and click "Select," and I'm not going to use the micro instance. Instead, I'm going to pick the general-purpose m4.2xlarge. So scroll down and you see m4.2xlarge.
Click on that and we'll see that this has 8 CPUs and 32 gigs of RAM. That's probably more than we need for many of the things that we're doing, but again, it's going to be a relatively quick analysis over the course of the tutorial and shouldn't take up…shouldn't cost very much.
Add storage
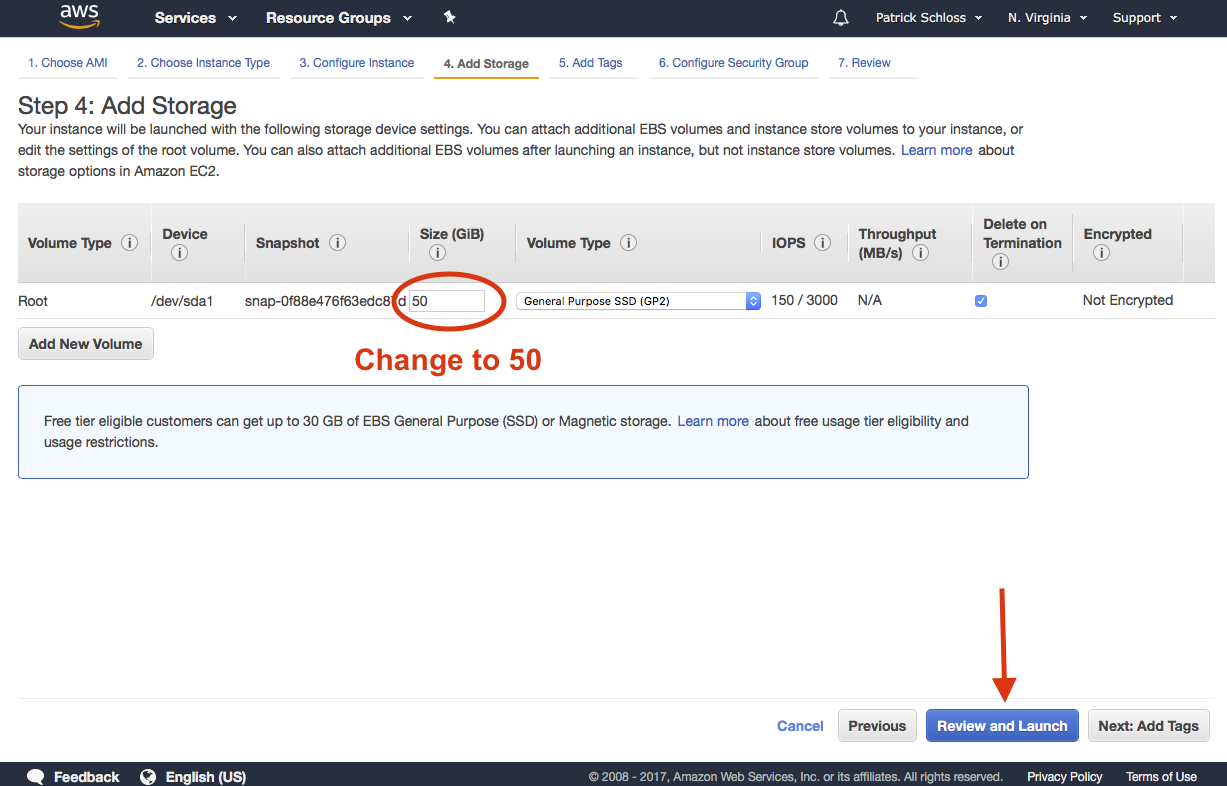
So the next thing we'll do is not click. Don't click "Review and Launch" but "Next" to configure the instance details. Click "Add Storage" and we want to make sure it says 50 gigabytes. That's good. And now we want to do "Review and Launch." So click that, and we'll see that it says your instance is not eligible for the free usage tier.
Security
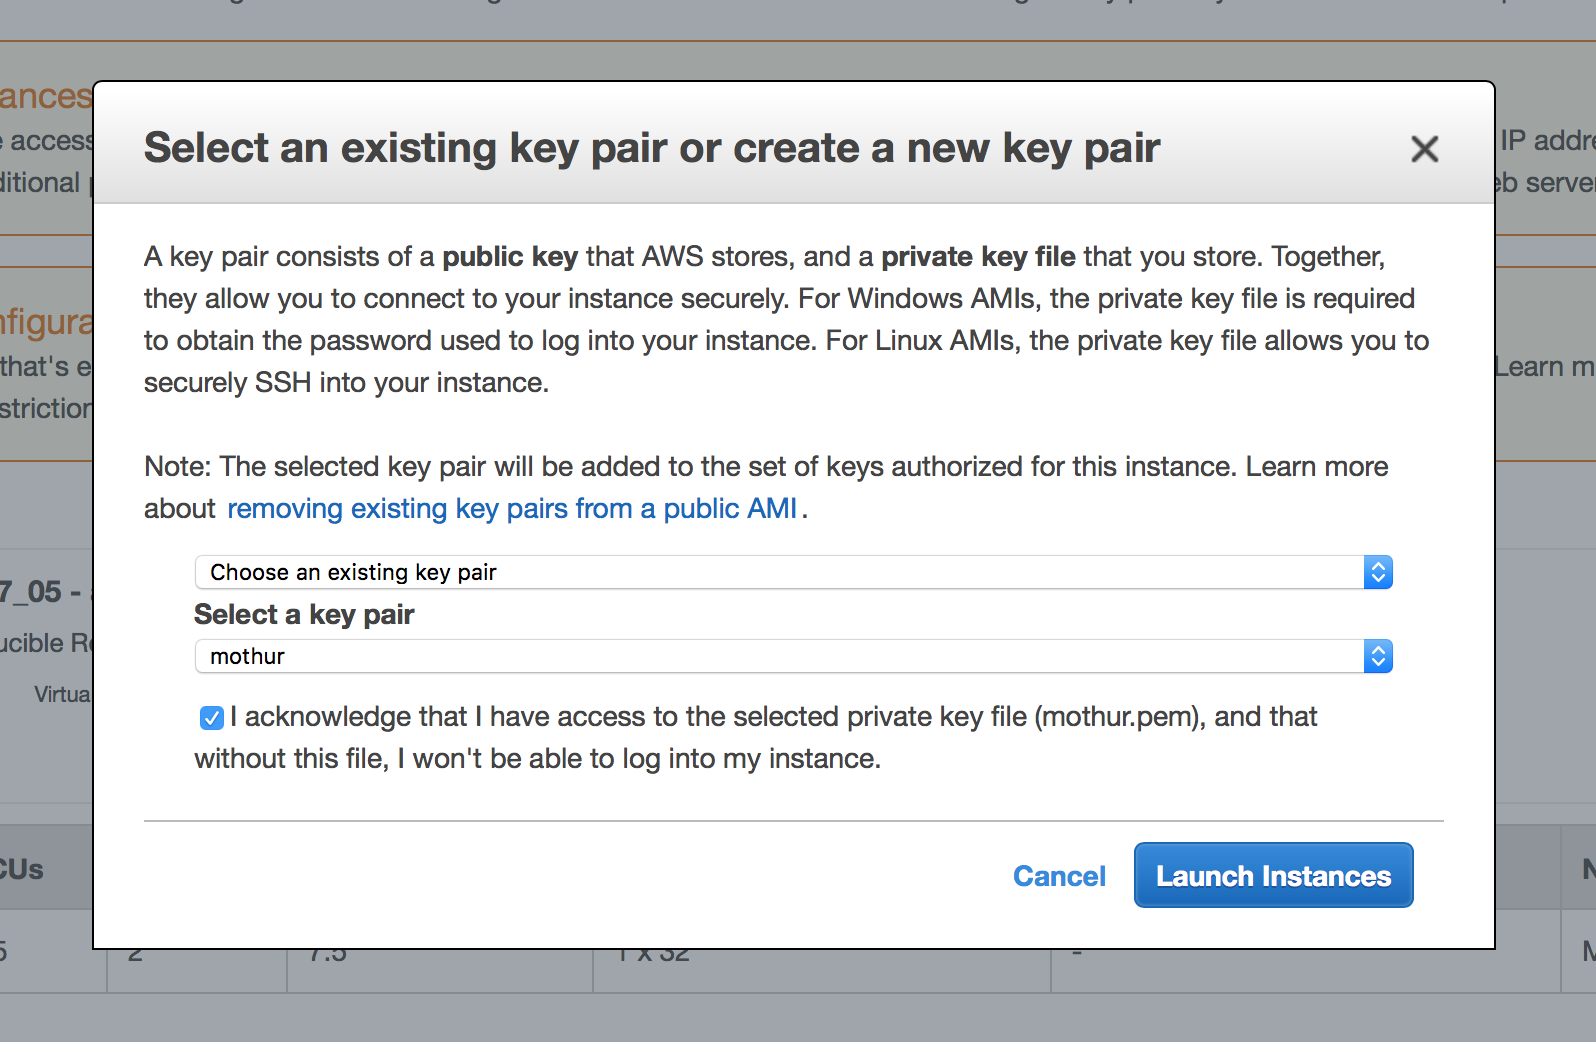
And so we're going to go ahead and click "Launch," and this pulls up the "Select an existing key pair" or "Create a new key pair." So here, go ahead and click your key pair, My Key Pair. Click that. And it says "I acknowledge that I have access to the selected private file, MyKeyPair.pem, that without this file, I won't be able to log into my instance."
So I'll click that. And then I'll go ahead and click "Launch instances," and my instances are now launching.
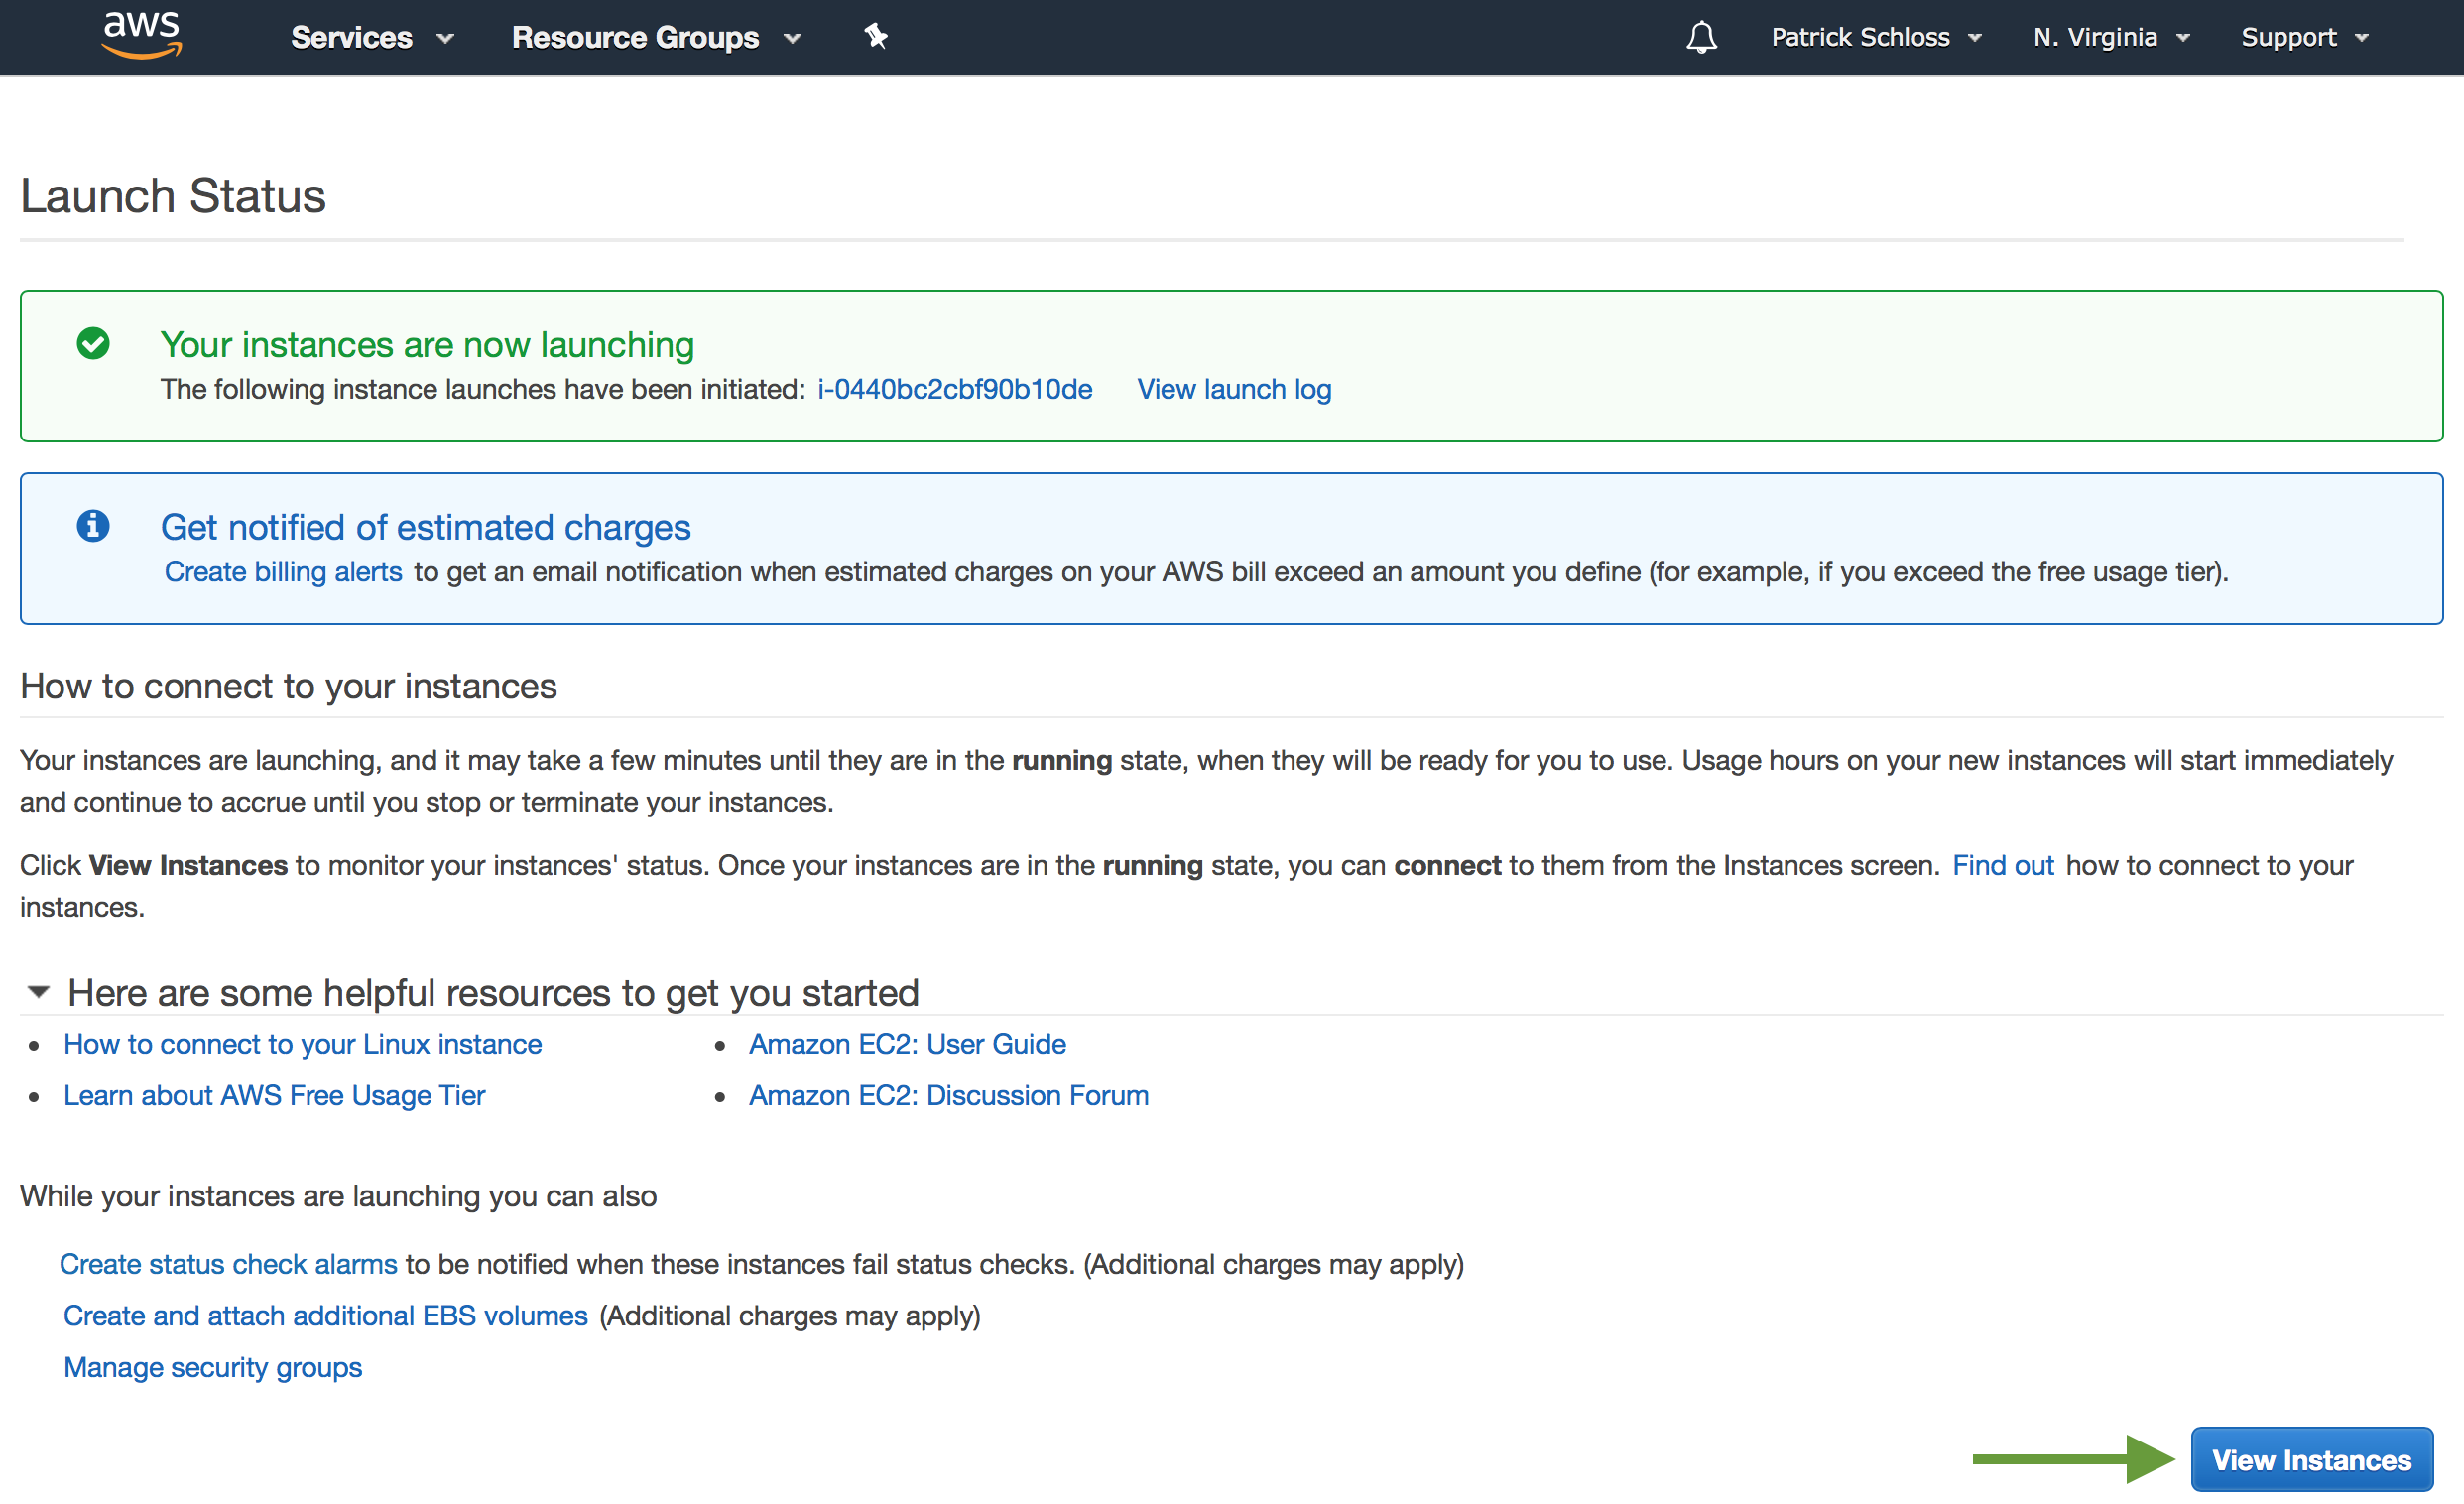
So I'm going to go ahead and click "View instances."
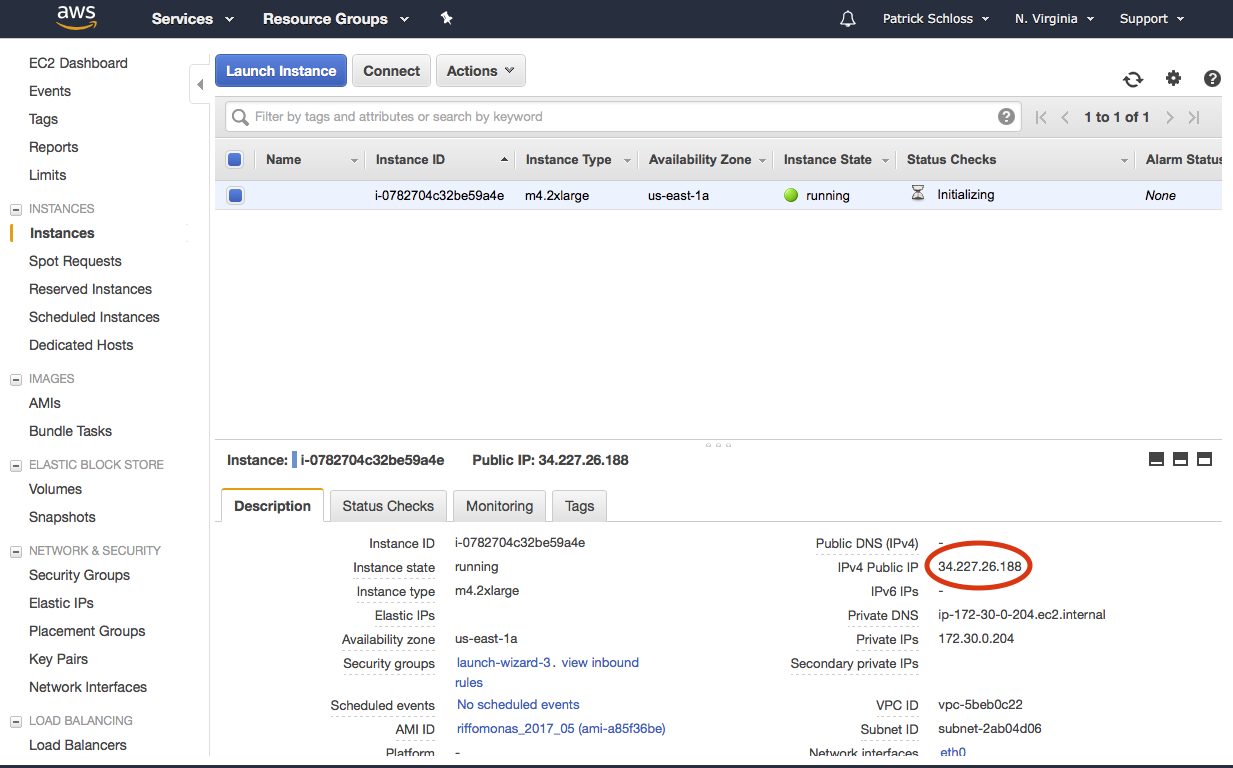
So this other one that we terminated, it may hang out there for a few hours. Might be for a day or two, but what's really important is that it's terminated. So if it says terminated, we don't need to worry about it. Our instance state for this new instance is pending. So now it says it's running, and I'm going to go ahead back to my terminal. Now, we want to be able to SSH into our instance, and to do that, the command will be very similar to what we did previously when we did the tutorial from the Amazon site.
Connecting
$ ssh -i ~/.ssh/mothur.pem ubuntu@54.90.95.116The authenticity of host '54.90.95.116 (54.90.95.116)' can't be established.ECDSA key fingerprint is SHA256:wE5Nlhu+JLSYp7qWYjQKWwsVbc6Imd26fUN0htxEP+Q.Are you sure you want to continue connecting (yes/no)? yesWarning: Permanently added '54.90.95.116' (ECDSA) to the list of known hosts.Welcome to Ubuntu 16.04.2 LTS (GNU/Linux 4.4.0-1016-aws x86_64)- May get warnings about packages being out of date...
$ sudo apt upgrade- May get a comment about needing to restart instance
- Go back to instance dashboard"Action -> Instance State -> Reboot"
We'll type ssh -i ~/-.ssh/my and then I'll hit Tab and it'll complete it for me.
And then we need a username which, for everybody during the tutorial will be ubuntu@. And then we want to come to our instance window and highlight the IP address, right-click copy, right-click paste into our terminal window and hit Enter.
It gives us this question about the authenticity of the host. We can say yes. It then says that there are some packages that can be updated and some security updates, that there will be a system restart required. So we can do sudo apt upgrade. It then says, "Do you want to continue?"
And we'll say Y for yes, It then runs through all this. Great. So it finished installing all that stuff, various security patches, and other things that it needed to upgrade to run well.
There were a couple points in there where it asked us a couple questions and I just hit Enter or Y for each of those, and you should do the same. So at this point, we need to restart our instance as it told us when we…before we went to update all of those tools. So what we'll do now is we'll type exit from our terminal which brings us back to our home directory on our local computer.
And here, now, in our instance window, we can now do action. Where's the action? Action's up here. Actions. And we can then do Instance State, Reboot. So this is clicked, our m4.2xlarge instance type.
We'll do Actions, Instance State, Reboot. Are you sure you want to reboot these instances? Yes, reboot. And we should be good. So now, let's go ahead and log back in, and so see if you can remember.
So it's ssh -i ~/.ssh/MyKeyPair.pem, ubuntu@, and then I'm going to copy this again, paste it in, and we're good to go.
You should see that it says zero packages can be updated, zero updates are security updates. Great. So if we type ls, there's nothing there. One of the things you might type is R and this will open up the R software package within Amazon.
So this is on our Amazon directory or Amazon instance. We can quit R by doing q(), and so that's great. You'll know that you're on the Amazon instance because in the lower-left corner here, it should say Ubuntu. And so you should see a little bit different configuration of what things look like in your terminal.
tmux
- You might have a job that needs to run for a long period of time
- Power could go out
- Internet might drop you
- You might want to move computer
- Instead, run the interactive job in the background using the
tmuxprogram
So when you're running things remotely on the Amazon server, we might have analyses that take a long time to run, or we might need to…and so because they're going to take a long time to run, we don't want to have to have our computer connected to the internet or running locally for all that time.
And so there's a nice tool called tmux that we can use, and tmux is useful for those cases where you've got a long job where you might want to disconnect from the internet. Say it's the end of the day and you want to put your laptop in your backpack to go home but that means then disconnecting from the internet and perhaps disconnecting your Amazon connection.
So tmux allows you to run…to keep those remote jobs running even if your local computer is not running.
tmux
tmux: Start a sessionControl-b d: Detach from current sessiontmux ls: List existing tmux sessionstmux aortmux a #0: Attach a specified session- There are many other commands and features for use wiht
tmux, but these will get you pretty far
So while we're in the Amazon instance, you can type tmux and this will then create a session. And we'll know that this is a tmux session, and again, we are still on Ubuntu as you see in the upper-left corner there, the way you know that it's tmux is that we've got this green band across the bottom of the screen.
And so I could type R to load the R program, and you'll see that we're in the R shell. To get out of R, I can then type Ctrl+B, remove my fingers from Ctrl and B and hit D, and that then brings me back to my terminal. To get back to that session, I can then type tmux a, and that brings me right back to where I was.
So again, to get out of this, we hit Ctrl+B and then D, and then tmux a gets us back in. So I could type exit. I'm disconnected from Amazon. If I hit the Up arrow, that will bring back the previous command. I can hit Enter. And then I can type tmux a, and voilà, I'm right back to that session that was still running even though I wasn't connected to Amazon.
So tmux is really powerful. There's a lot of great other tutorials out there. I'm going to go Ctrl+B, D. One other thing to know is tmux ls, and this lists the various tmux sessions that I have going, and you'll see this first one is zero. So I could do tmux 0 to open up that first session.
Because I only have one tmux session going, it doesn't really matter. It's going to take that first one. No, sorry. It's tmux a #0. And that brings us right back. So I can then quit this tmux session by quitting out of R, and then from this prompt, I can type exit, and that then gets me out of tmux.
So there's a lot of other commands and there's a lot of other things that you can do with tmux to run multiple sessions at the same time and to make sure that your analyses won't be ended if you quit Amazon. So if you're going to run something that's going to take a while, be sure you run tmux before you start those other commands.
Now what?
- You're using your own computer that is hosted by AWS
tmuxand rock on!- Moving data around...
- Later we'll see how to get data into your instance using
wgetandcurl - Can also use
sftpto pull things down and put them up ~ same syntax as ssh - Perhaps easiest way is to use the FileZilla client
- Later we'll see how to get data into your instance using
So now, we're using our own computer that's hosted by Amazon. We're using tmux and that allows us to then carry on even if we're not connected to the internet, even if we're asleep or wherever, and what we're going to talk about next is how we can use a program called FileZilla to connect our local computer to Amazon to move files back and forth.
Setting up FileZilla
- FileZilla can be run on Windows, Mac OS X, and Linux
- Download and install the appropriate version of FileZilla for your computer (You don't need the "Pro" version)
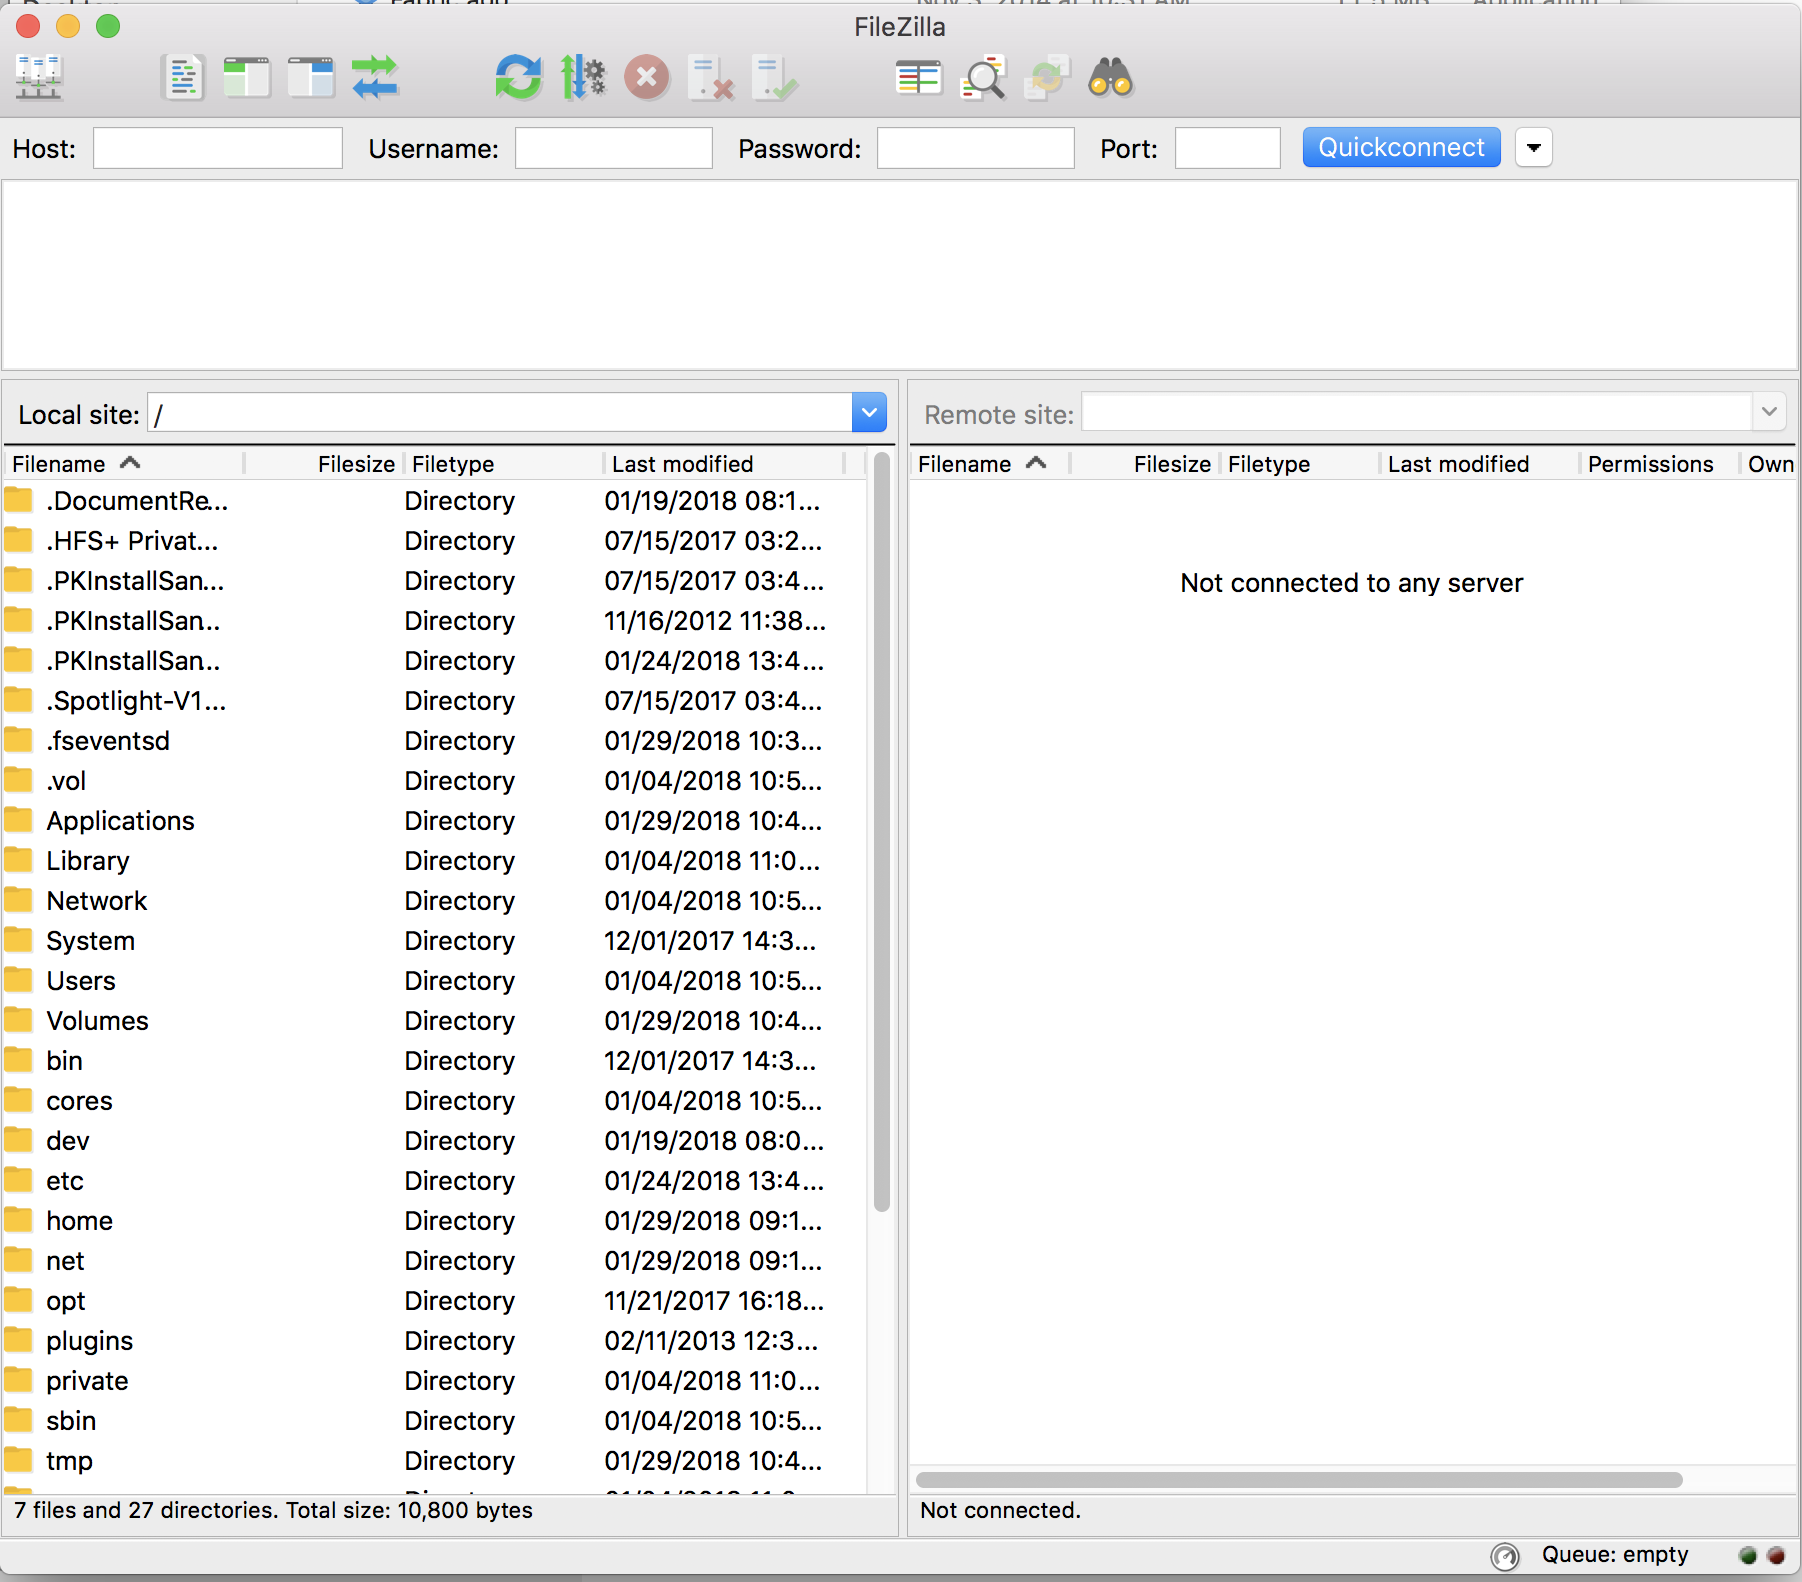
So to install FileZilla or to use it, we first need to install it. So I'm going to open up a new tab here, go to Google and type in FileZilla and it comes up as the top hit, at least on my browser, and you hit that.
And then that gives you a couple links to download the FileZilla client. And so this is the one we want, download FileZilla client, all platforms. Knows I'm using a Mac. There's other platforms for Windows and UNIX users. So download that. I don't want the pro version. I just need the freebie version.
Go ahead and click Download. It pulls that down pretty quickly and install it like you would any other piece of software on your computer and follow the instructions. I'm going to skip that. You don't need the freebie stuff they're trying to give you, just the FileZilla.
And so this now opens up FileZilla which we can use to work with a remote computer. And so it says, "The free open-source FTP solution." So FTP is a file transfer protocol, and we've got this nice interface that we can use to access our files from Amazon. So I'll go ahead and click OK to close that. I'm going to clean things up here, get rid of that. Drag this over to my trash. Great.
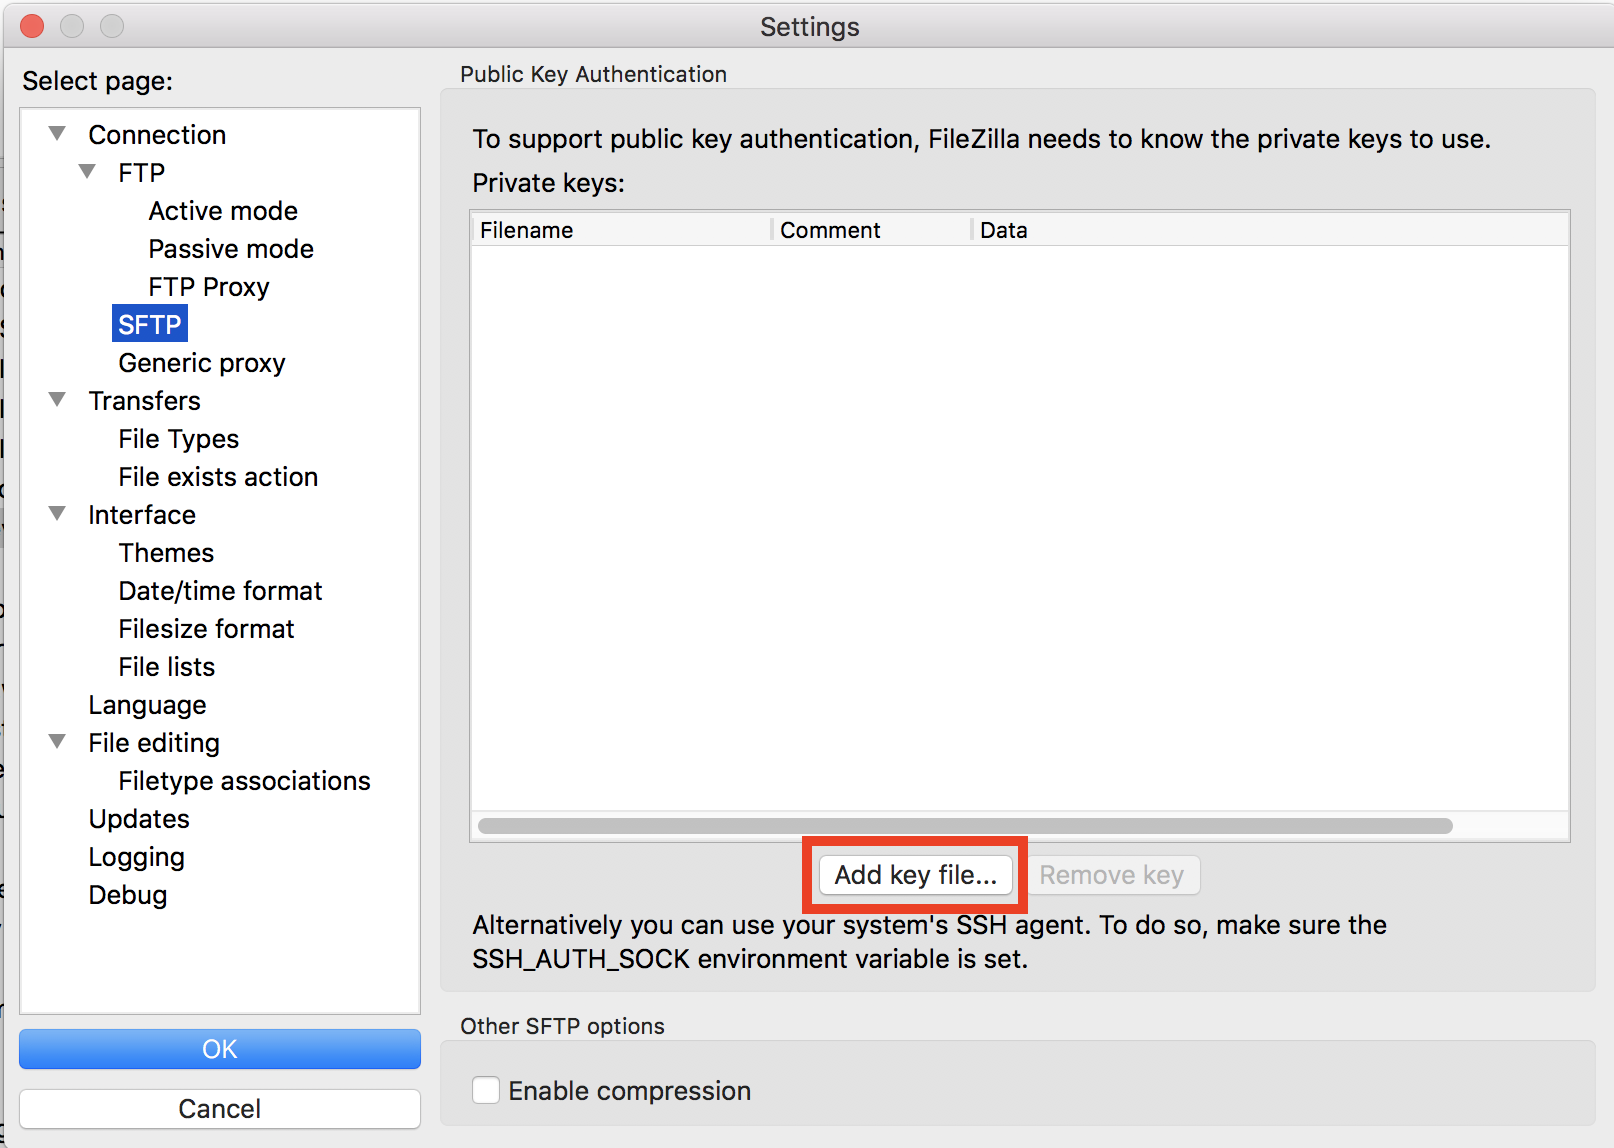
So the first thing we want to do is open our settings. And I'm going to…on a Mac, I can do this under FileZilla settings, and I'm going to click on SFTP. For some reason, I've got something here, but it says, "Could not load key file." I'm going to remove that. You probably don't have that. I'm going to then add a key file. So one of the problems with that .ssh file at least on a Mac is that Mac hides any file or directory that starts with a period.
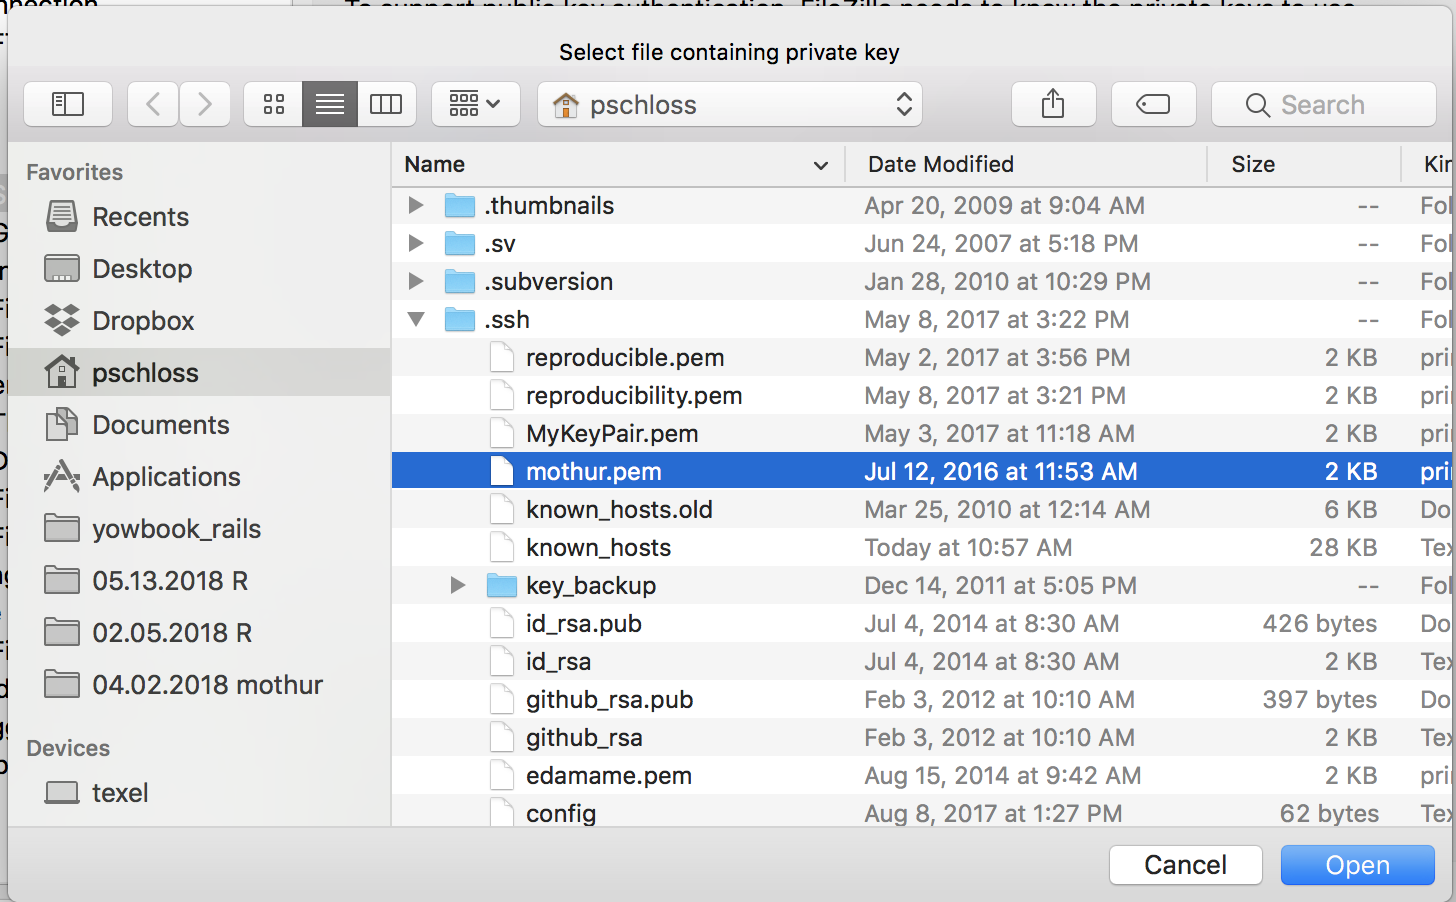
So on a Mac, to see those hidden directories or files, I can hold down the Cmd+Shift+. keys all at the same time, and voilà, that opens up. So Cmd+Shift+. allows me to see those hidden directories.
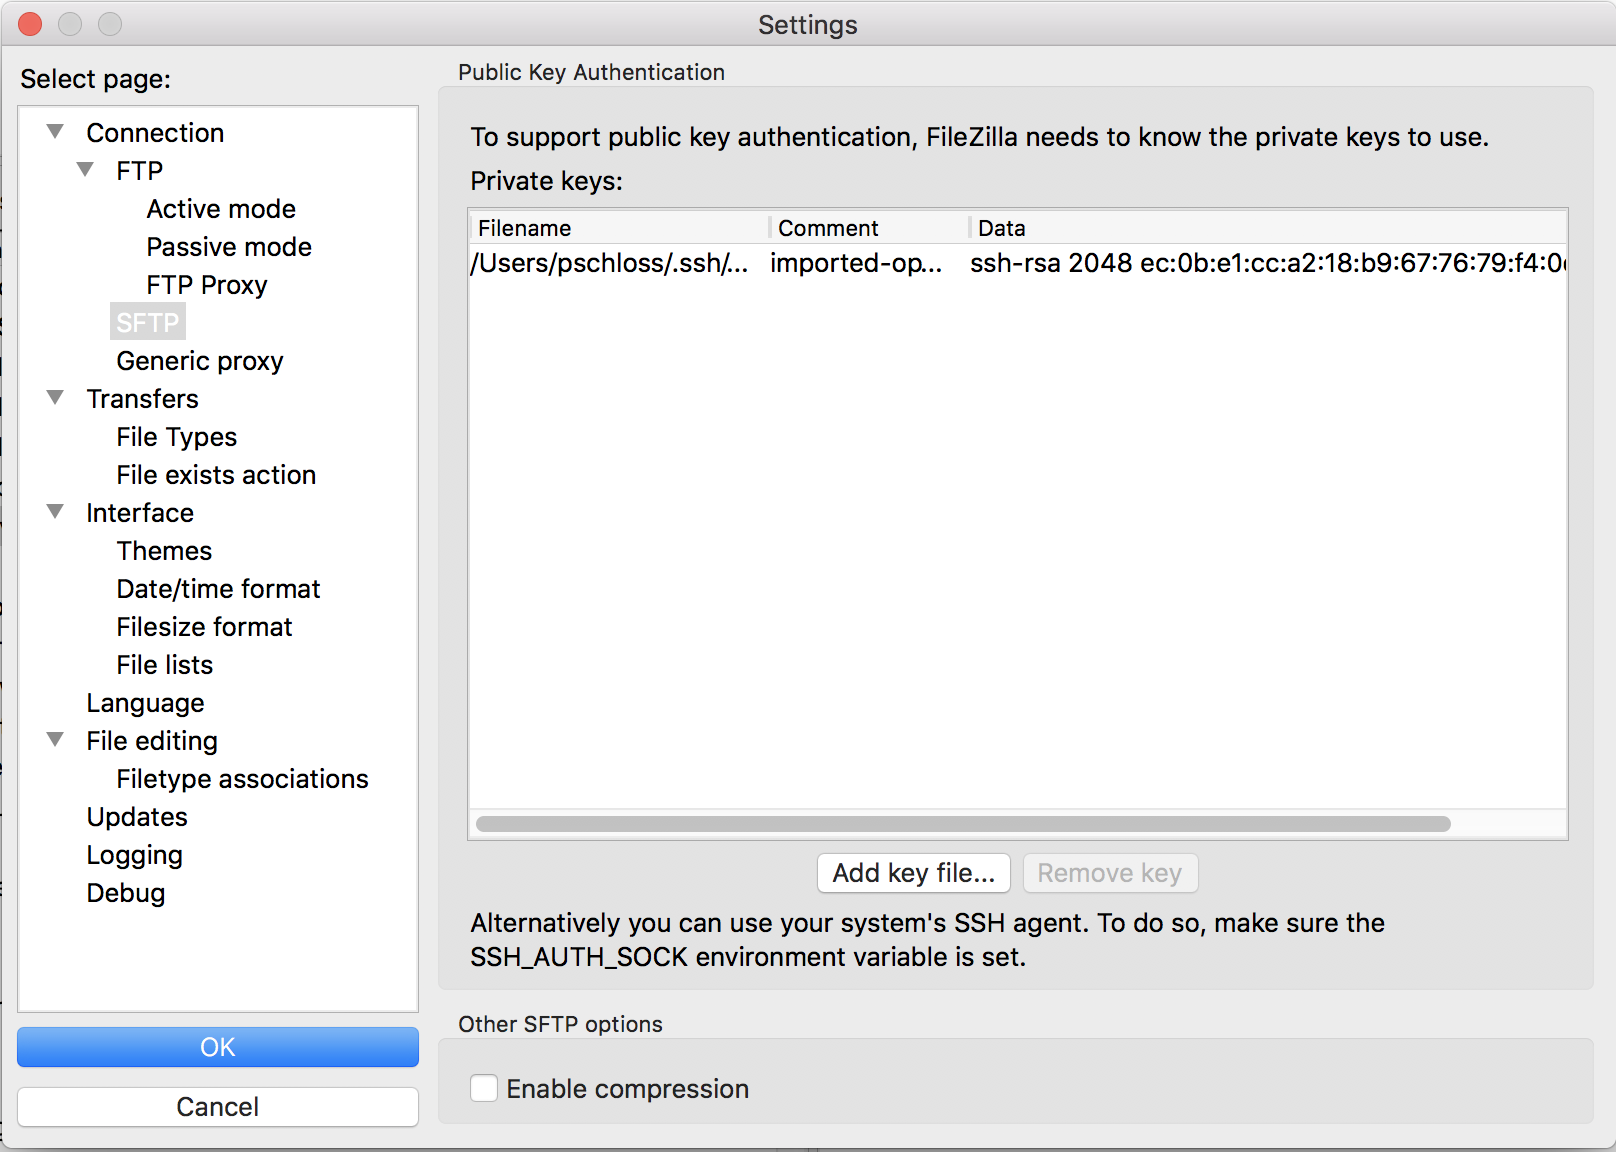
So I'm going to open up .ssh, and then I'm going to do MyKeyPair.pem, and I'm going to click Open. And that looks right.
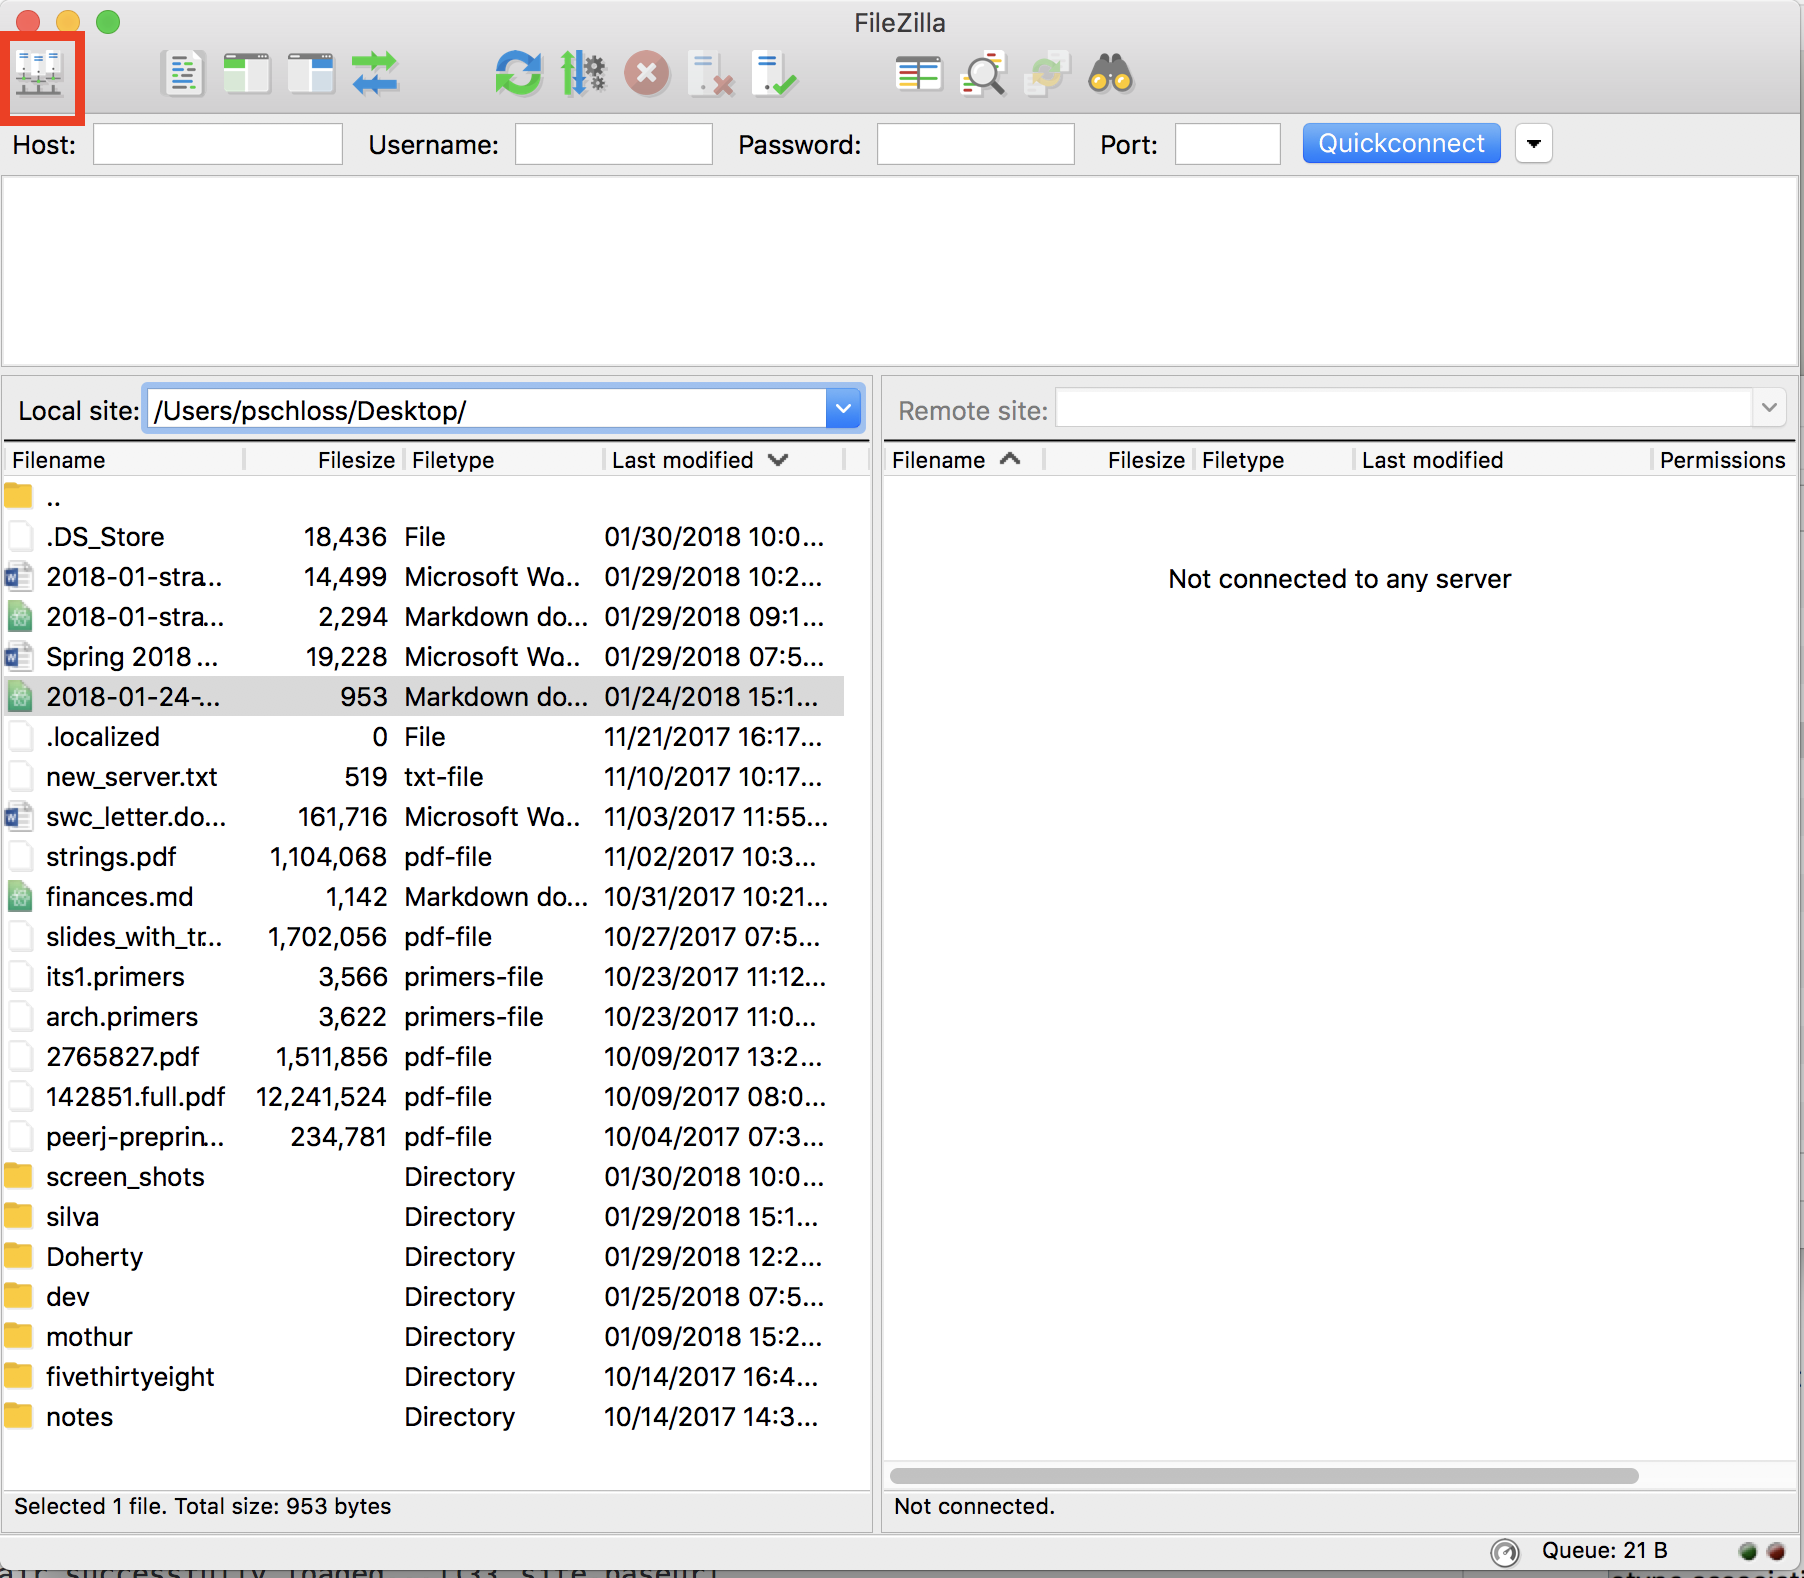
And so then I can click OK, and then up in the upper-left corner, there's this "Open the site manager," and I'm going to click on that.
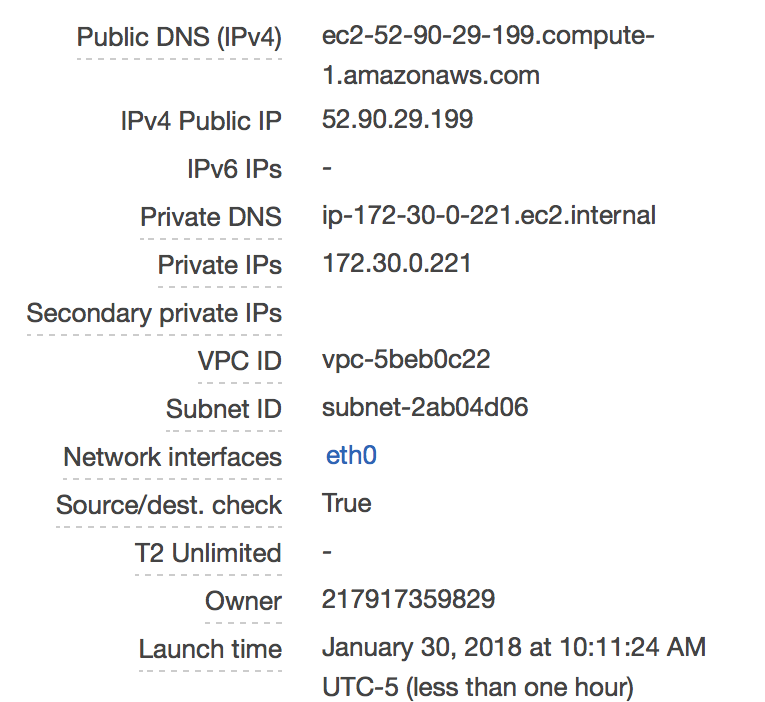
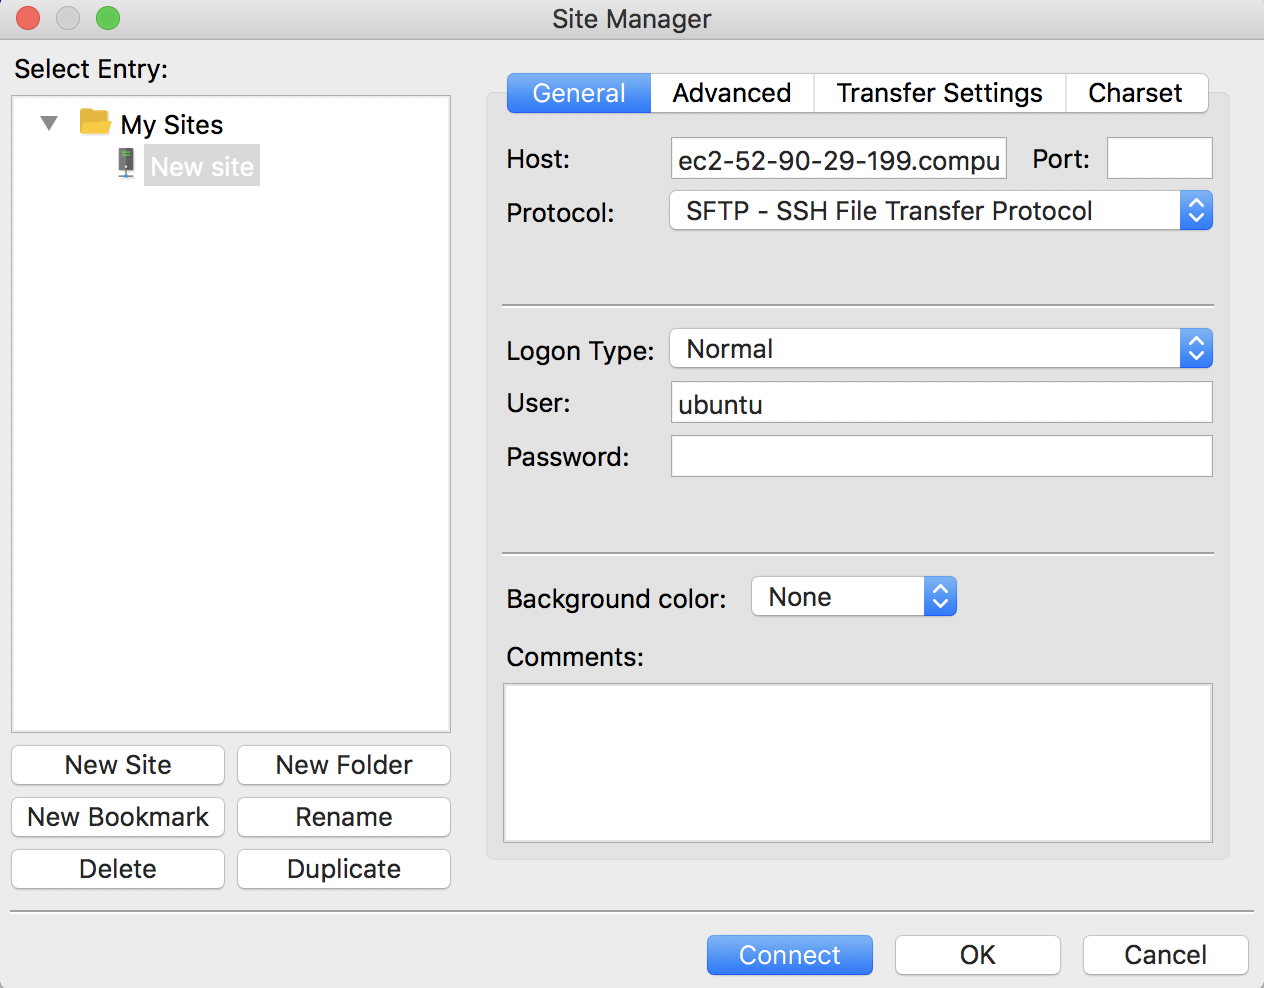
I'm going to go ahead and copy again my public IP address in there. I'm going to use the SFTP SSH File Transfer Protocol.
I'm going to log on Normal and the username, again, is Ubuntu. I'm not going to put anything in for the password. I want to say Connect. And so it says that, "As host key is unknown, you have no guarantee that this is the computer you think it is." I'm pretty confident. I'm going to always trust this host, and add this key to the cache.
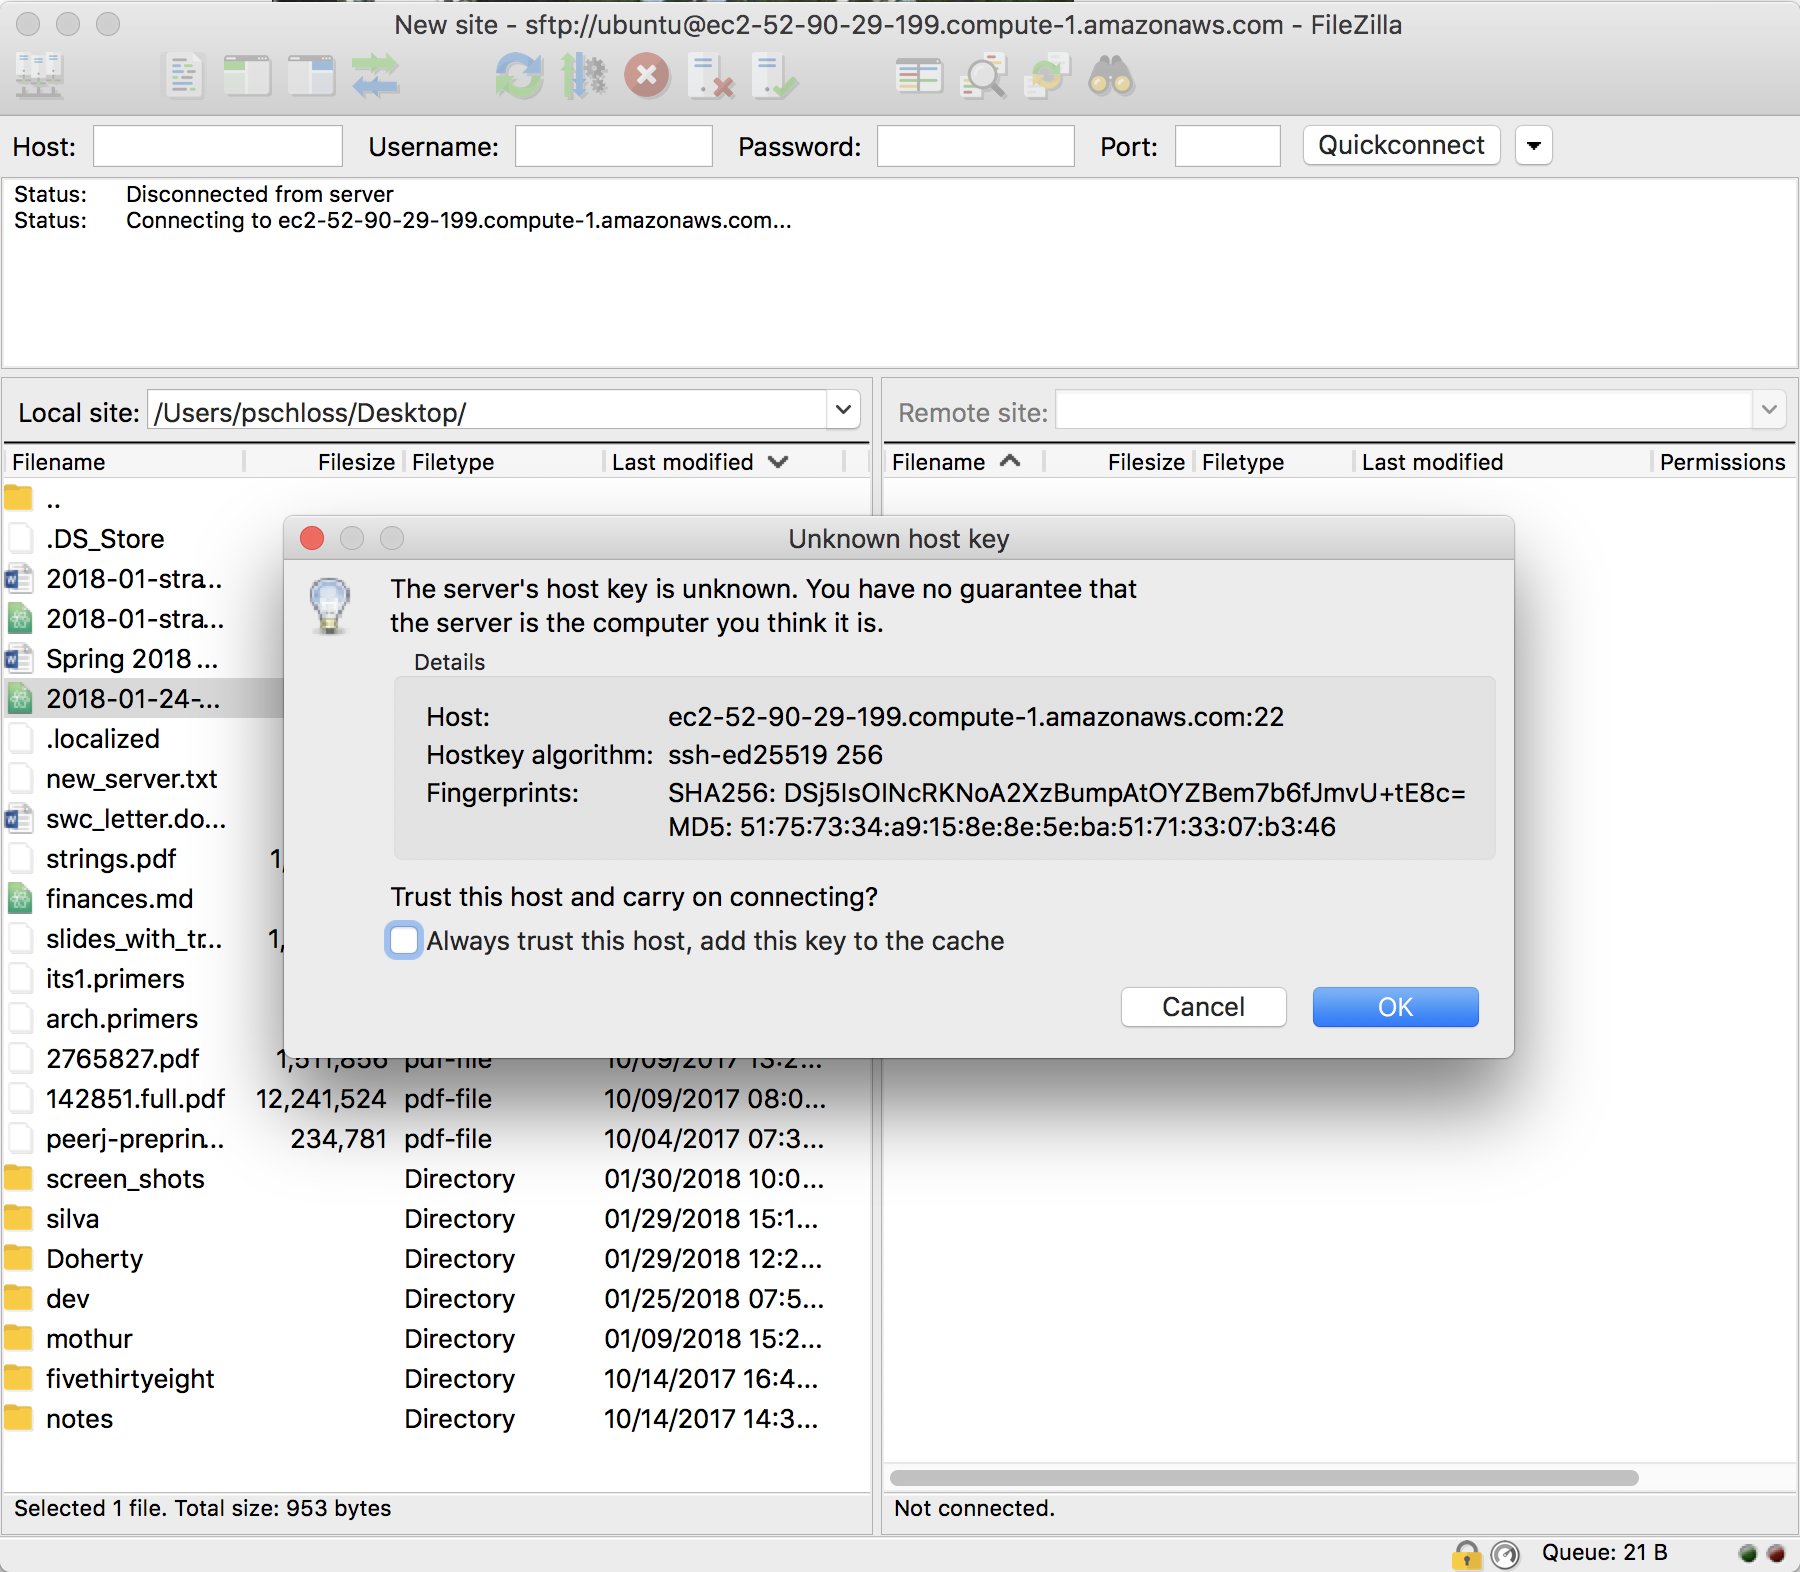
So I'll say OK. And so it's now a listing… "Directory listing of home ubuntu successful."
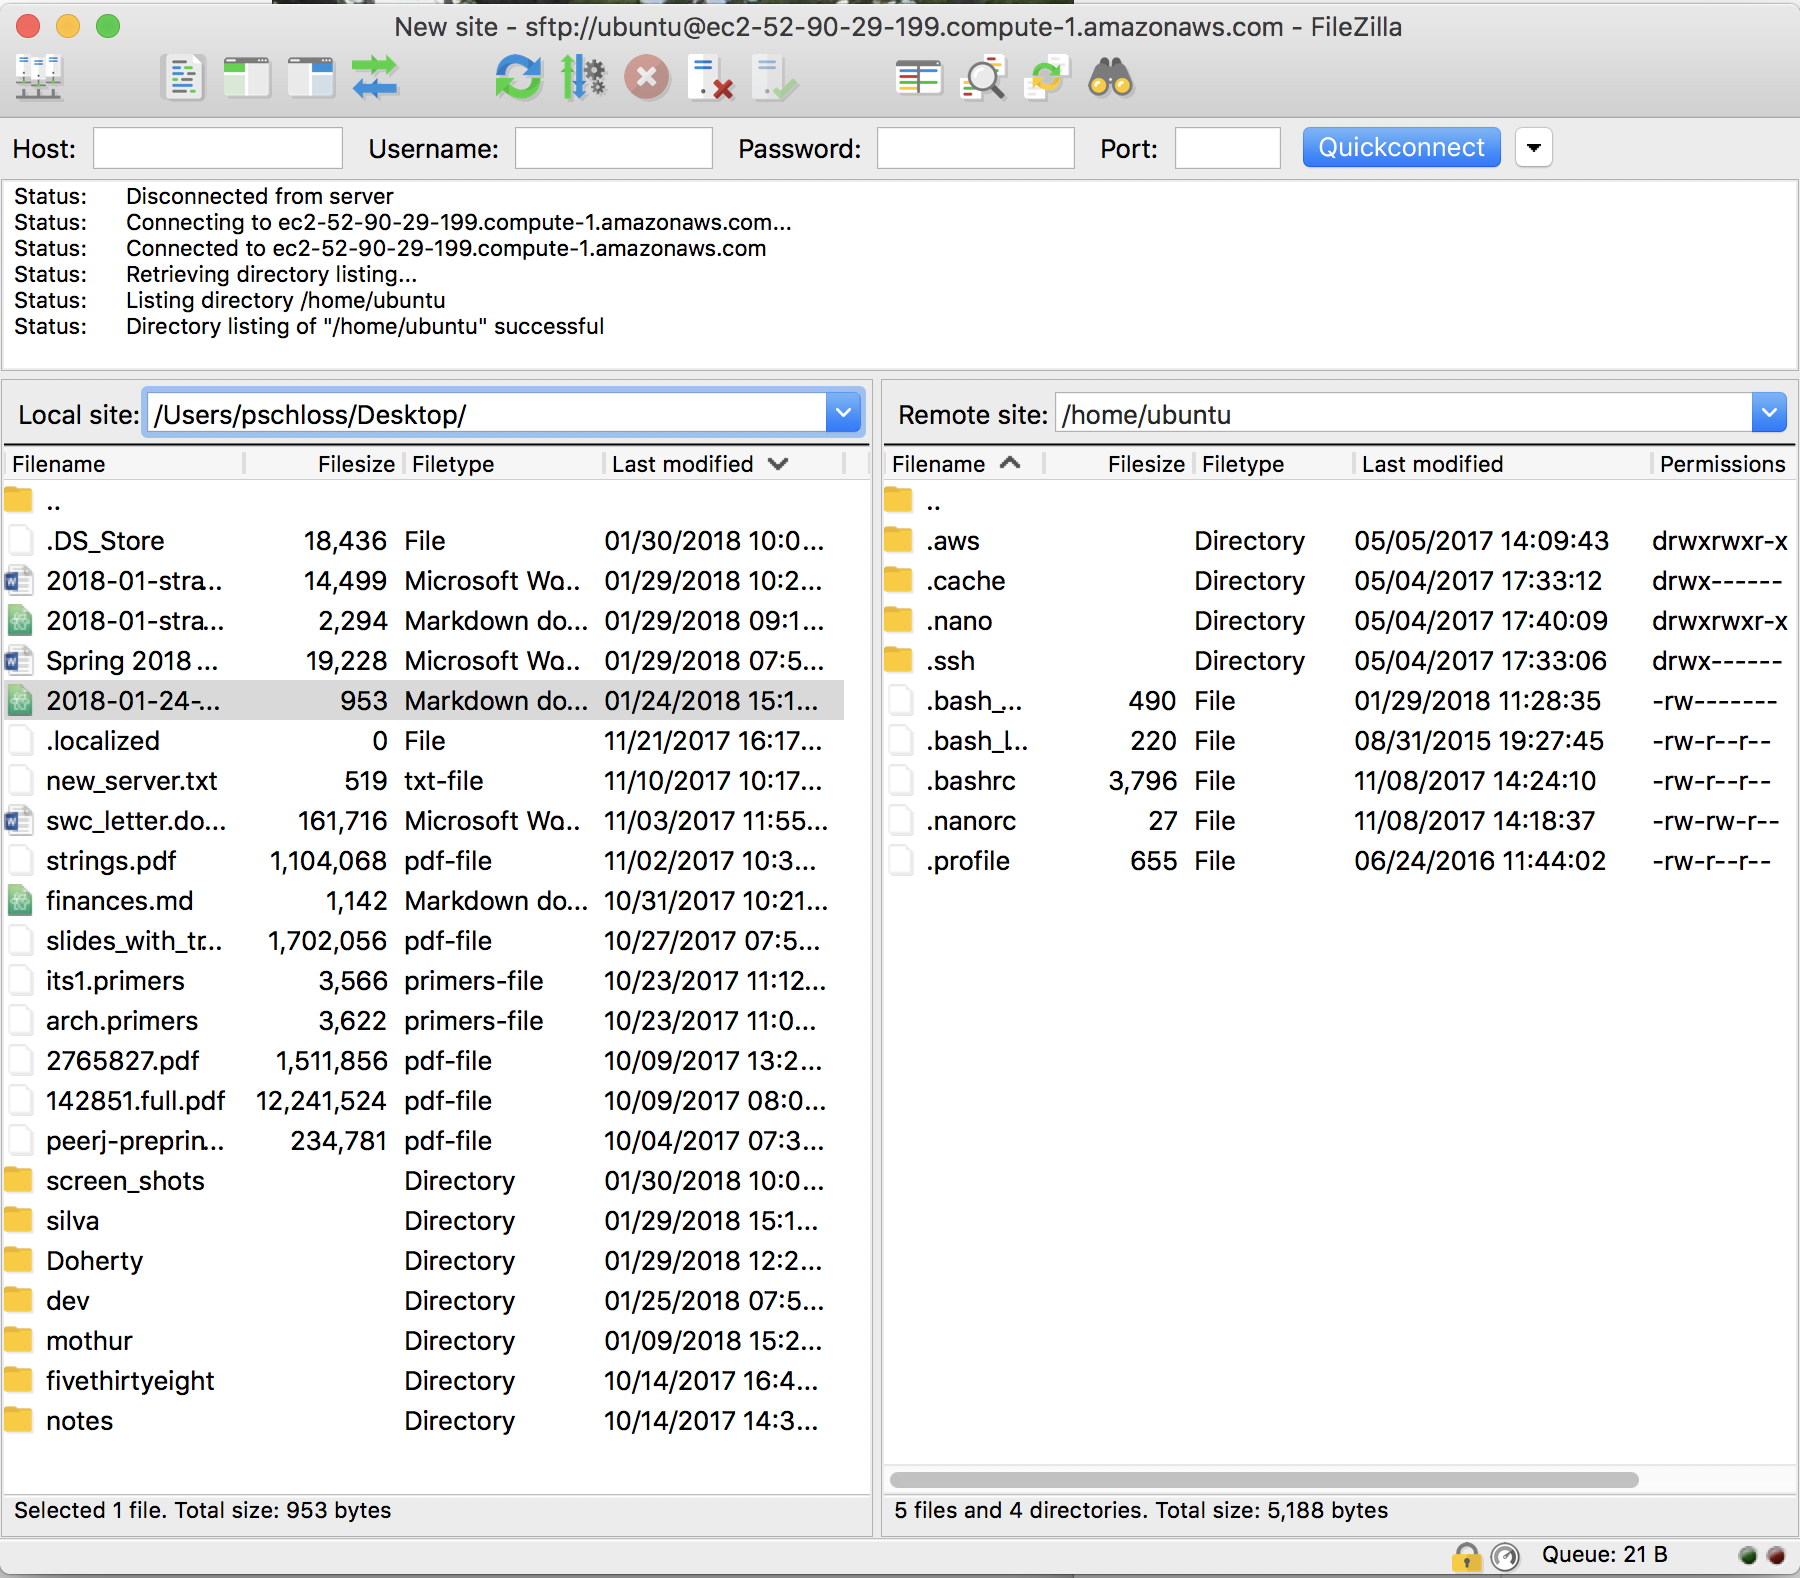
You might have a listing here that has the hidden files.
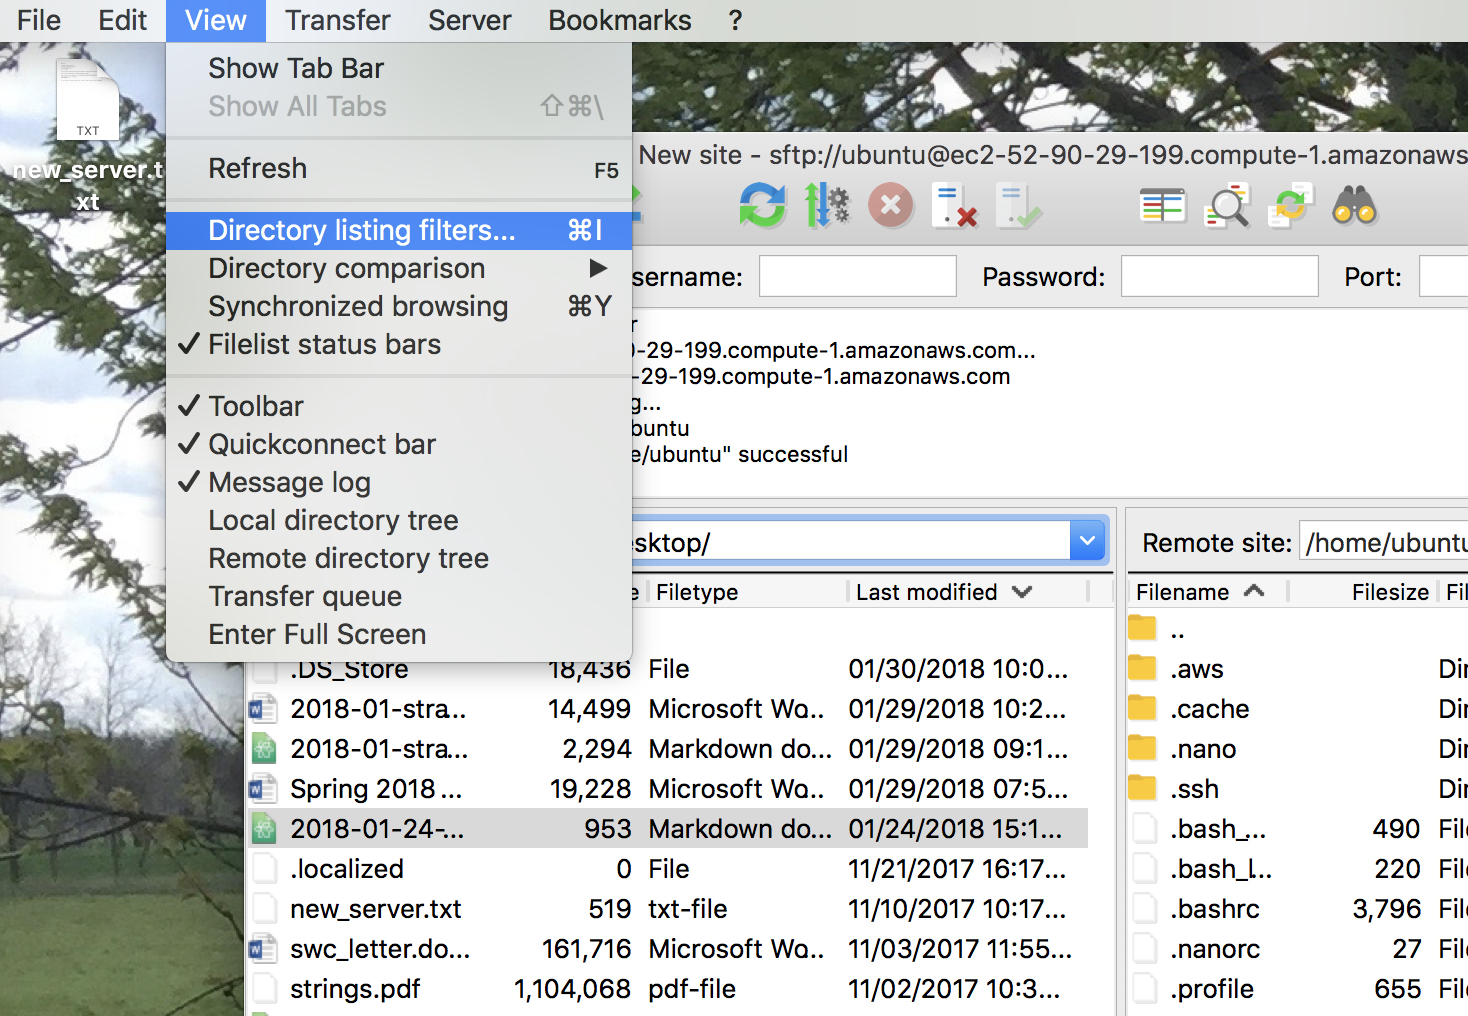
So to double-check that you don't see those, we are going to go up to View and go to Directory Listing Filters.
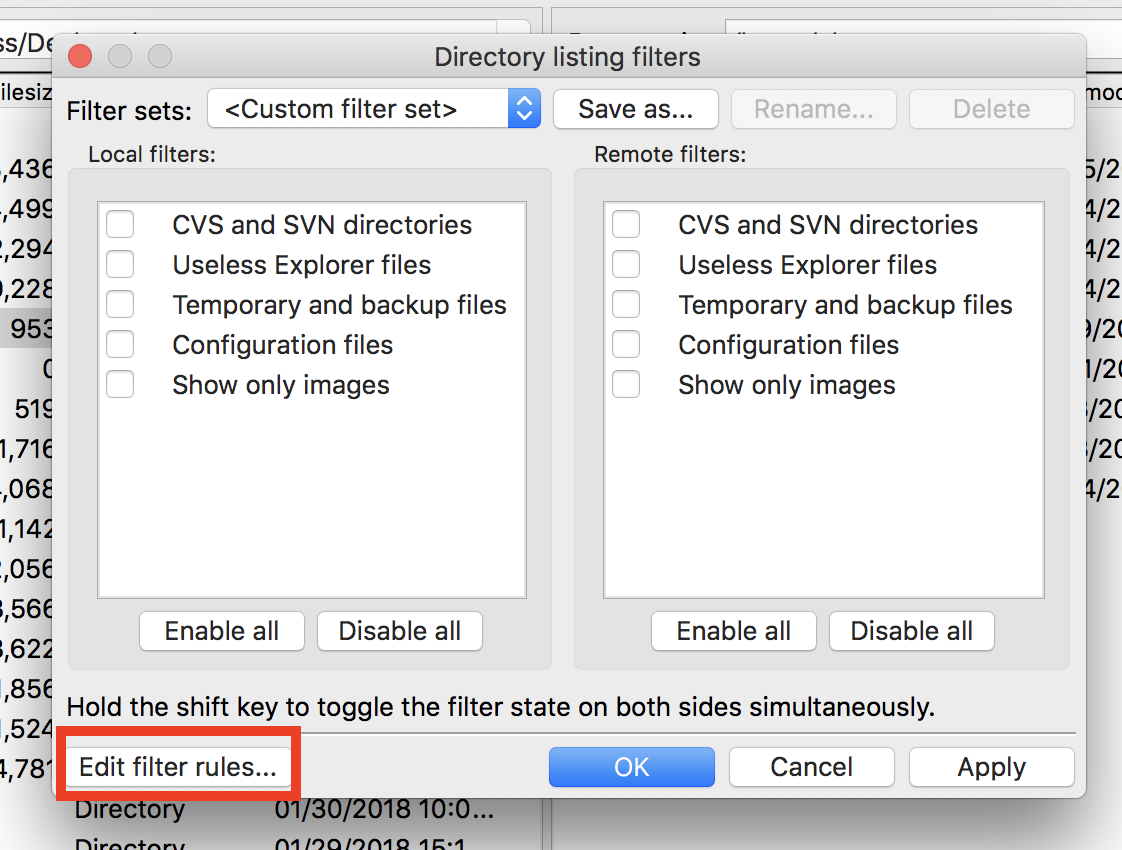
Yours probably looks like this. So we're going to edit filter rules.
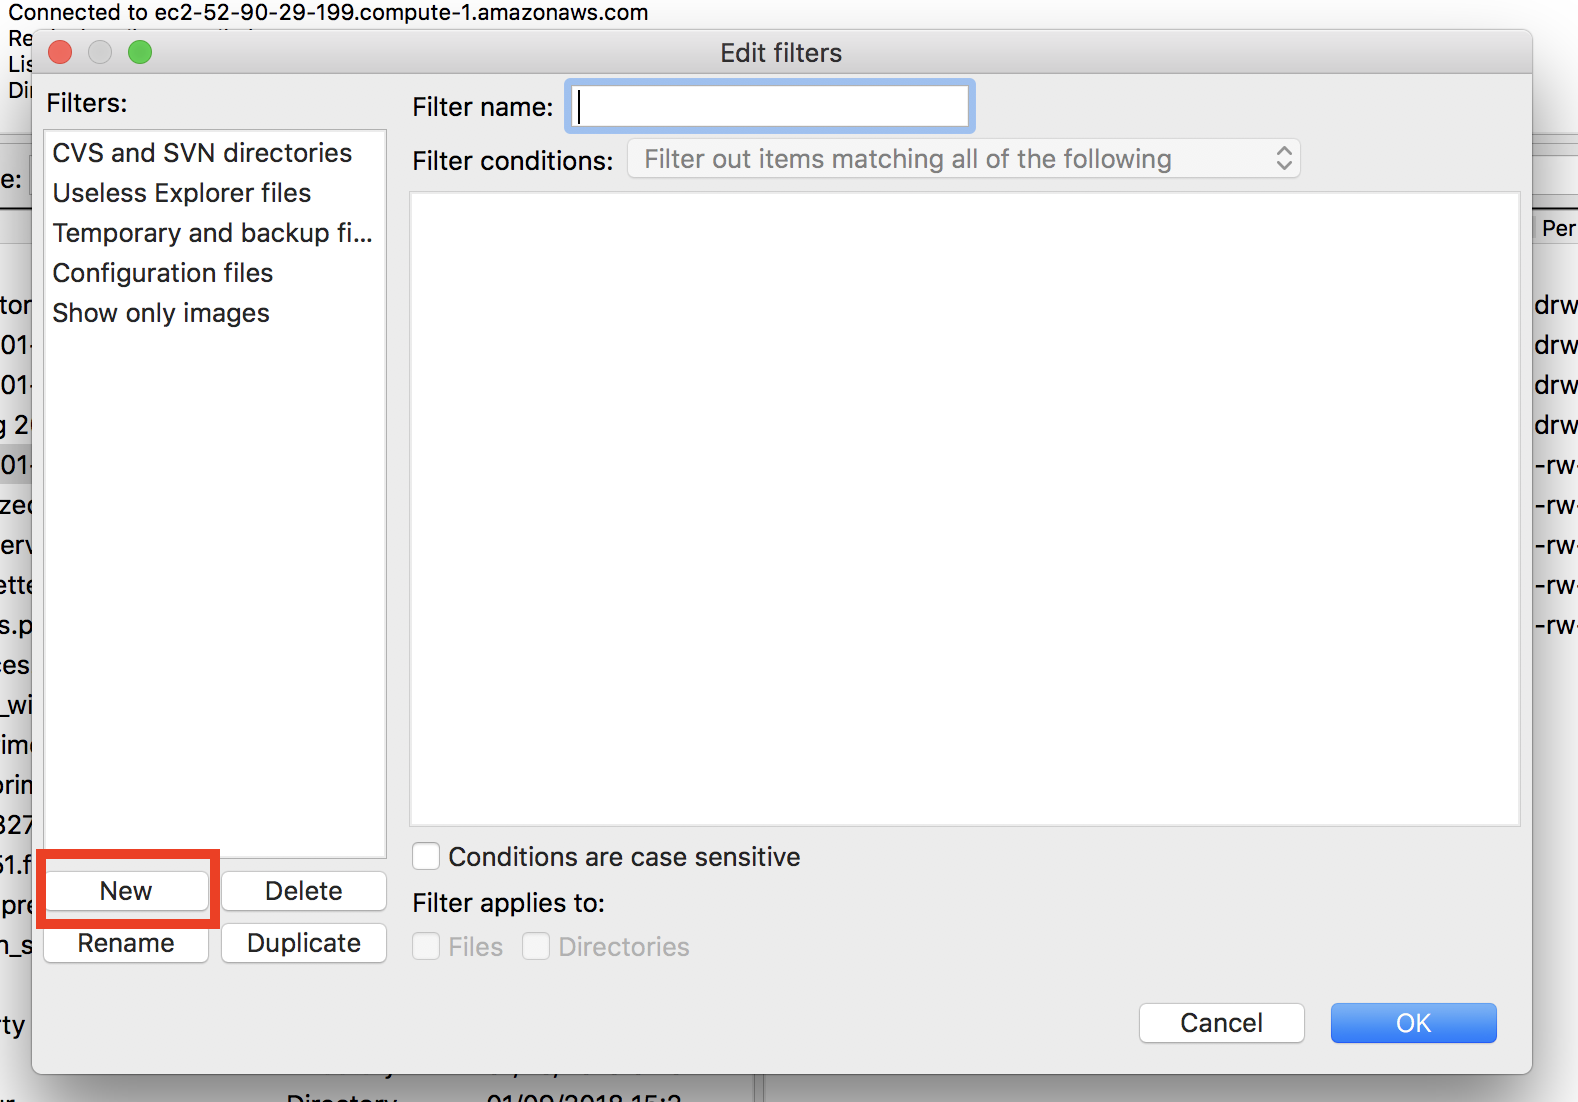
So I'll say New,
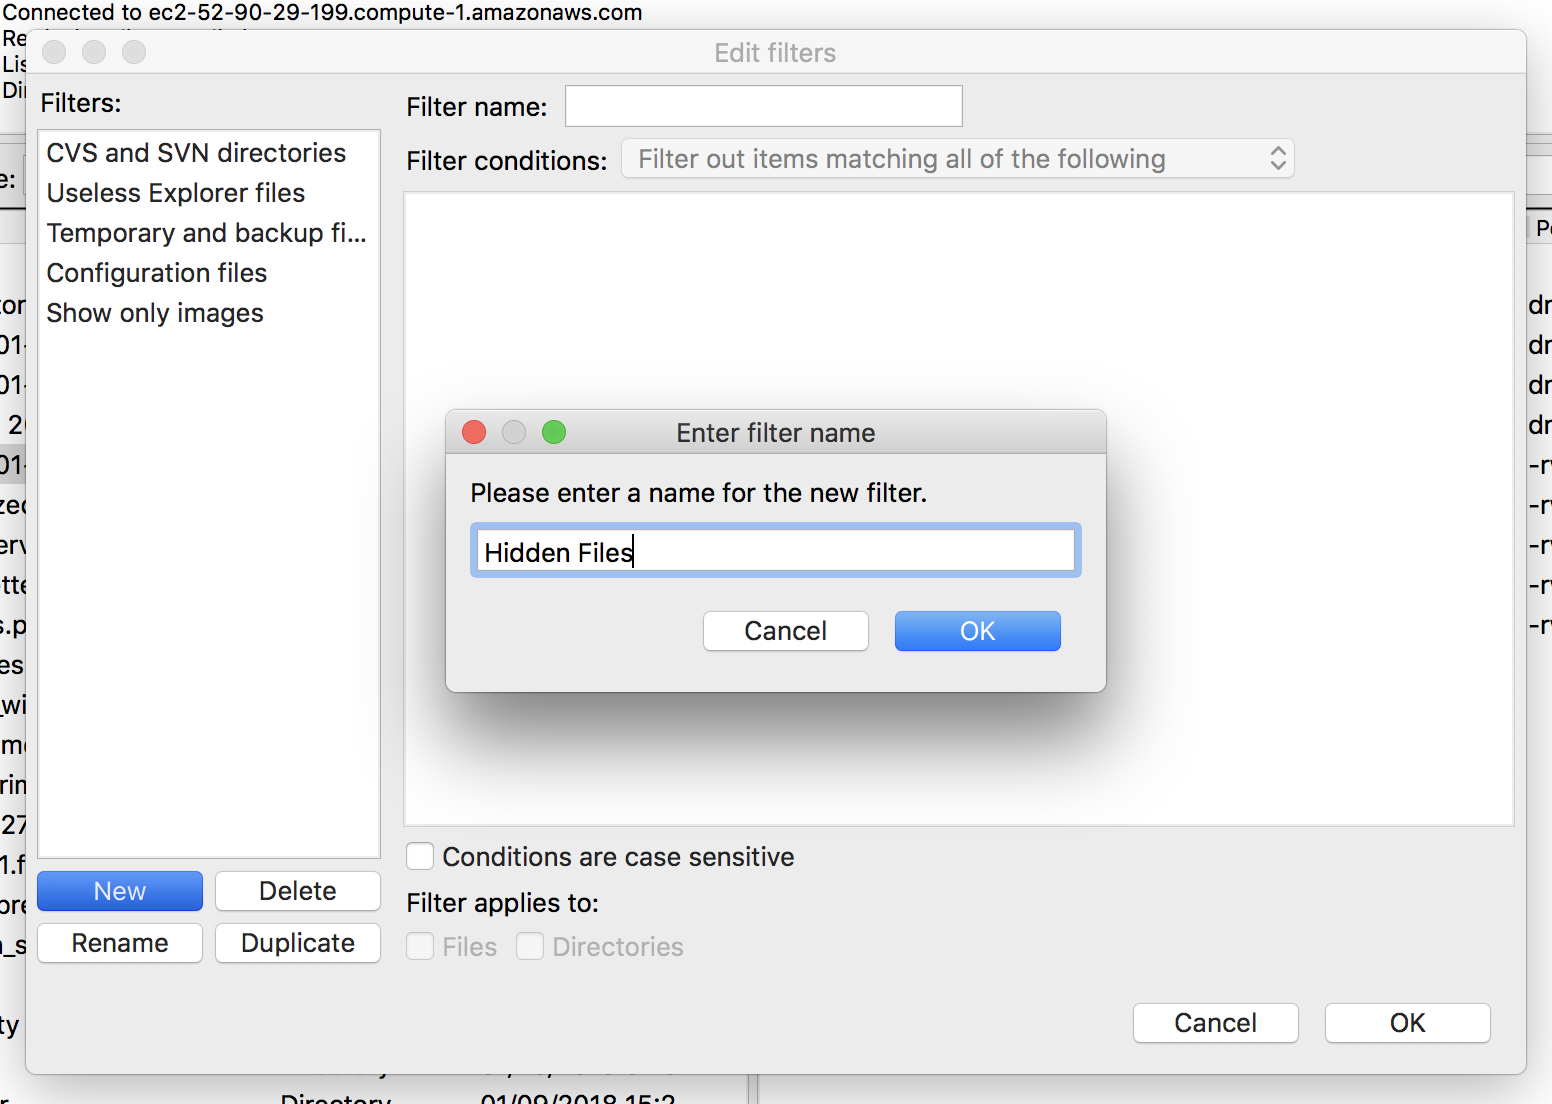
Hidden Files, and then click OK.
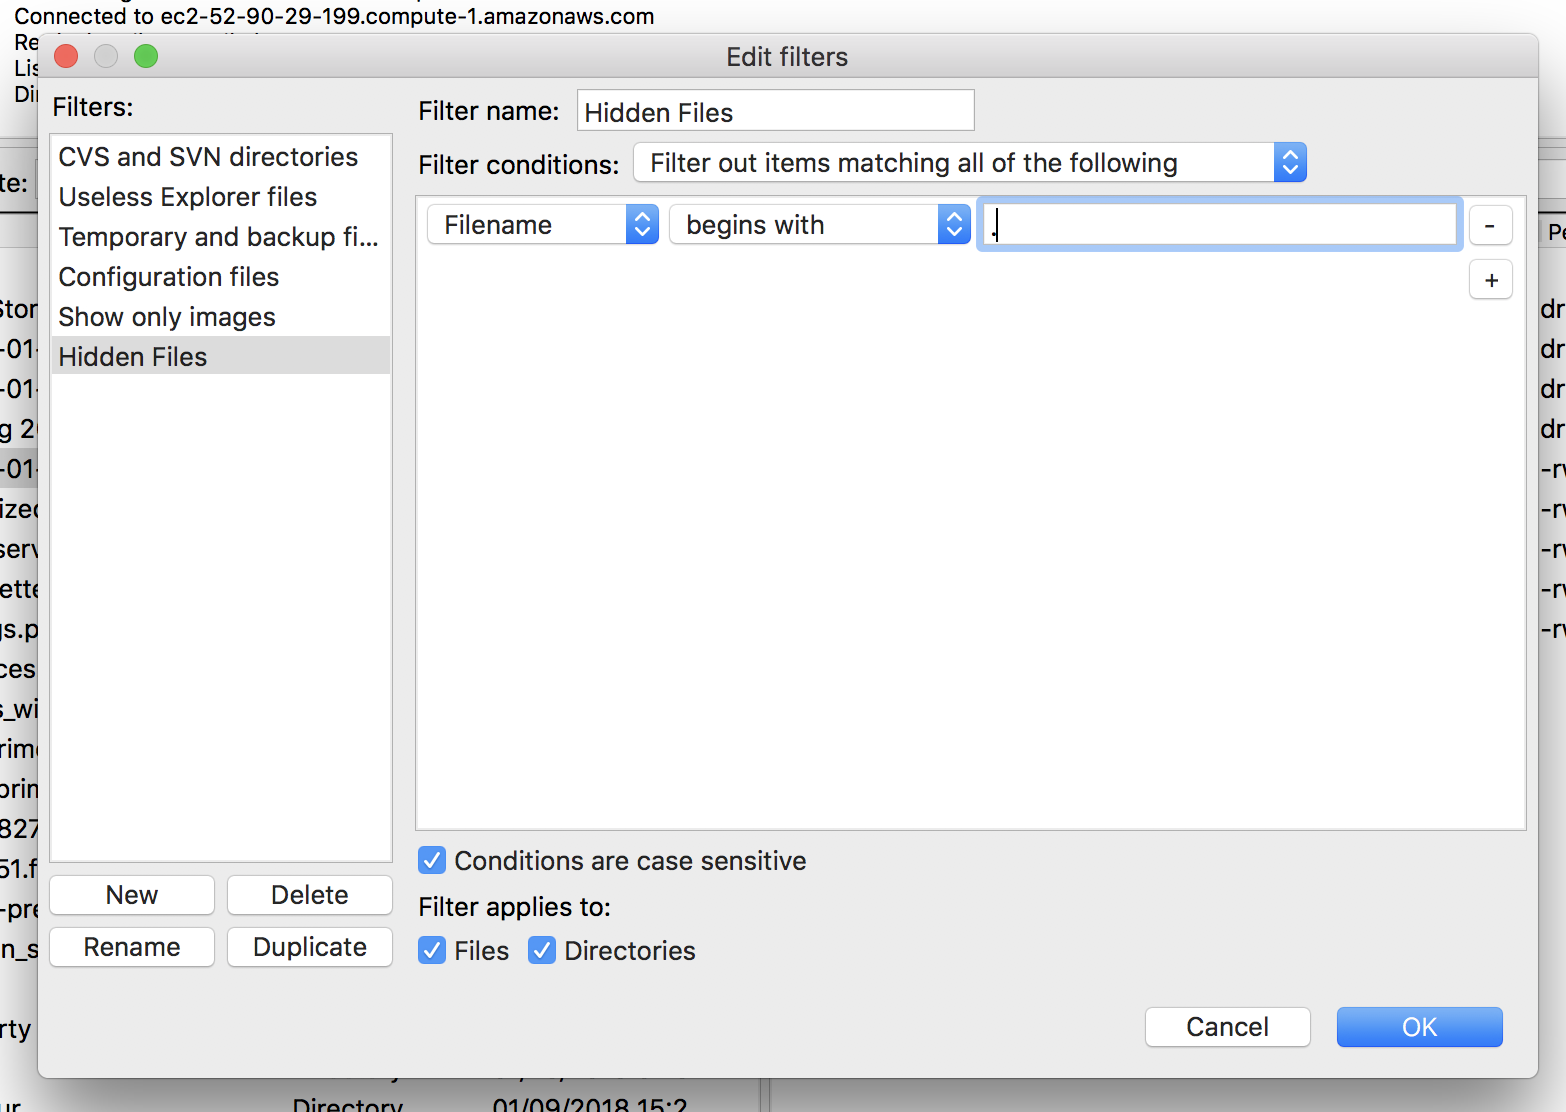
What I will then do is to say if the file name contains…well, I want that to change to "begins with" a period and I'm going to filter out items matching all of the following.
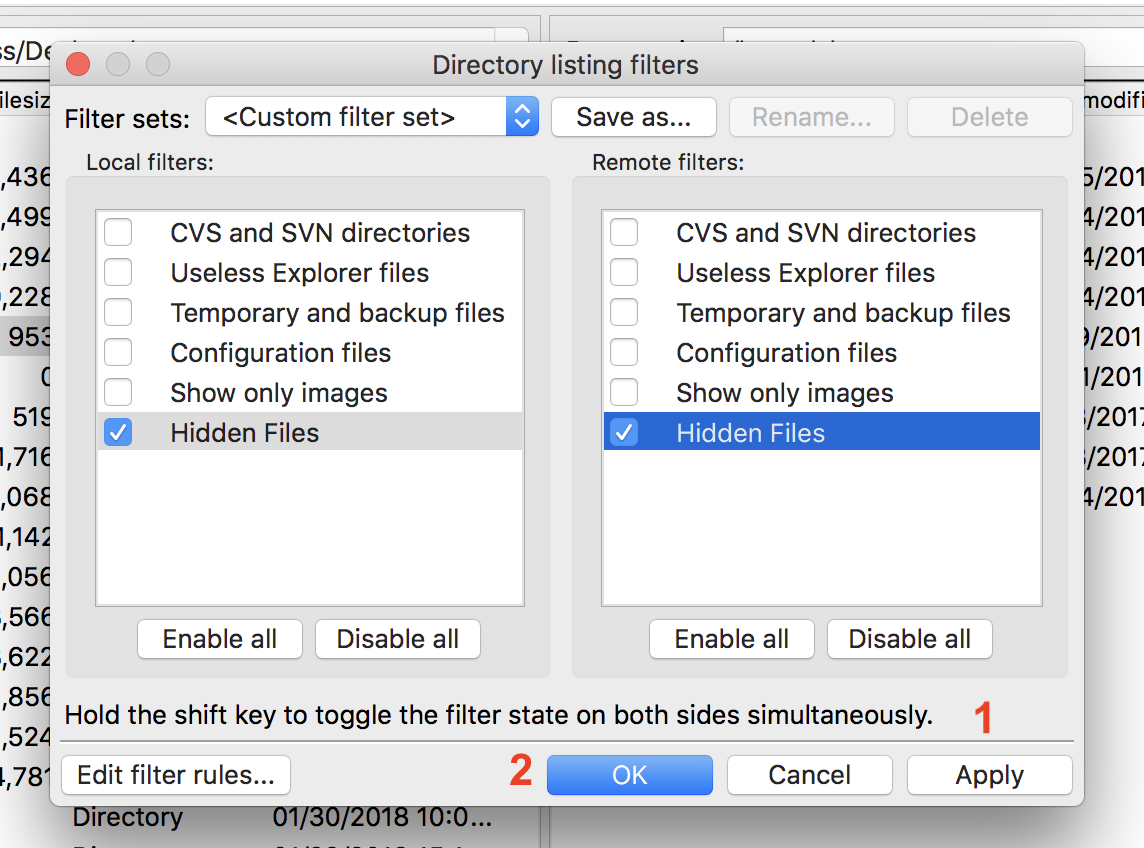
And so then I can say OK. And then I want to click Hidden Files and Hidden Files so that those are no longer seen. And so then I'm going to click Apply and then OK.
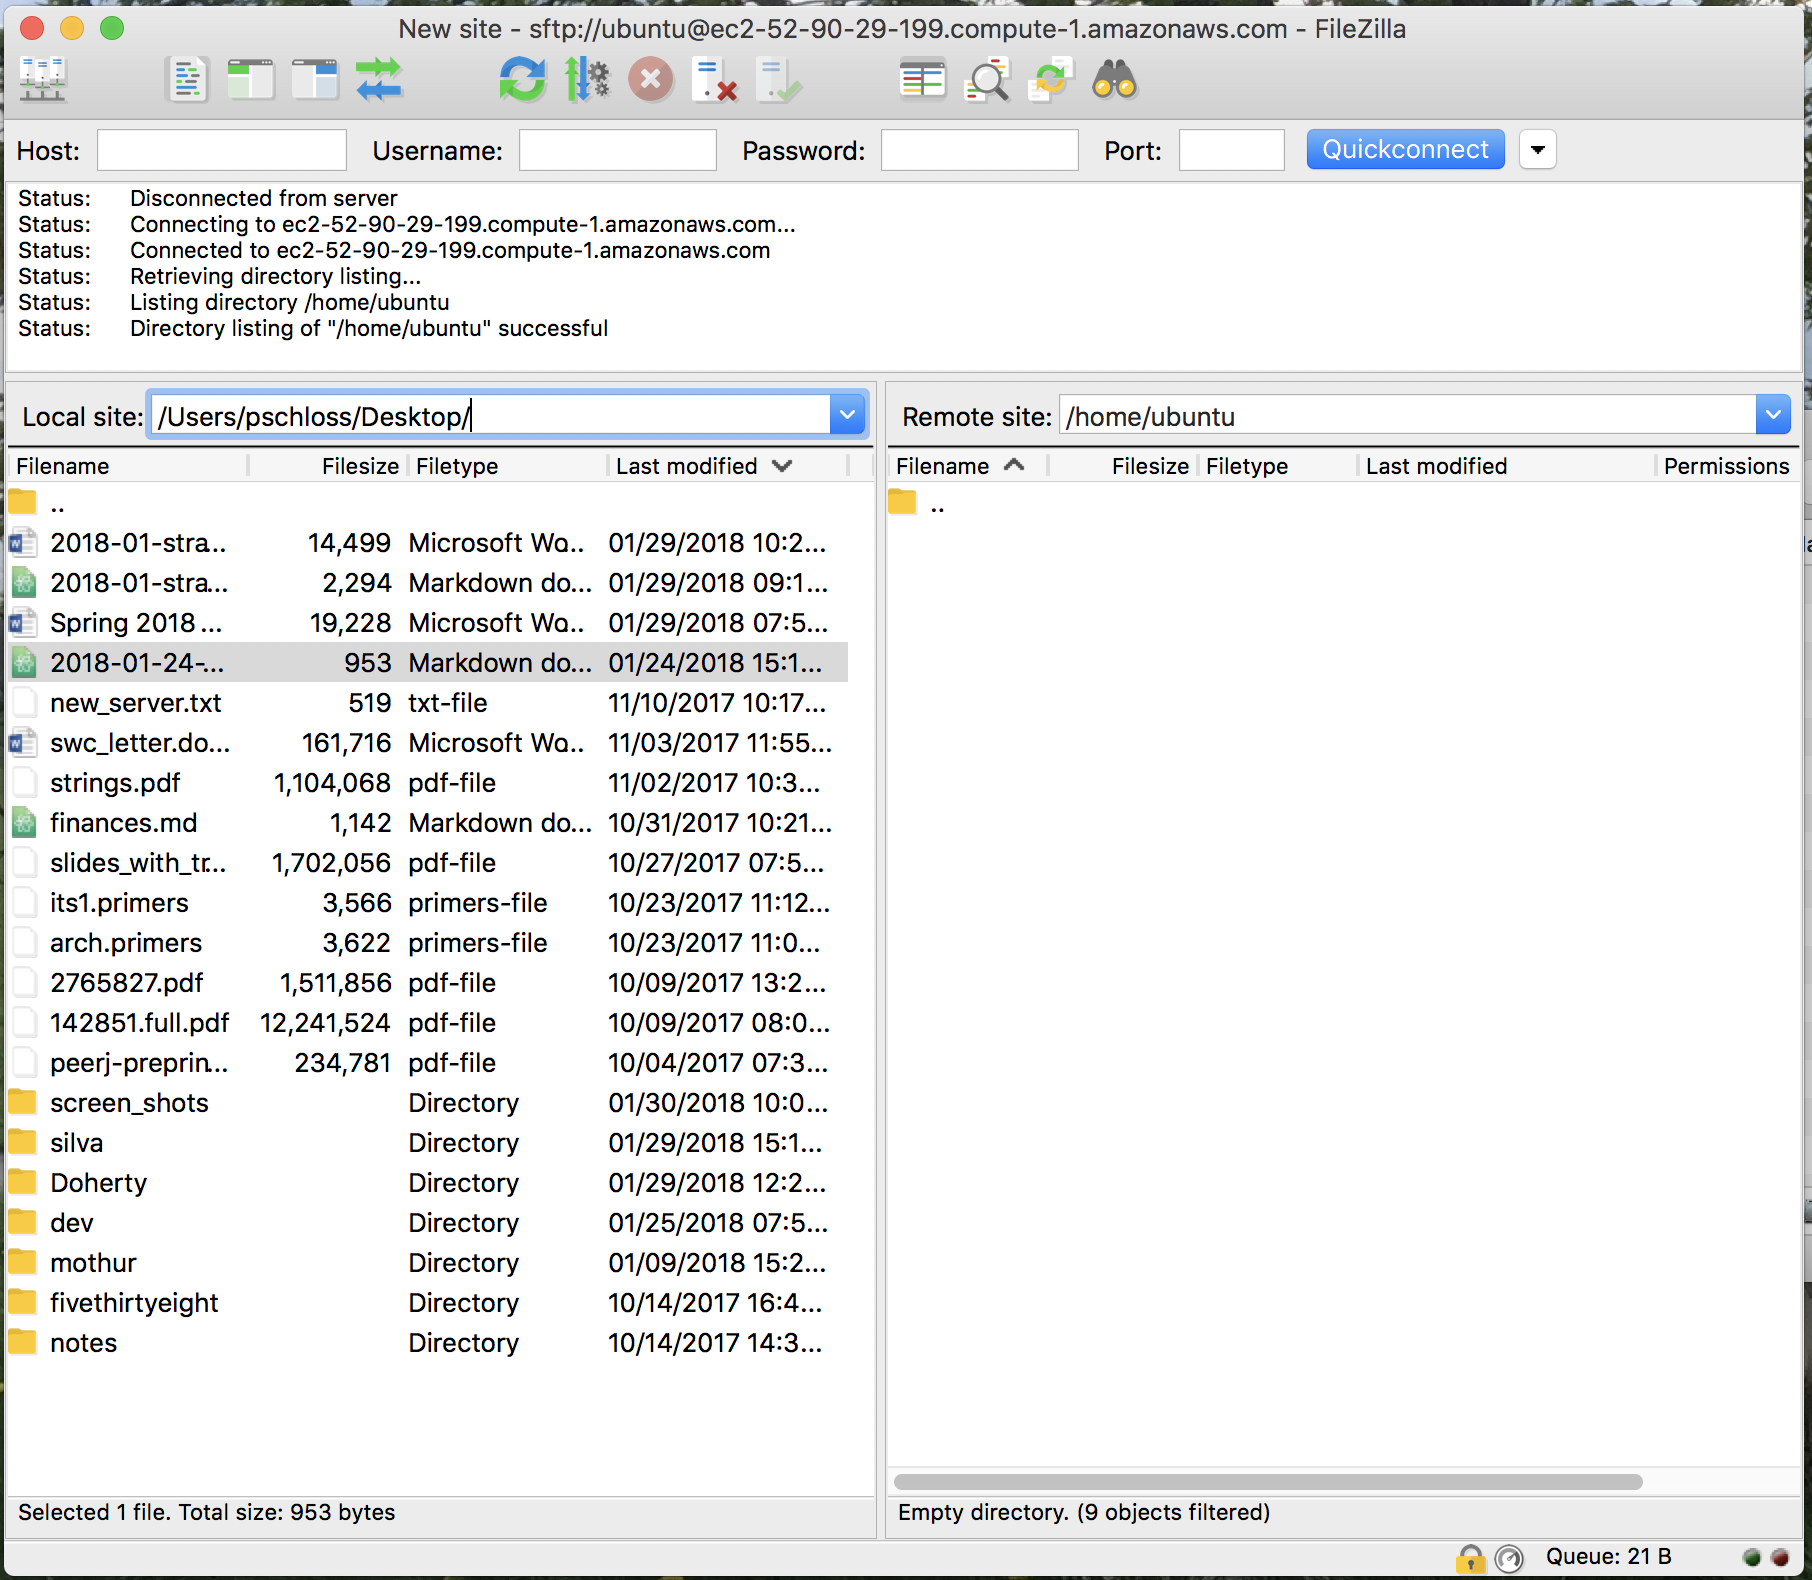
And if before you had those dot files, those hidden files listed, they should now be hidden. So this looks the way we want it.
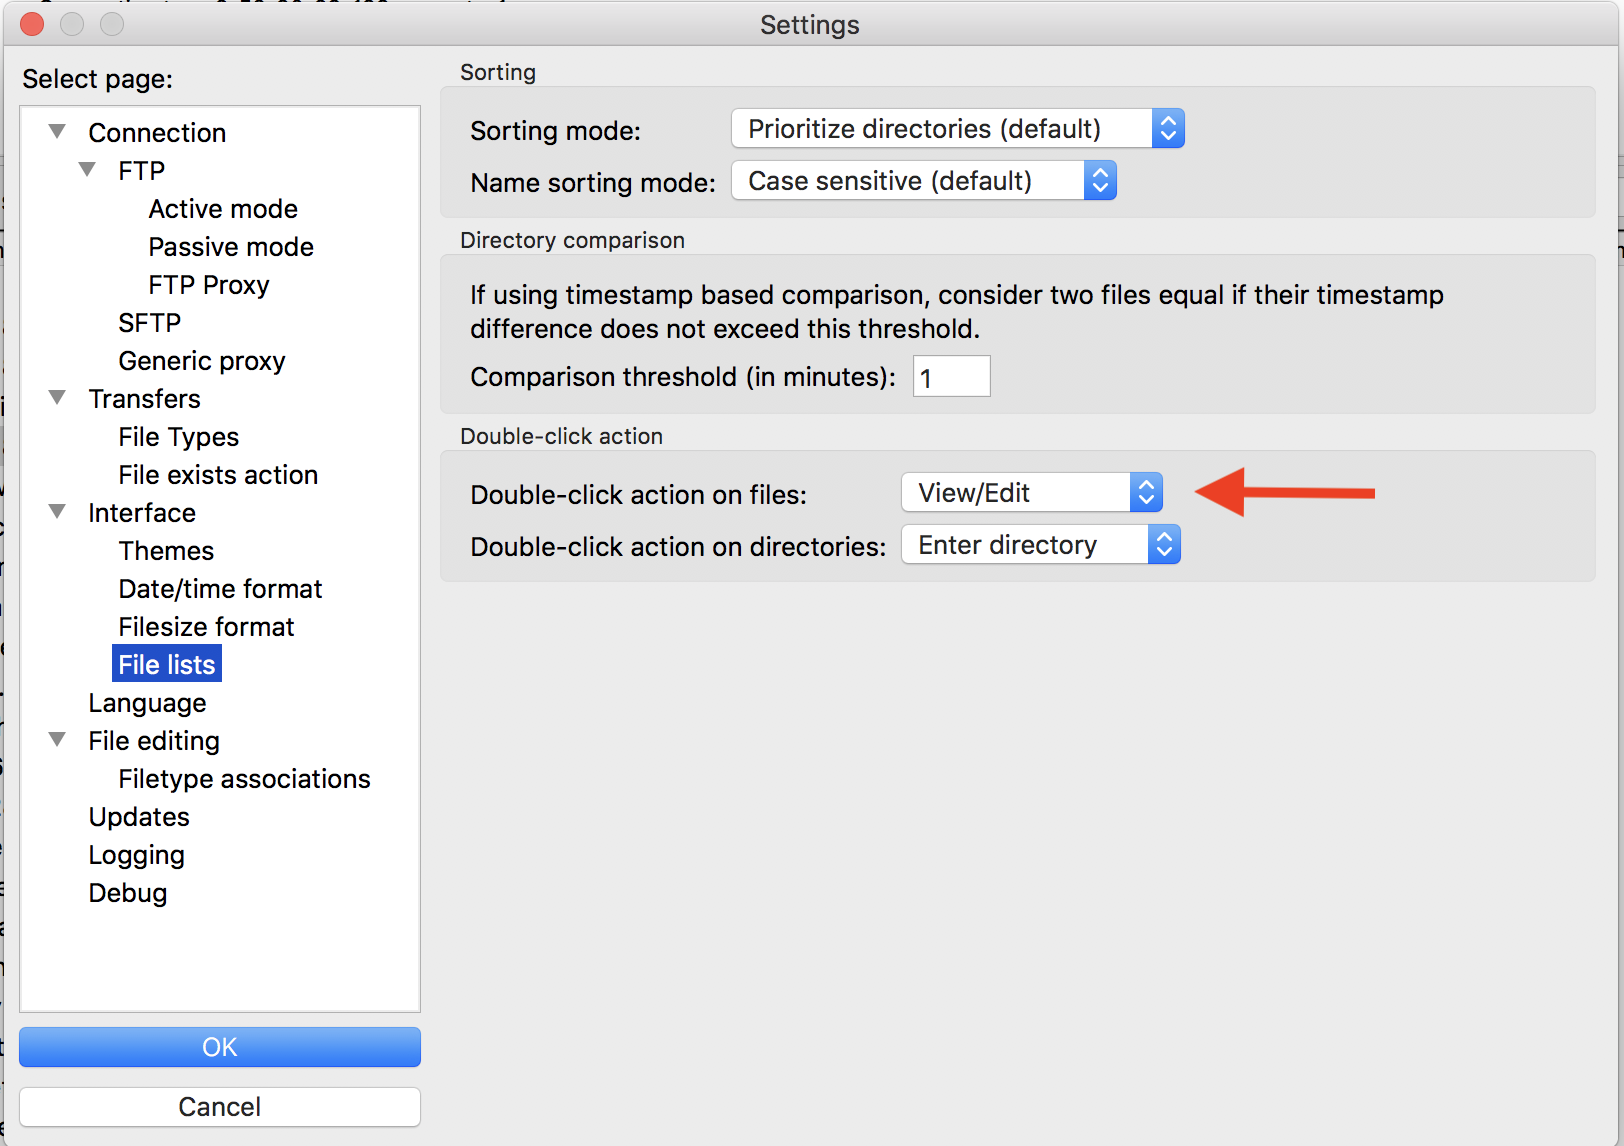
One other thing that we want to do is go up into Settings again, and we want to look at file lists and the double-click action on files should be View, Edit. Double-click action on directories should be enter directory. So this will allow us to double-click on a file and have it open up. So we'll say OK. Great.
Let's test it out
- Log into AWS
- From your home directory (
cd ~) do the following...
ubuntu@ip-172-30-0-221:~$ wget -O picture.jpg https://picsum.photos/400/?random--2018-01-30 15:40:30-- https://picsum.photos/400/?randomResolving picsum.photos (picsum.photos)... 104.37.178.1, 2610:1c8:c::1Connecting to picsum.photos (picsum.photos)|104.37.178.1|:443... connected.HTTP request sent, awaiting response... 302 FoundLocation: /400/400/?image=360 [following]--2018-01-30 15:40:30-- https://picsum.photos/400/400/?image=360Reusing existing connection to picsum.photos:443.HTTP request sent, awaiting response... 200 OKLength: 20204 (20K) [image/jpeg]Saving to: ‘picture.jpg’picture.jpg 100%[====================>] 19.73K --.-KB/s in 0.001s2018-01-30 15:40:30 (24.4 MB/s) - ‘picture.jpg’ saved [20204/20204]ubuntu@ip-172-30-0-221:~$ lspicture.jpgSo now what we'd like to do is to test this out. So I'm going to go ahead and minimize that window, and you'll see that I'm still logged into Amazon. If you haven't already logged into Amazon or if you logged out, log back in.
And so I'm going to run a command that will grab a picture from the internet. So the command is wget -o picture.jpg https://picsum.photos/400/?random. So this picsum.photos website is a website that creates random pictures.
So I'm going to…just to show you, if I highlight that, copy it, open up a new tab here, paste that in, you'll see that it's a website that allows you to get a lot of different random pictures if you just need pictures to hold for things.
So that's kind of cool. So anyway, clean things up, and I can come back to my terminal and hit Enter, and you'll see that now I have a file called picture.jpg, but picture.jpg is on the Amazon server, it's not on my local computer. So how do I get that onto my local computer?
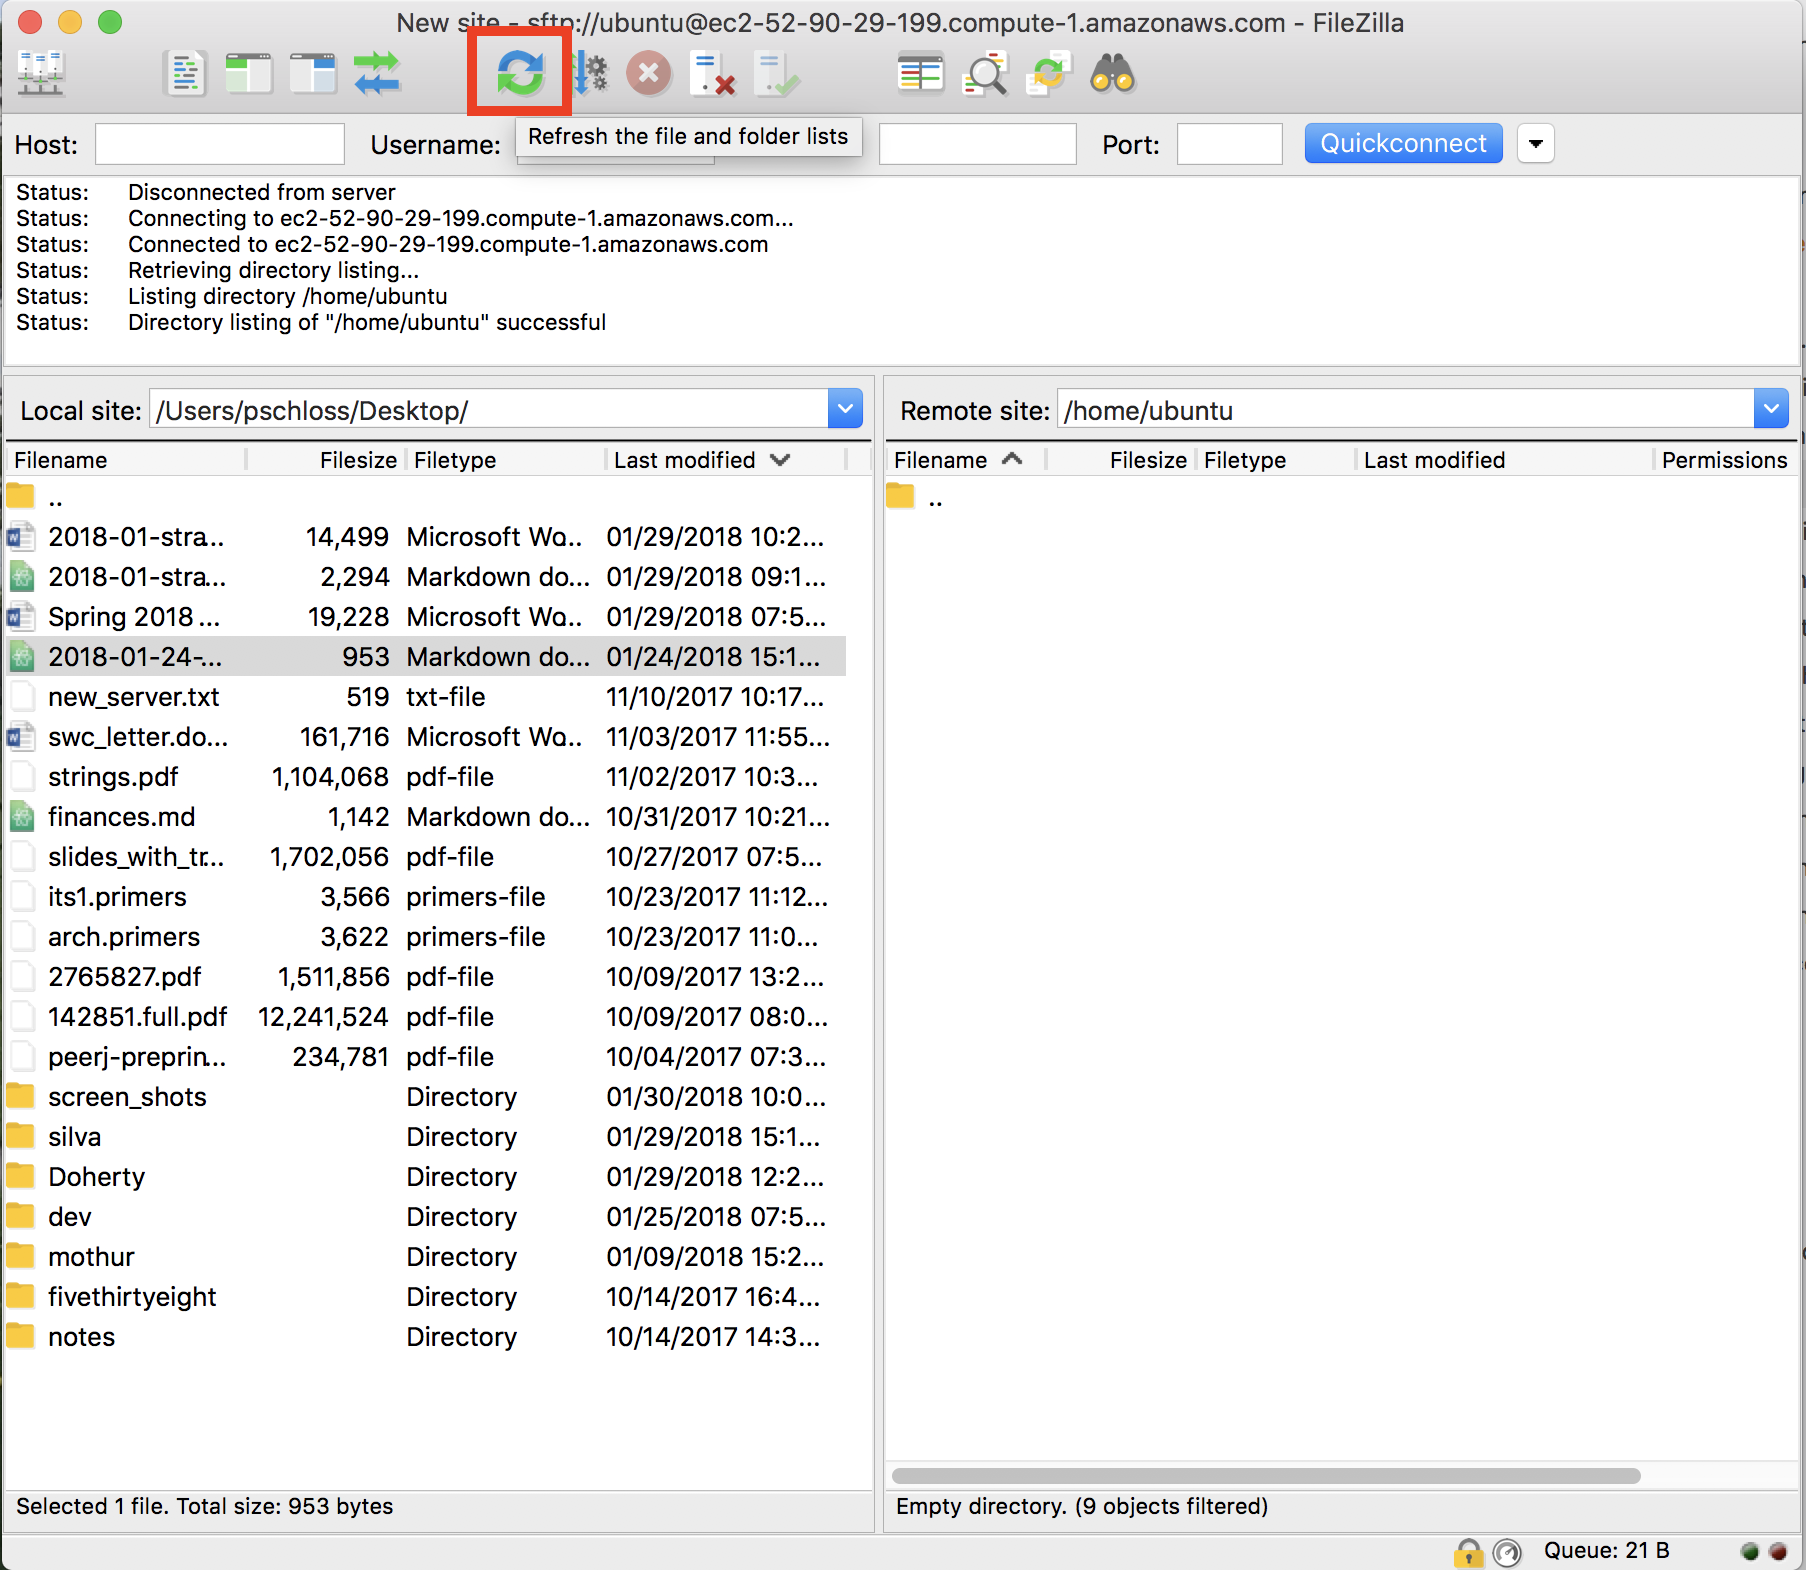
So we're going to use FileZilla to do that. And what we'll do is hit the Refresh button up here and we now see picture.jpg show up.

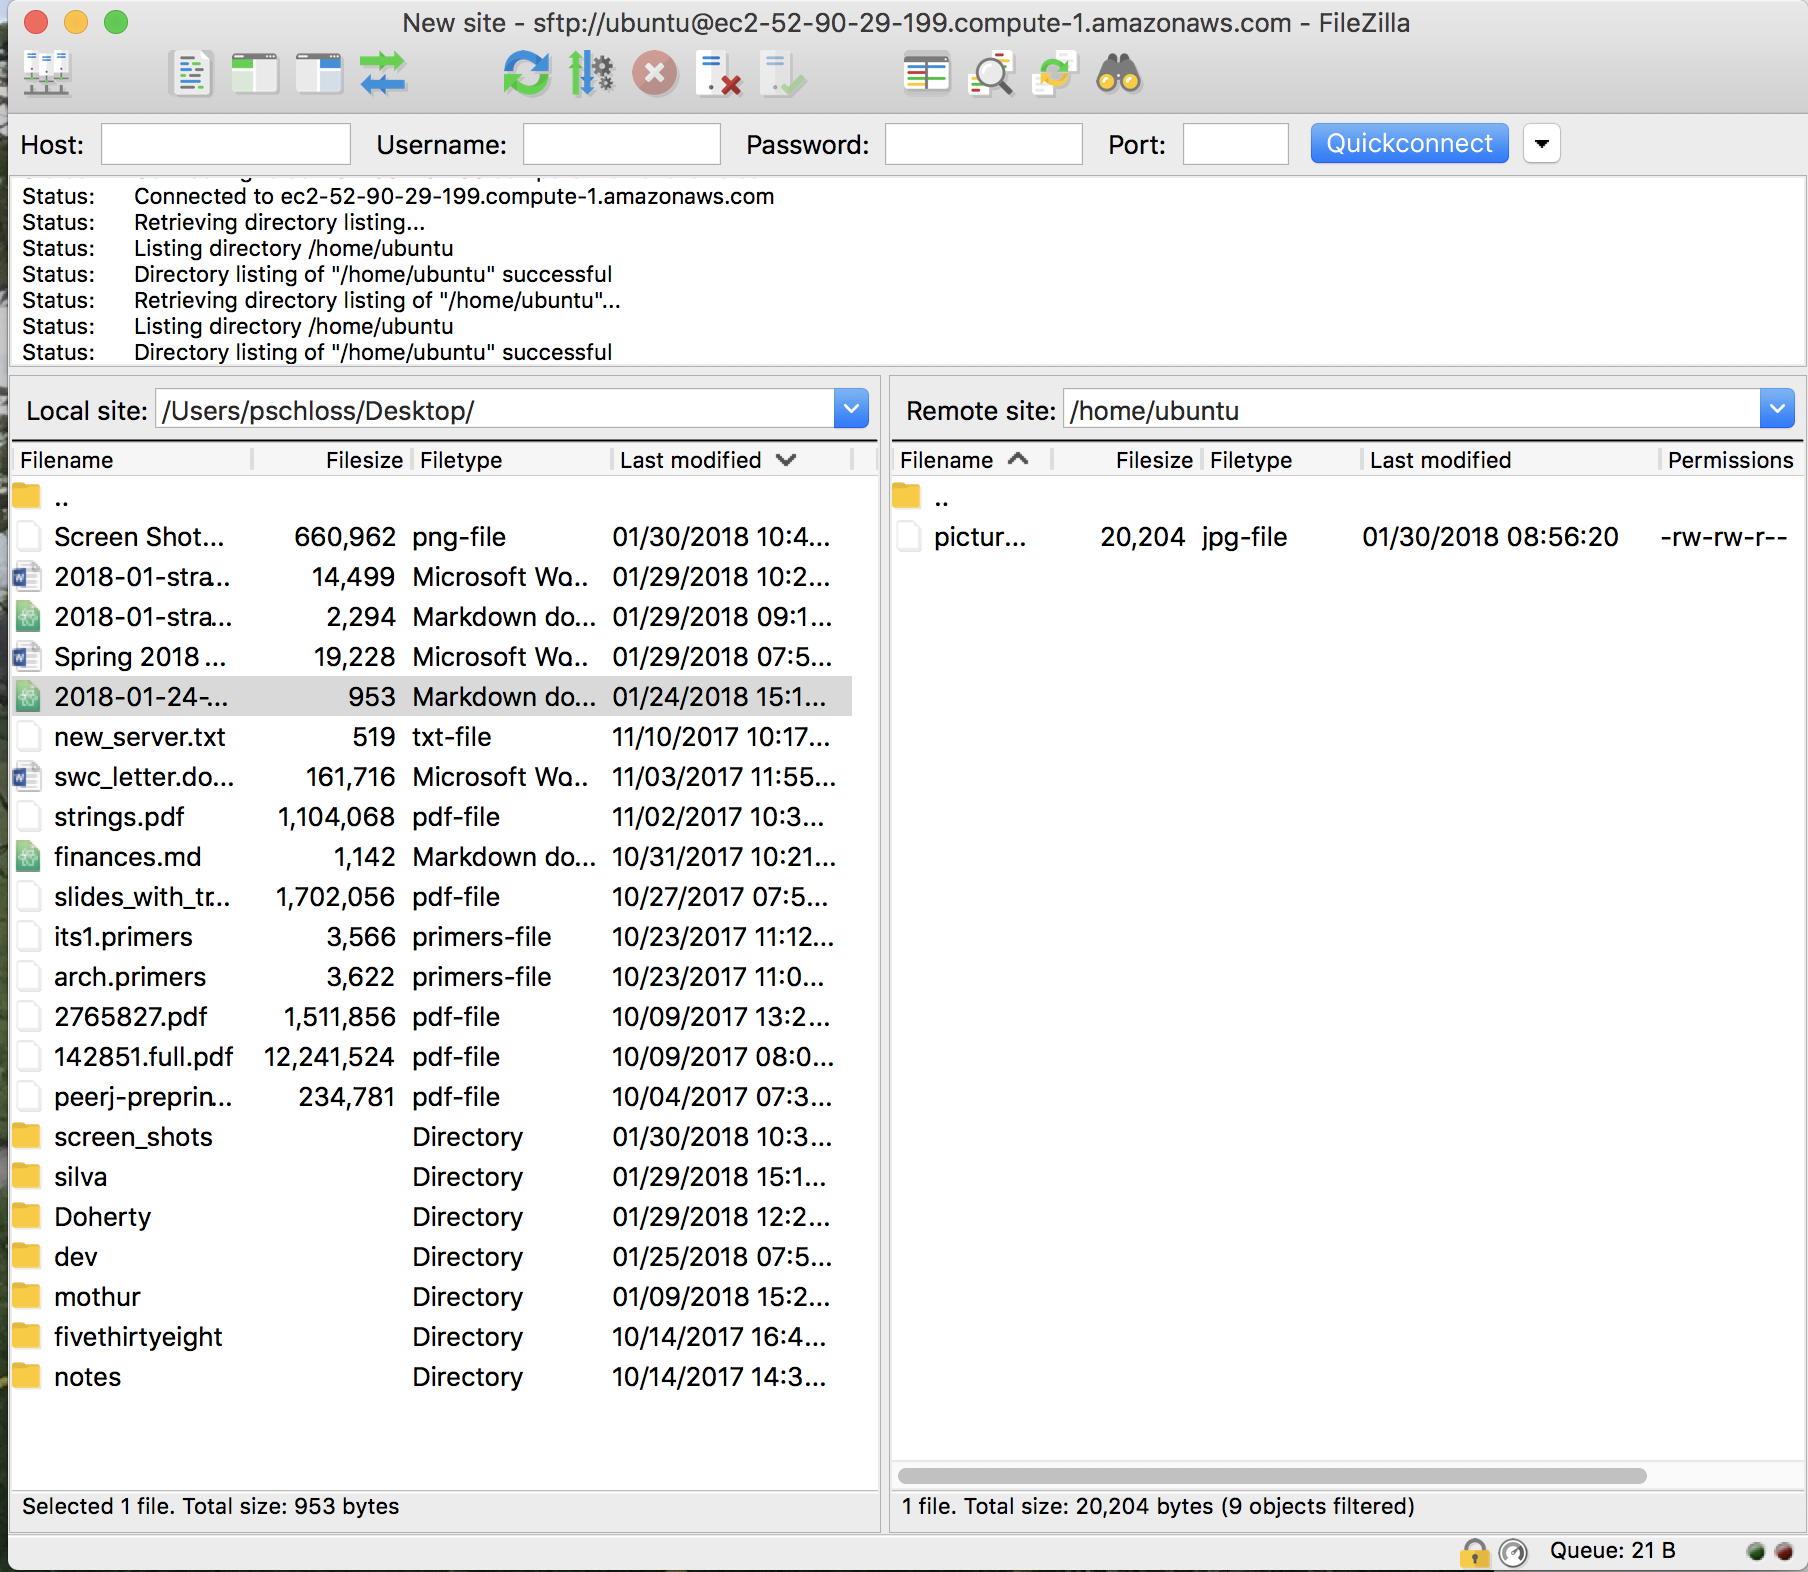
So we're going to use FileZilla to do that. And what we'll do is hit the Refresh button up here and we now see picture.jpg show up.
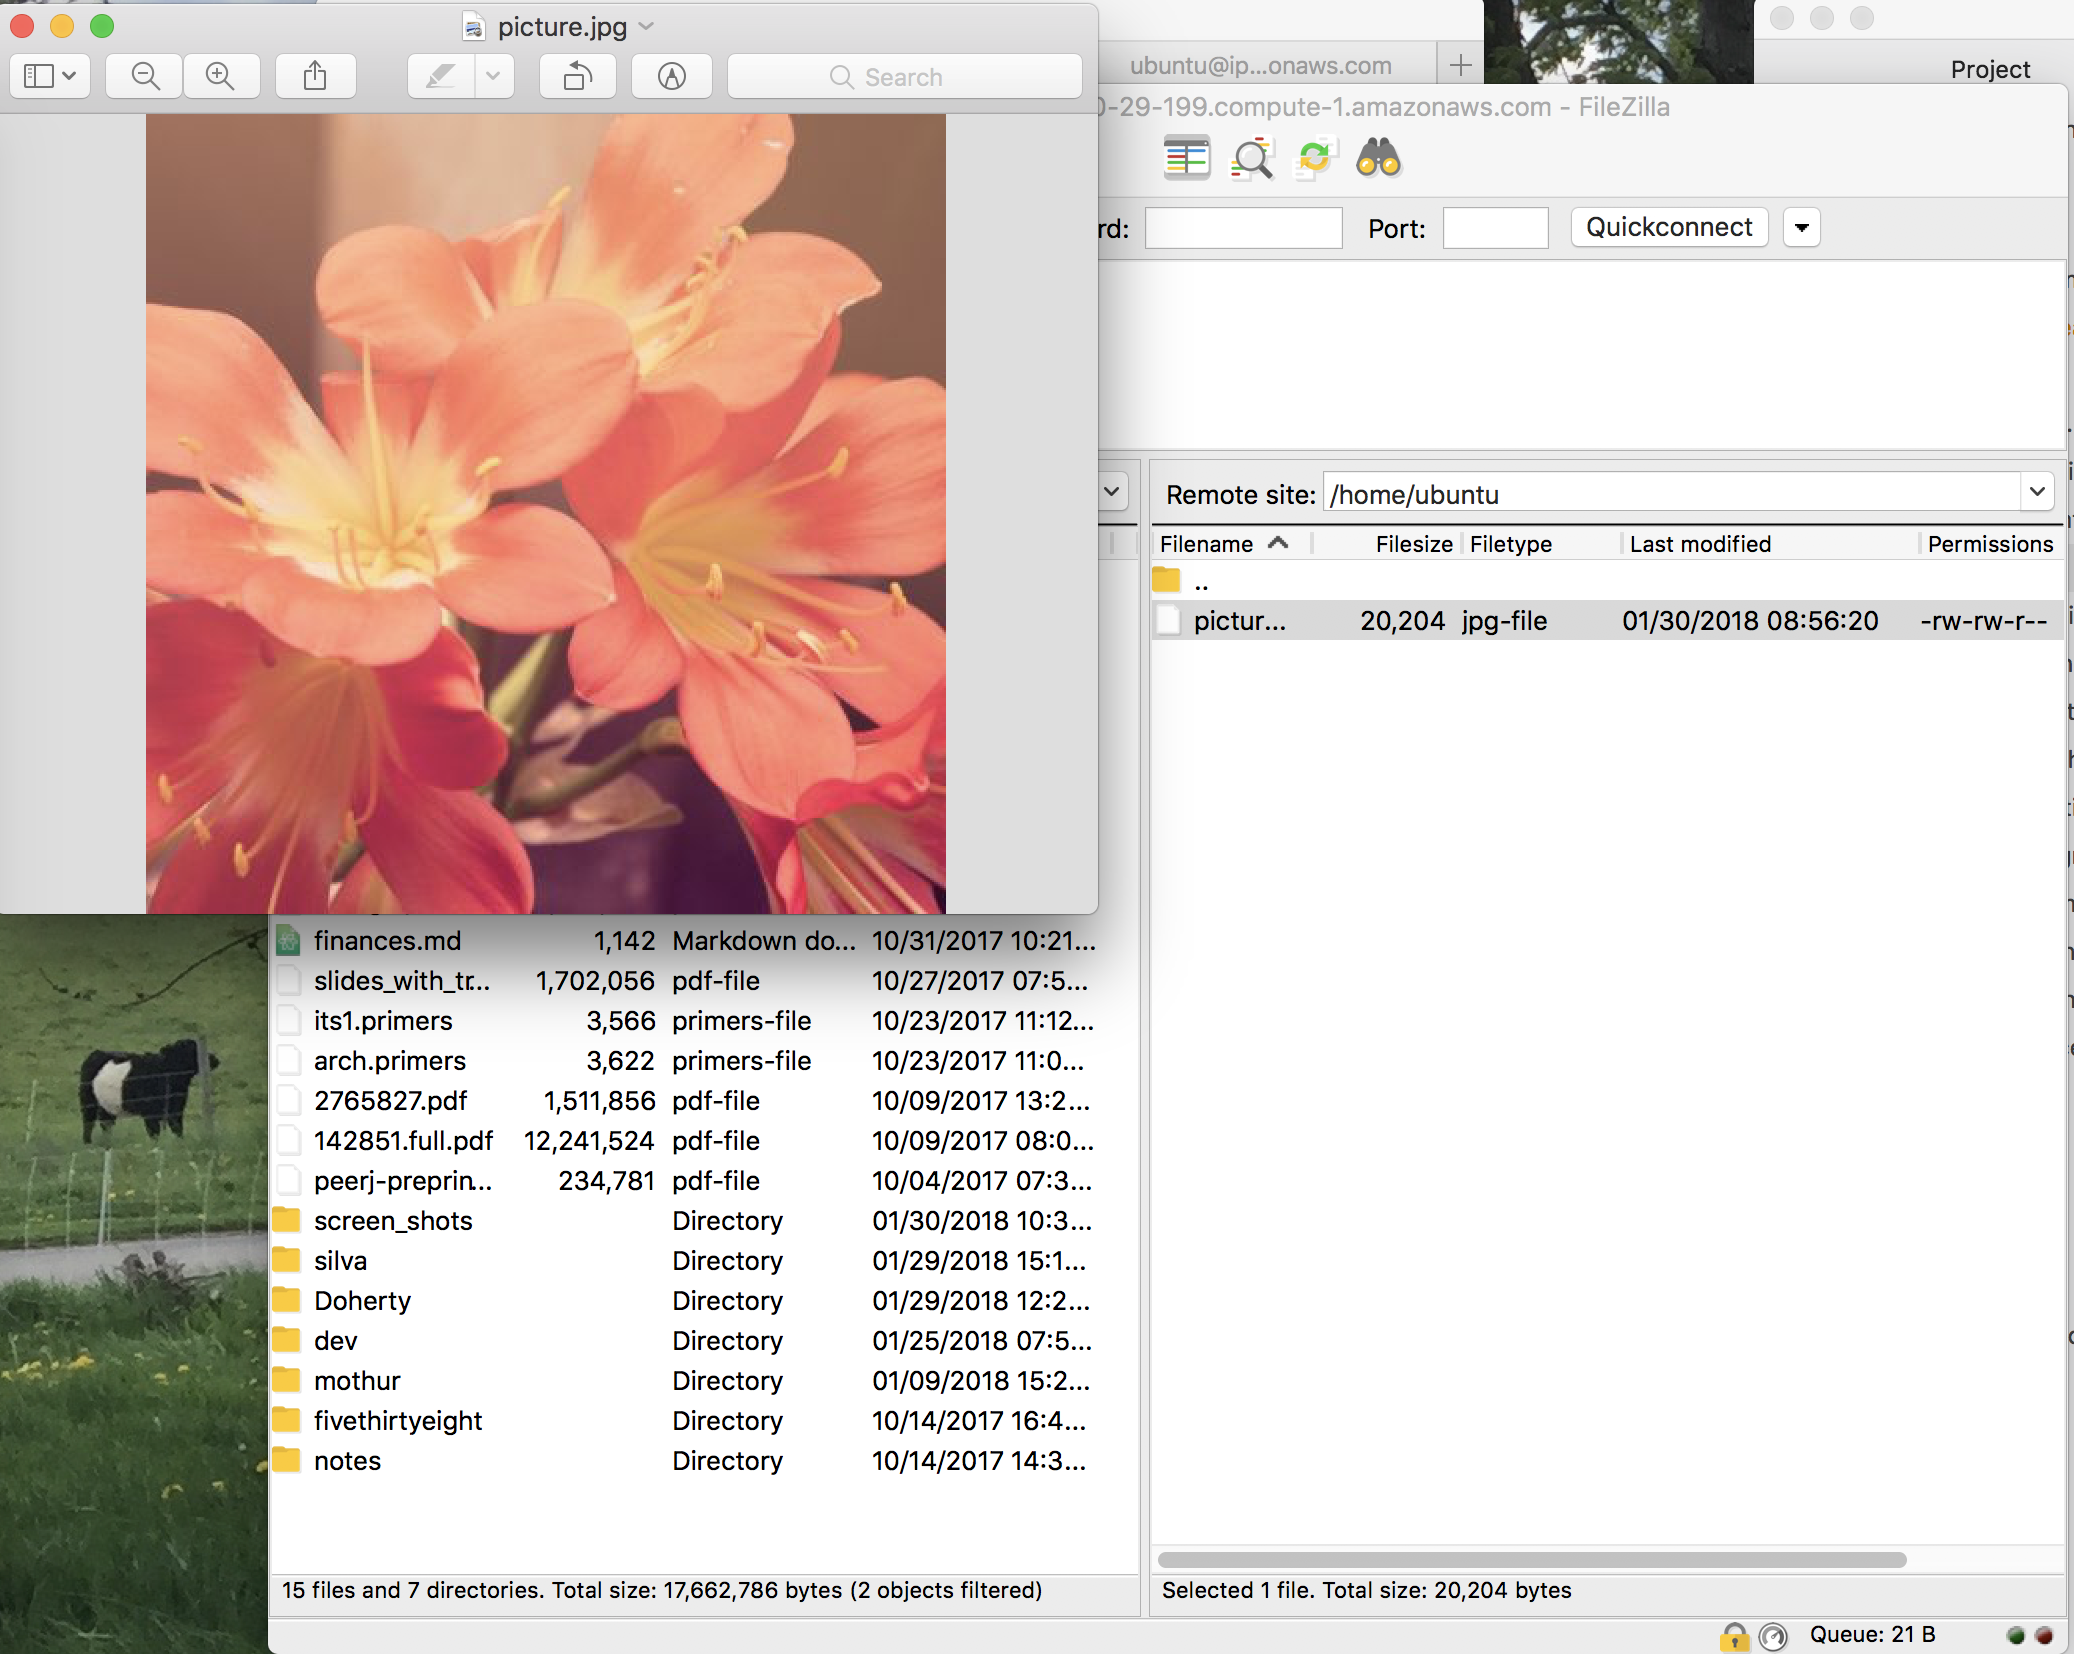
And so if we double-click on that, it will open up a random picture. Pretty cool. So I have a picture of some mountain range and the Milky Way or the stars off in the distance. You have something probably totally different. That's cool. And so that's, again, very useful for thinking about how we get files down from Amazon.
So something else we might do is to think about how we would put something into here that we could then put up on to Amazon. I'm going to, for fun, go back to that picsum.photos page. And I'll just pick…I'll highlight this and then copy that and paste it into my thing.
And I see that pretty picture. I'll save this to my desktop which now shows up over here as 300.jpeg. And so I can then drag this into the right side of FileZilla. And then you'll see it's been added.
And so now, if I come back to my terminal and type ls, I now see that I have both 300.jpeg and picture.jpg. So again, it's really handy to be able to transfer files back and forth. So if I were to then delete picture.jpg, do you really want to delete the one file from the server?
Yes. And so now if I come over here to my terminal and type ls, I now see that picture.jpg is gone.
Quitting
- For temporarily quitting AWS session...
- Select your instance in the dashboard
- Click on the "Actions" button along the top of the console.
- Go Instance State -> Stop and click the blue button "Yes, Stop"
- You will see the state change to "stoping" and then "stopped"
- This is a safe state to leave your instance without getting charged for processing time
- If you repeat the previous step, but click "Start", it will restart the instance, albeit with a different DNS address
- For permanently quitting AWS session...
- If you instead click "Terminate", it will shut down the instance
- All of your work will be deleted
- 'Control-b d' will detach tmux. If you're done with tmux, exit will get you out of tmux
- The exit command from the command line will log you out of AWS
We're at the end of the tutorial and what I'd like to do now is show you how we can come back to the console without terminating our instance so that it's still there when we open up tomorrow. So if you want to temporarily quit the session, we'll click on our instance.
We can then go up to Actions and then we can go to Instance State, and then we can say Stop. So before, we did Terminate, and Terminate permanently quits the session. It will delete everything. Stop will stop the session. It will suspend the session.
And so here it says, "Any data on the ephemeral storage of your instances will be lost." So we don't have any of that, so we're not going to worry. So we'll then say yes, stop. And so now that's stopping. So note that if we come back later, so this is stopping, we'll give it a minute to stop, you can always hit Refresh if you're getting antsy like me.
And so we now see it's stopped. And so if we look down here now, we see that we no longer have an IP address. So if we want to restart this, we can, again, click on that. So we could then click Actions, Instance State, Start, and that would fire it back up again, but I'm not going to do that. And then you will also see that our session over here has given an error because we've closed the network connection.
We stopped the session. But if we do Actions, Instance State, Start, do you want to start these instances? Yes, start. Now, it's running. We now have a new IP address. I can copy that and come back up here, and you see that it kicked me out, but if I hit Up arrow again, I get back to that long SSH command and I can delete the IP address and paste it in, hit Enter.
Again, it doesn't know this address, so I'll say yes. And then if I type ls, we'll see that 300.jpeg is still there. So we stopped the instance, but it wasn't running. We're not getting charged for it. So I'll go ahead and type exit. Exit again, and we'll come back here and we will stop this instance. Yes, stop.

Awesome. We have used cloud computing to play with some pictures. Admittedly, it's a very humble beginning to our use of high-performance computing clustering, but we've already gone over a lot of great material that we will be using in future tutorials of this series.
Exercises
- How can using an HPC facilitate reproducible research?
- What are the strengths and weaknesses of storing a project's analysis as an AMI?
- From your terminal, delete
picture.jpg. Confirm that you can no longer see it in Filezilla
We've been able to connect to Amazon. We've been able to move files around. We've learned about tmux. And so those are tools, again, that we're going to be using as we go forward with our data analysis. So as some exercises, what I'd like you to do is to think about how using an HPC can facilitate reproducible research.
What would be the strengths and weaknesses of storing a project's analysis as an AMI? From your terminal, we did this with picture.jpg, but go ahead and log back in, use FileZilla to upload a file.
Maybe perhaps download another file like we did with that wget command from being logged into the Amazon instance, and do that exchange a couple times where you pull things down to your local computer, push things up to your Amazon remote to show to yourself that you can do this.
I hope you enjoyed learning about how to access and work with Amazon EC2 service. There really are a lot of different services available through AWS that you might enjoy learning about for your other projects. They really have a nice set of tutorials available on the AWS website that you can use to learn how to use them. For this series of tutorials, however, we'll only be using the Amazon EC2 service.
What do you think? How might we use the Amazon EC2 to improve the reproducibility of our analyses? So I can think of two possible ways where we could use Amazon EC2 to improve reproducibility. First, just as I made a Mothur AMI that we're using in this tutorial and we'll continue to use through the rest of the series, we can also make an AMI for our full data analysis.
That way, we could share a directory structure, files, and software with anyone. Second, when we're analyzing large data sets, we sometimes will run part of the analysis on one computer and other parts of the analysis on another computer. By having access to an affordable and flexible set of computers like Amazon's EC2, we can access all sorts of hardware configurations without having to move files around.
I find that when I have to move files around, they invariably get dropped in the wrong place or perhaps I use different versions of software on the different computers. Overall, this will hinder the reproducibility of my analyses. We'll come back to using Amazon's EC2 in a couple of sessions. So feel free to revisit the material in this tutorial to get some more practice in.
In the next tutorial, we'll discuss various types of documentation that you can use to improve the reproducibility of your analysis.
